CI/CD decision workflows with Nextmv and GitHub Actions
⌛️ Approximate time to complete: 20 min.
CI/CD decision workflows with Nextmv and GitHub Actions
In this tutorial you will learn how to set up a CI/CD decision workflow using Nextmv and GitHub Actions. More specifically, this tutorial will guide you through setting up an acceptance test workflow. Complete this tutorial if you:
- Are comfortable using the terminal.
- Are familiar with GitHub and GitHub Actions.
- Want to learn how to automate testing and experimentation using CI/CD workflows.
In short, we will show you how to get the following GitHub workflow up and running:
# Create a name for the workflow.
name: CI/CD decision workflow - acceptance testing

# Define the events that trigger the workflow. In this case, we simply run it
# when there is a commit to the main `develop` branch.
on:
  push:
    branches:
      - develop

jobs:
  acceptance-test:
    runs-on: ubuntu-latest
    steps:
      # Check out the current code of the repository.
      - name: Checkout code
        uses: actions/checkout@v6

      # Use the Nextmv GitHub Action to set up the Nextmv CLI.
      - name: Install Nextmv CLI
        uses: nextmv-io/setup-nextmv@v1
        with:
          api-key: ${{ secrets.NEXTMV_API_KEY }}

      # Deploy the code, create a new version, and update the `staging` instance to use the new version.
      - name: Push new version of nextroute and update staging instance
        run: nextmv cloud app push --app-id nextroute --version-yes --update-instance-id staging
        working-directory: ./ci-cd-github-actions/python-nextroute # Location of the app to push

      # Create a new acceptance test comparing `staging` to `production`.
      - name: Create a new acceptance test
        run: |
          # Define metrics in-line or load them from a `.json` file.
          METRIC='{
              "field": "result.value",
              "metric_type": "direct-comparison",
              "params": {
                  "operator": "le",
                  "tolerance": {"type": "relative", "value": 0.05}
              },
              "statistic": "mean"
          }'

          # Create an acceptance test comparing `staging` to `production`.
          nextmv cloud acceptance create --app-id nextroute \
              --candidate-instance-id staging \
              --baseline-instance-id production \
              --metrics "$METRIC" \
              --input-set-id input-set-1
At a high level, this tutorial will go through the following steps:
- Clone a community app locally.
- Push the model to Nextmv Cloud.
- Set up prerequisites for running an acceptance test.
- Run an acceptance test using a CI/CD workflow in GitHub Actions.
You may follow along with the full tutorial code. Let’s dive right in 🤿.
1. Create an account
The full suite of benefits starts with a Nextmv Cloud account.
- Visit the Nextmv Console to sign up for an account at https://cloud.nextmv.io.
- Fill out the form. A member of the Nextmv team will reach out to you to complete the sign-up process.
- Log in to your account. The Nextmv Console is ready to use!
Once you have logged in to your account, you need to fetch your API key. You can do so from your settings.
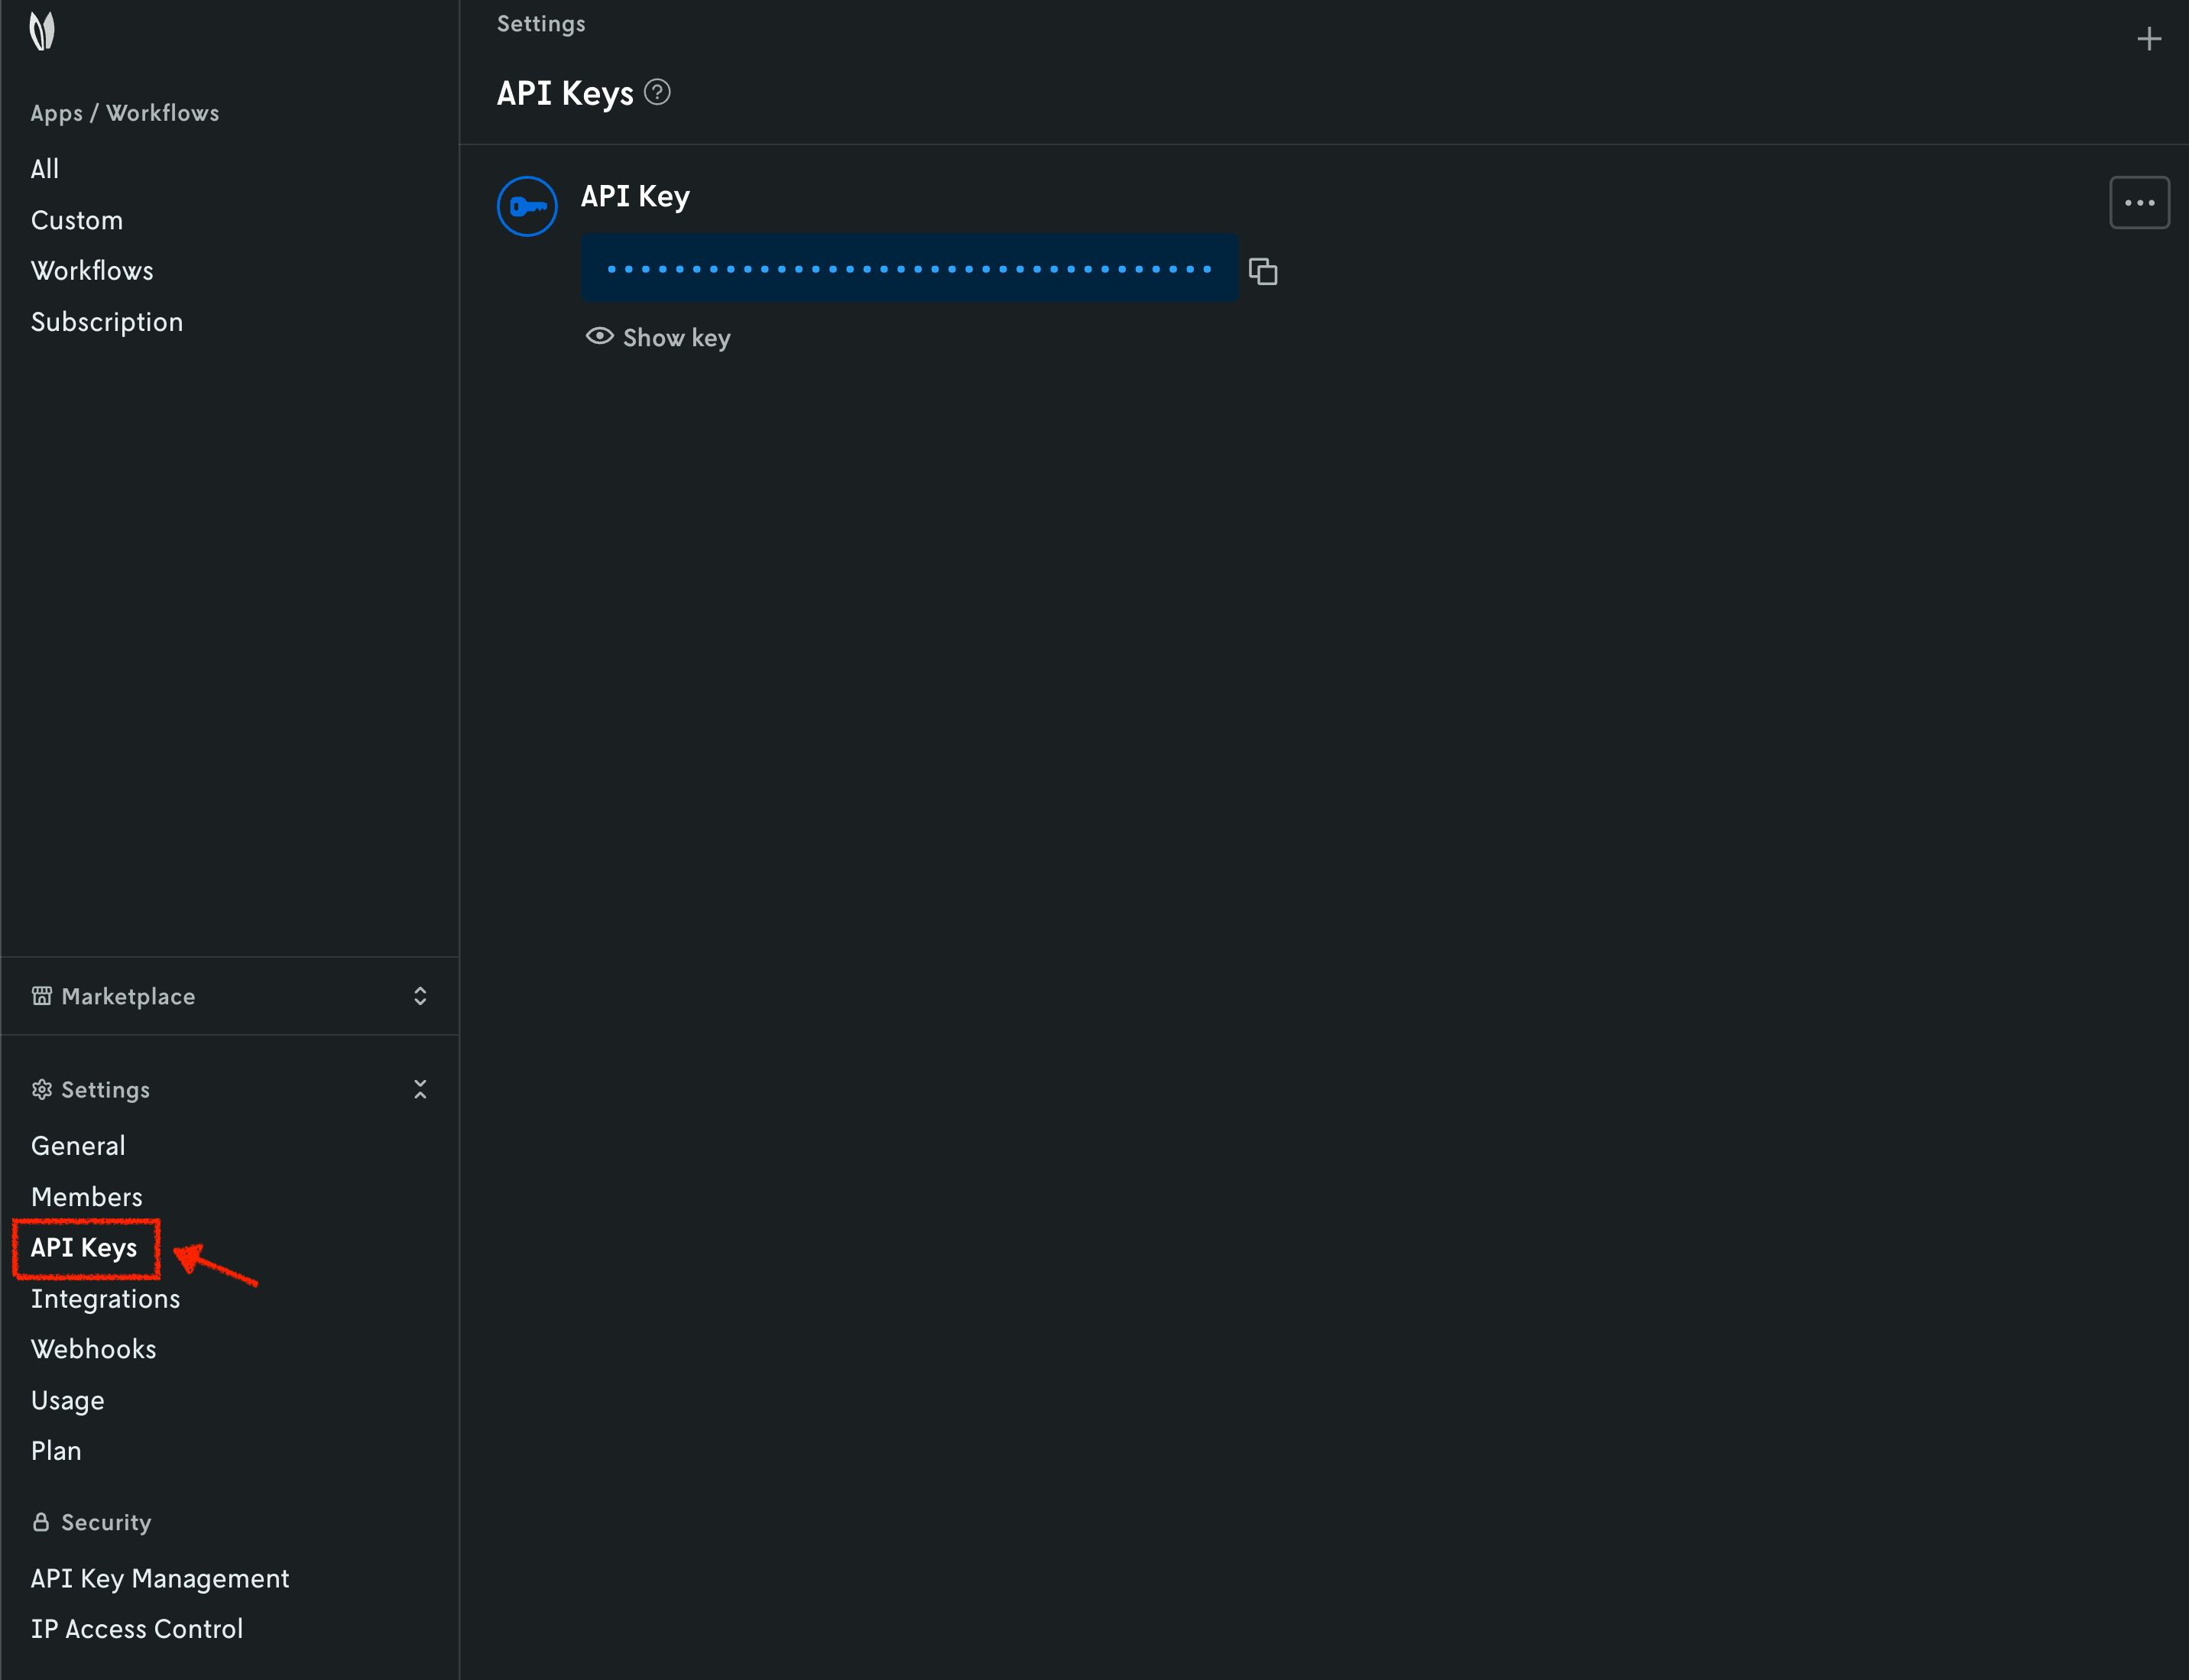
When you have your API key, it is convenient to save it as an environment variable so that you can use it for the rest of this tutorial.
2. Install the Nextmv CLI
Please see the Nextmv CLI installation guide.
3. Clone a community app
Community apps are a great place to explore pre-built decision apps. To work with community apps you have two options:
- Clone the GitHub repository locally.
- Use the Nextmv CLI to clone a specific community app.
This tutorial will use the second option. We will be using the
python-nextroute community app, which solves a Vehicle Routing Problem (VRP)
with Nextroute and Python. To clone this community app, run the following
command:
This command is saved as app1.sh in the full tutorial
code.
Once the app has been cloned, you should see a structure similar to the following:
python-nextroute
├── app.yaml
├── input.json
├── LICENSE
├── main.ipynb
├── main.py
├── pyproject.toml
├── README.md
├── requirements.txt
└── uv.lock
4. Create your Nextmv Cloud application
Tip
Go to the Applications section to learn more about Nextmv applications.
Run the following command to create an application with the ID nextroute.
⏳ Creating or getting application...
{
  "id": "nextroute",
  "name": "nextroute",
  "description": "",
  "type": "custom",
  "default_instance": "",
  "default_experiment_instance": "",
  "subscription_id": "",
  "locked": false,
  "created_at": "2024-03-14T19:55:16.543961Z",
  "updated_at": "2024-03-14T19:55:16.543961Z"
}
This will create a new application in Nextmv Cloud. This command is saved as
app2.sh in the full tutorial code. You can also create
applications directly from Nextmv Console.
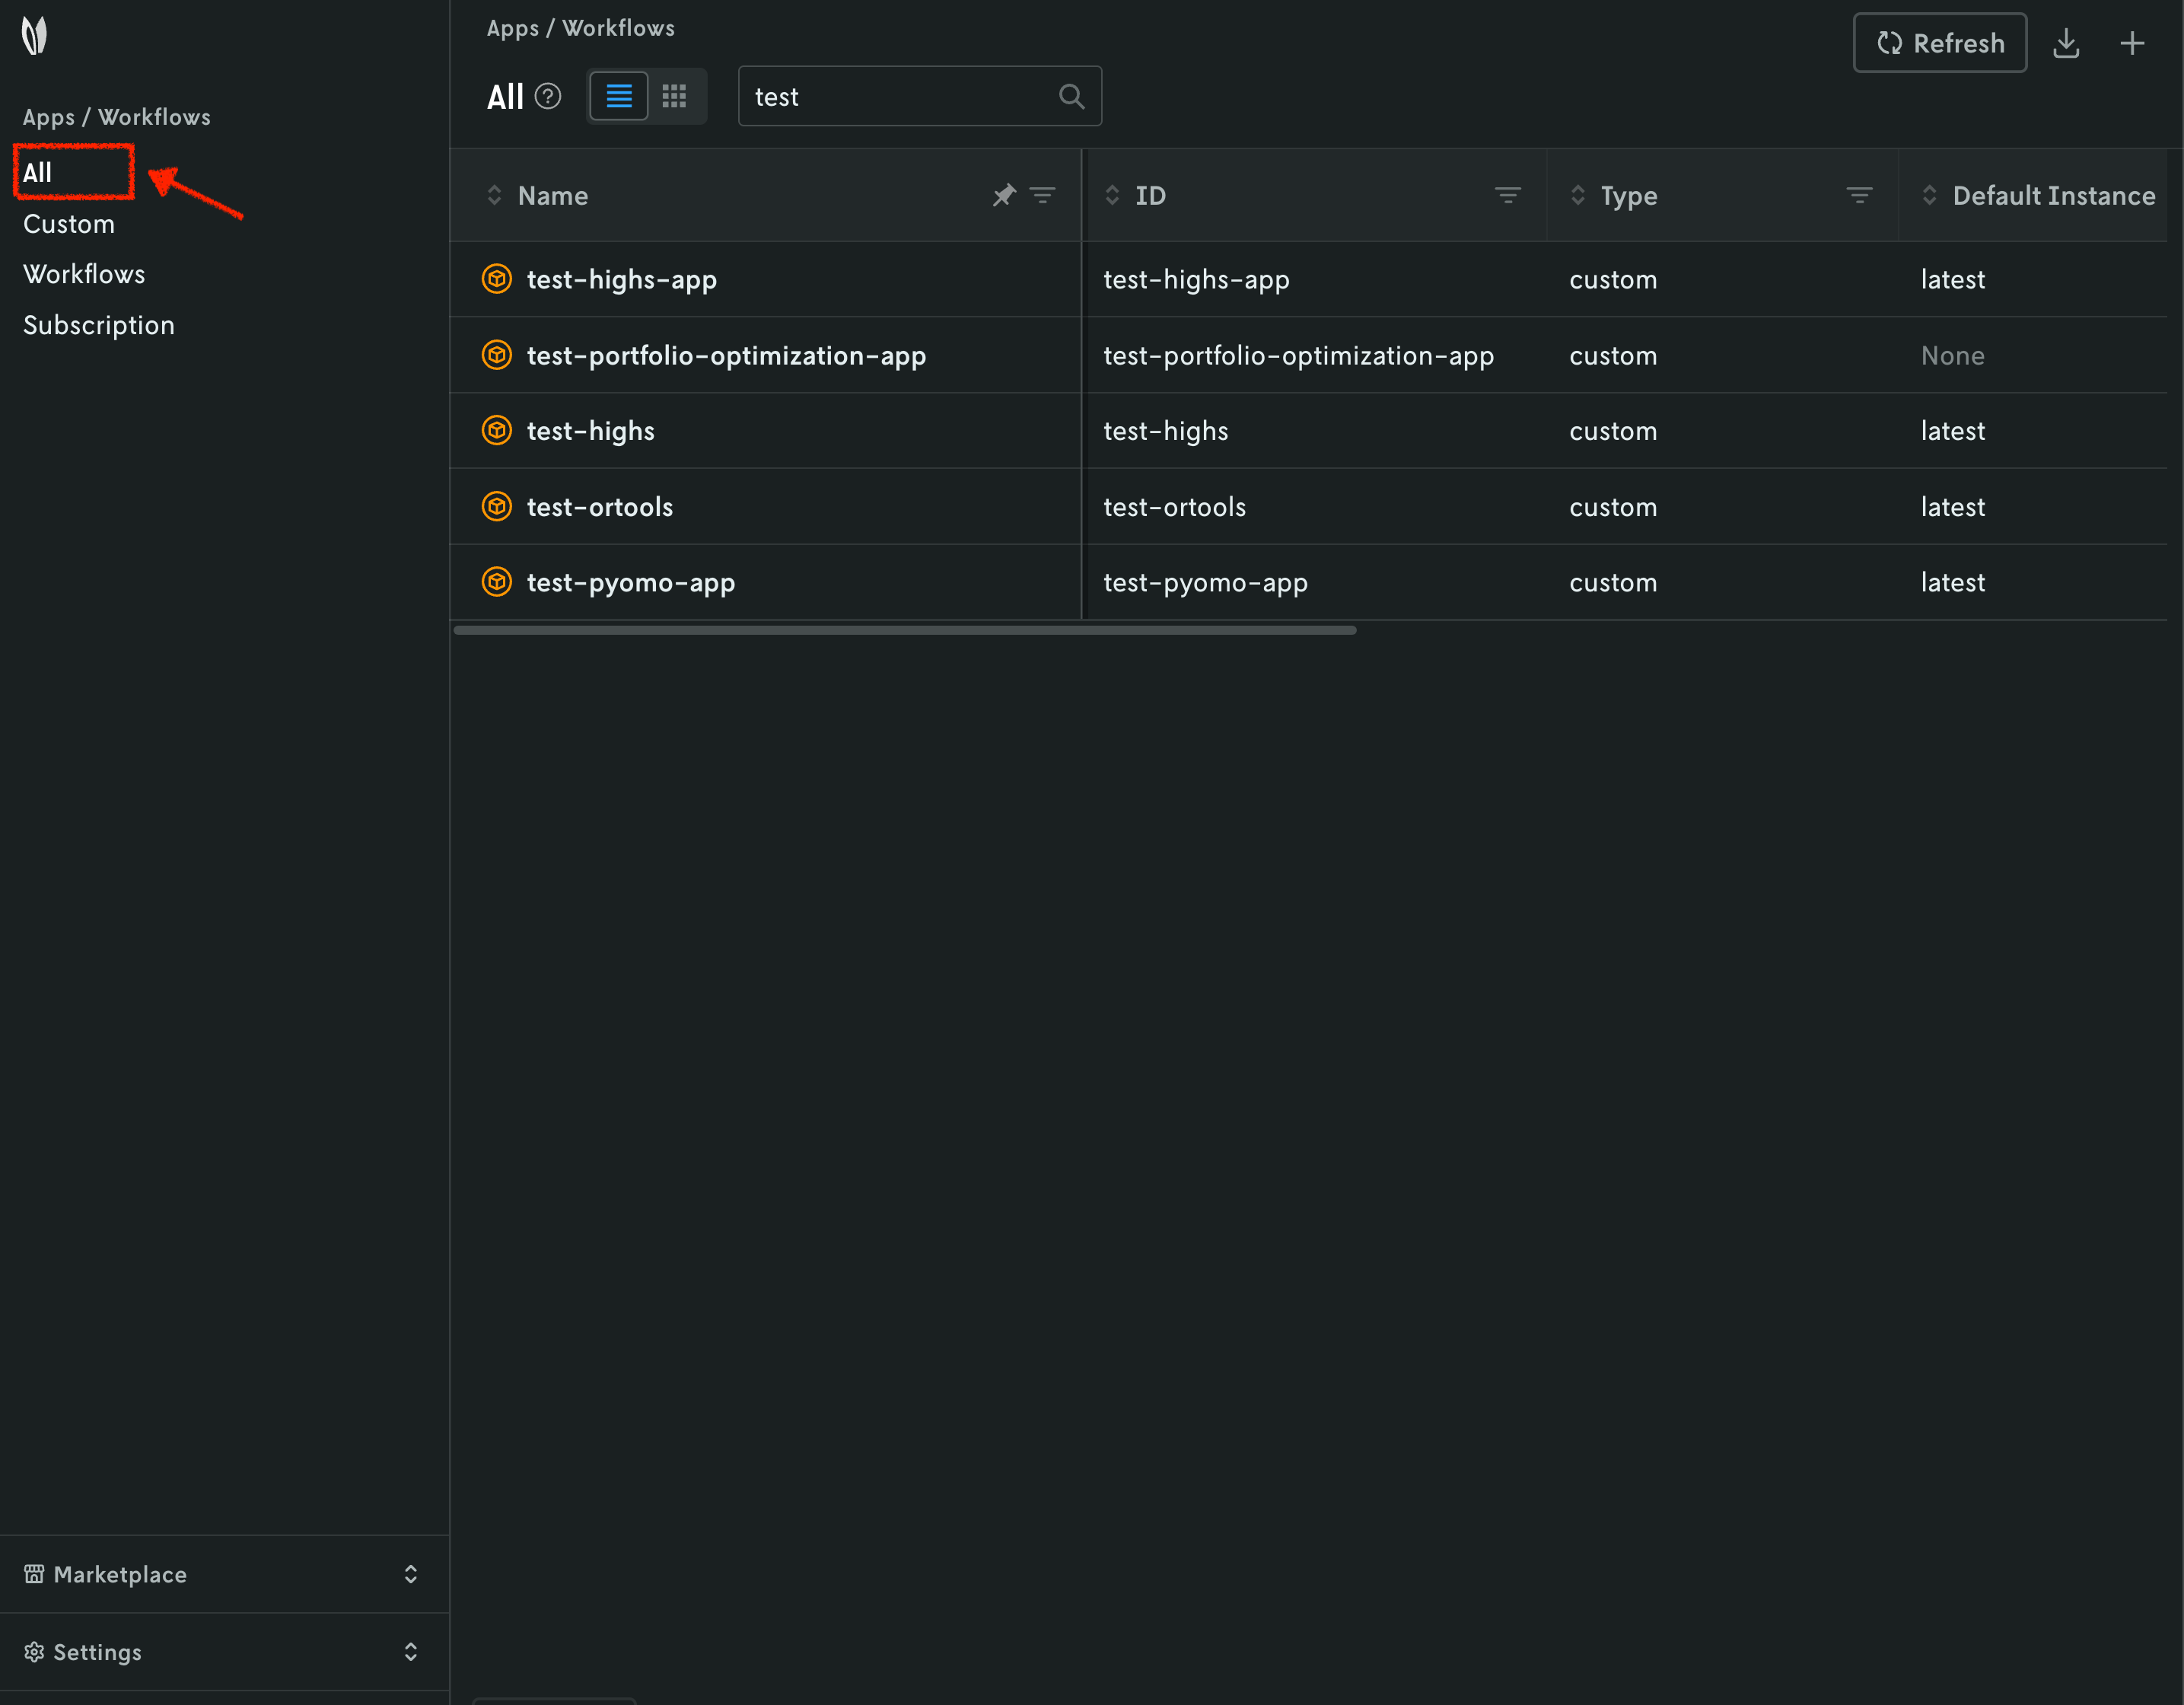
You can go to the Apps section in the Nextmv Console where you will see your applications.
5. Push your Nextmv application
You are going to push your app to Nextmv Cloud. Once an application has been pushed, you can run it remotely, perform testing, experimentation, and much more. Pushing is the equivalent of deploying an application, this is, taking the executable code and sending it to Nextmv Cloud.
Deploy your app (push it) to Nextmv Cloud. Note that this command is being
executed outside (one directory above) of the python-nextroute directory.
💿 Starting build for Nextmv application nextroute.
🐍 Bundling Python dependencies.
📋 Copied files listed in app.yaml manifest.
📦 Packaged application (9006 files, 76.02 MiB).
🌟 Pushing to application: nextroute.
💥 Successfully pushed to application: nextroute.
{
  "app_id": "nextroute",
  "endpoint": "https://api.cloud.nextmv.io",
  "instance_url": "v1/applications/nextroute/runs?instance_id=latest"
}
This command is saved as app3.sh in the full tutorial
code. The --version-no option is used to avoid prompting
you into creating a version and instance, which we will cover in the next steps.
You can go to the Apps section in the Nextmv Console where you will see your application. You can click on it to see more details. Once you are in the overview of the application in the Nextmv Console, it should show the following:
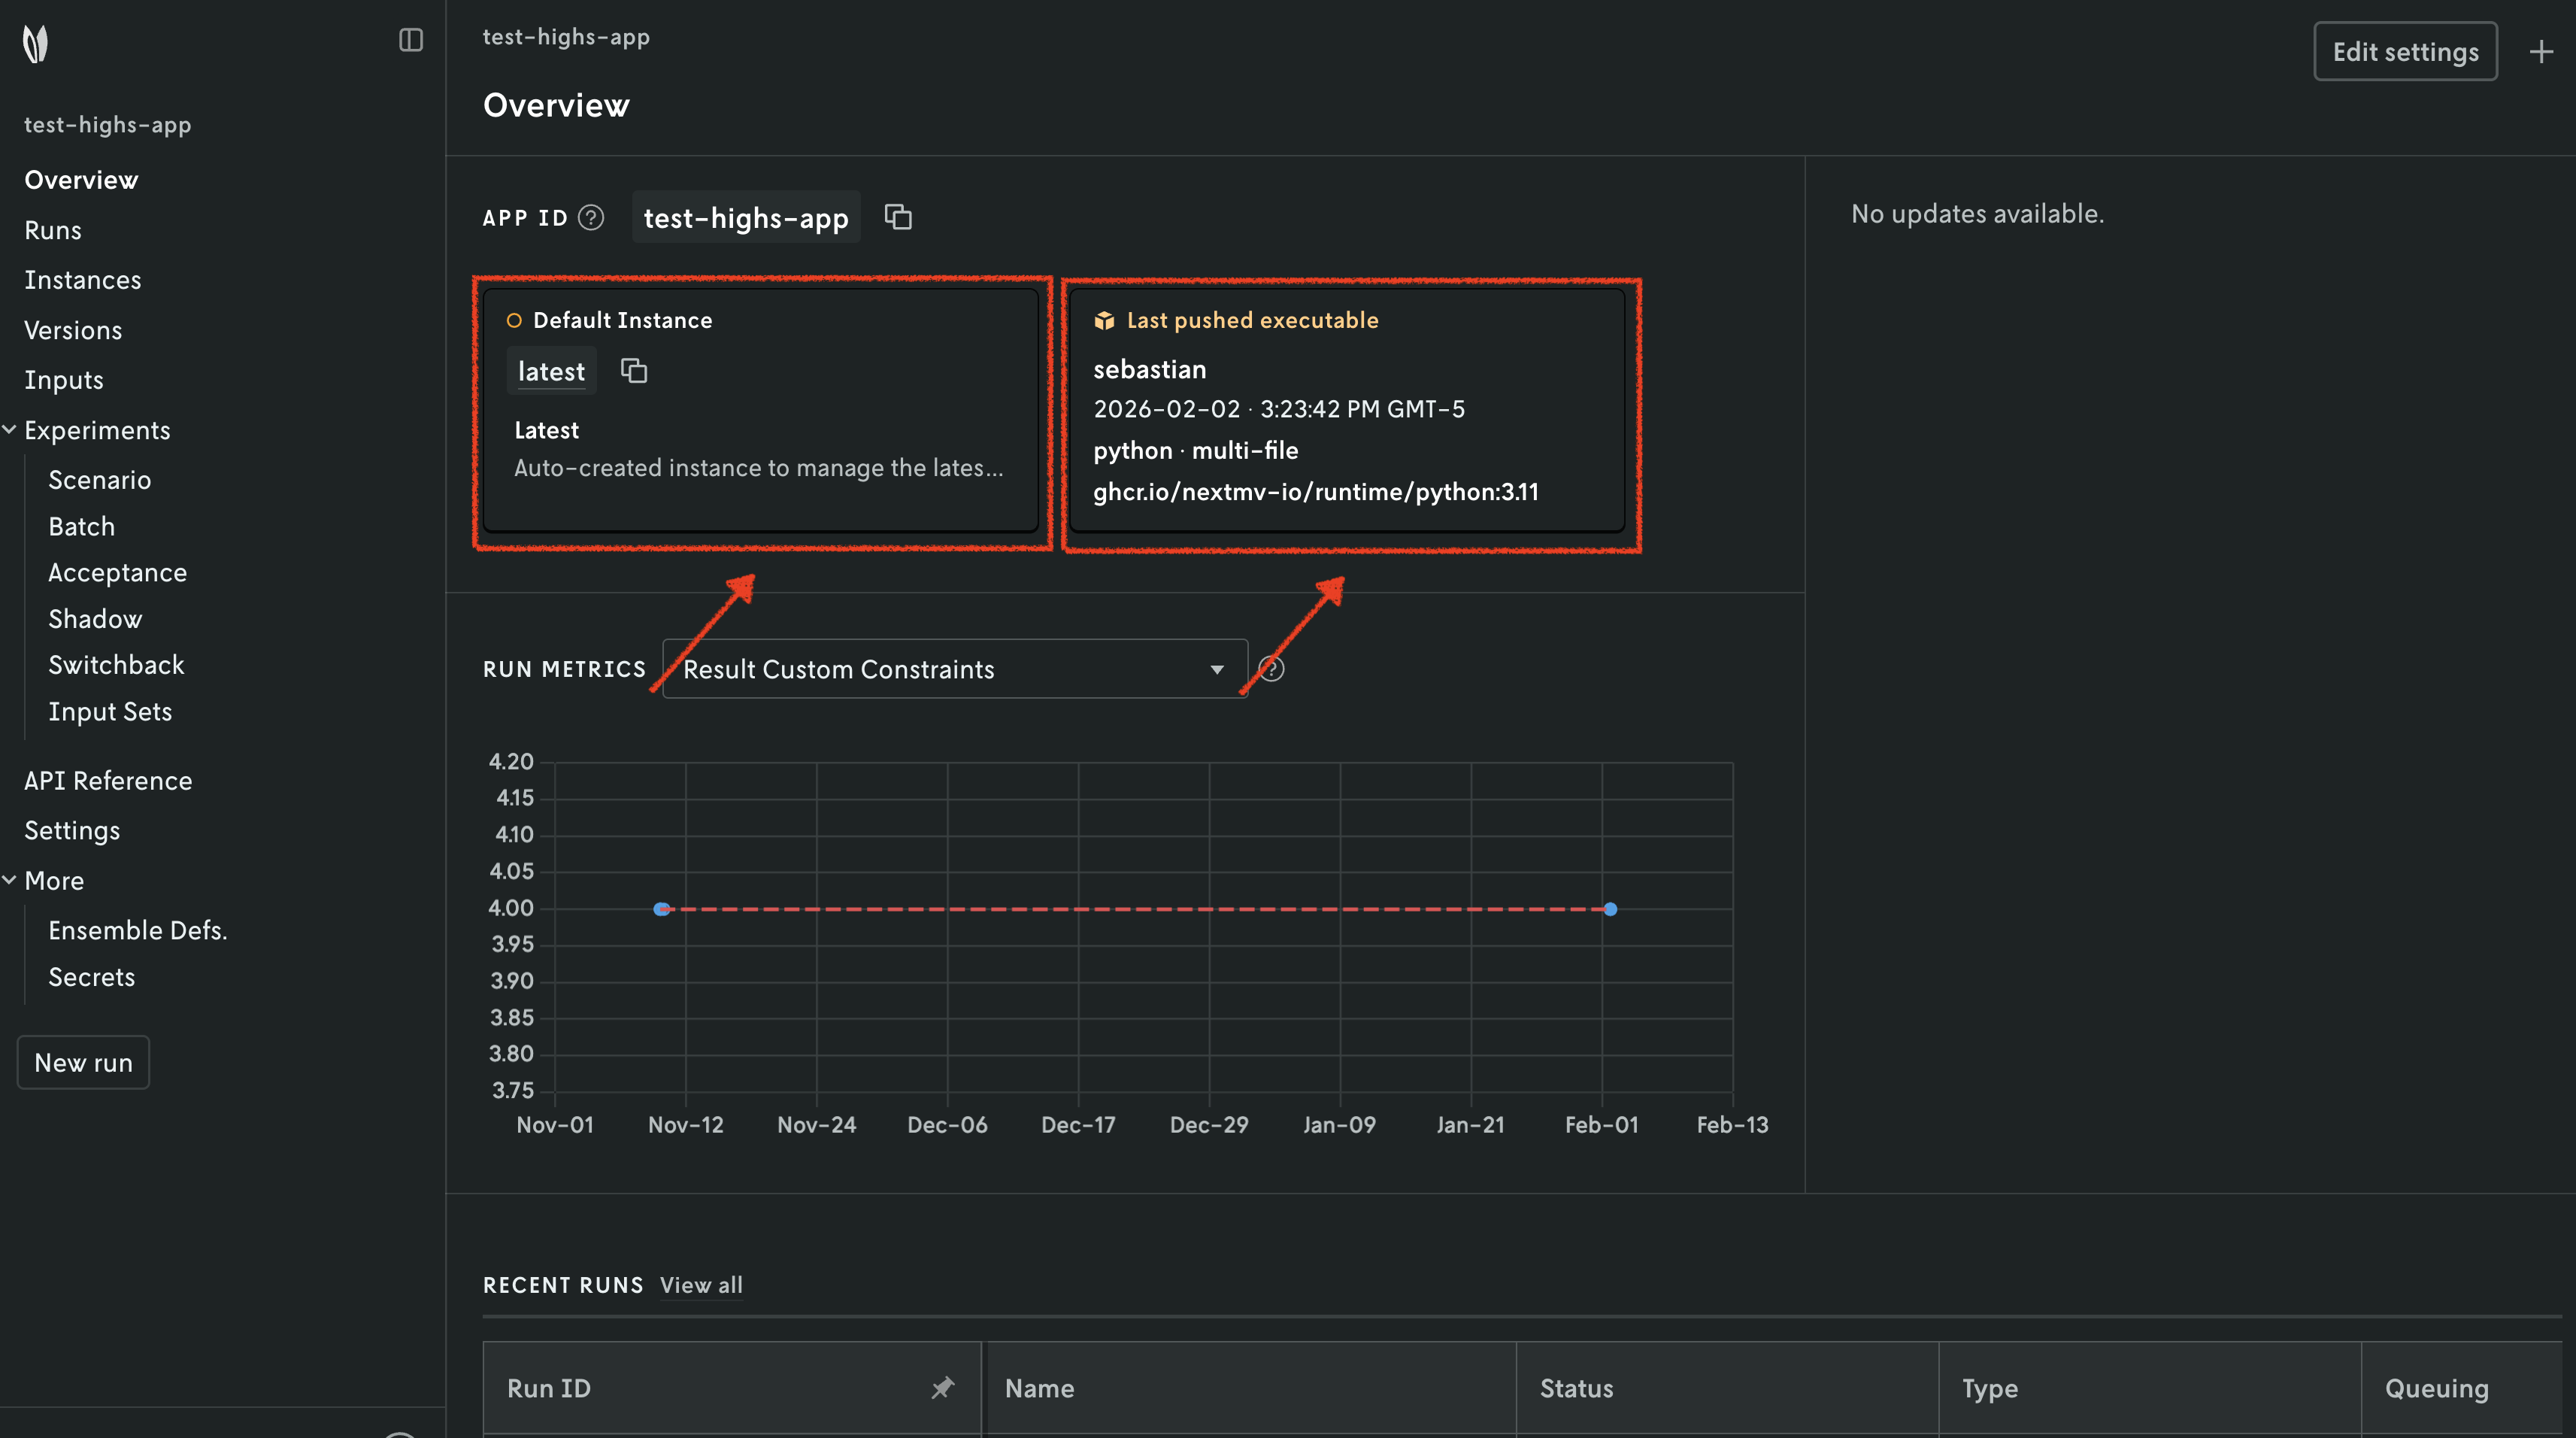
- There is now a pushed executable.
- There is an auto-created
latestinstance, assigned to the executable.
An instance is like the endpoint of the application.
6. Create an initial version and the instances
We are going to create a version, which is the equivalent of tagging the executable code that was pushed. Think of a version as a Git tag, a snapshot of the code at a given point in time.
Run the following command:
⏳ Creating version...
{
  "id": "initial-version",
  "application_id": "nextroute",
  "name": "initial-version",
  "description": "",
  "executable": {
    "id": "initial-version",
    "user_email": "sebastian@nextmv.io",
    "uploaded_at": "2026-04-21T21:59:32.720274Z",
    "requirements": {
      "executable_type": "python",
      "runtime": "ghcr.io/nextmv-io/runtime/python:3.11"
    }
  },
  "created_at": "2026-04-21T22:01:56.359738Z",
  "updated_at": "2026-04-21T22:01:56.359738Z"
}
This command is saved as app4.sh in the full tutorial
code.
Using this version, we will now create two instances. You can think of an instance as an endpoint for the application, that uses a version and a certain configuration.
production: our stable instance.staging: our testing instance. With this instance we are going to solve the question: "What happens if I run this application for longer than the default?"
Run the following commands to create these instances:
⏳ Creating instance...
{
  "id": "staging",
  "application_id": "nextroute",
  "version_id": "initial-version",
  "name": "staging",
  "description": "",
  "configuration": {
    "execution_class": "6c9500mb870s",
    "options": {
      "solve_duration": "20"
    },
    "queuing": {
      "priority": 6,
      "disabled": false
    }
  },
  "locked": false,
  "created_at": "2026-04-21T22:18:54.649621Z",
  "updated_at": "2026-04-21T22:18:54.649621Z"
}
⏳ Creating instance...
{
  "id": "production",
  "application_id": "nextroute",
  "version_id": "initial-version",
  "name": "production",
  "description": "",
  "configuration": {
    "execution_class": "6c9500mb870s",
    "queuing": {
      "priority": 6,
      "disabled": false
    }
  },
  "locked": false,
  "created_at": "2026-04-21T22:18:56.369989Z",
  "updated_at": "2026-04-21T22:18:56.369989Z"
}
This command is saved as app5.sh in the full tutorial
code. Notice how the staging instance has a custom
option set.
7. Run remotely and create an input set
To create an input set, we are going to leverage a remote run. We can execute
runs against a specific instance, which in this case is going to be staging.
Run the following command. Note that this command is being executed outside
(one directory above) of the python-nextroute directory.
This command is saved as app6.sh in the full tutorial
code.
An input set is a collection of inputs. One way to create an input set is to
use the past runs of an instance. In this case, we are going to create an input
set based on the runs of the staging instance. Of course, you should expect a
single run (which is the one we just created), but in a real scenario you would
have multiple runs to create a more robust input set.
This command is saved as app7.sh in the full tutorial
code.
Now we have everything we need to run an acceptance test.
8. Creating an acceptance test
Before setting up the GitHub Actions workflow, let's run an acceptance test manually to see how it works. An acceptance test is a type of test that compares two instances of the same application, a candidate and a baseline, using a defined set of metrics and inputs. We are testing business metrics, based on pre-defined statistics, to accept or reject a candidate instance.
Run the following command:
METRIC='{
    "field": "result.value",
    "metric_type": "direct-comparison",
    "params": {
        "operator": "le",
        "tolerance": {"type": "relative", "value": 0.05}
    },
    "statistic": "mean"
}'
nextmv cloud acceptance create --app-id nextroute \
    --candidate-instance-id staging \
    --baseline-instance-id production \
    --metrics "$METRIC" \
    --input-set-id "<INPUT_SET_ID_CREATED_PREVIOUSLY>"
This command is saved as app8.sh in the full tutorial
code. Notice the following:
- We are comparing the baseline
productioninstance against the incoming candidatestaginginstance. You would always assign new code to a new version, and you would update thestaginginstance to use that new version. - In this case we are comparing the default solve duration against a longer solve duration of 20 seconds.
- We use the input set that we created in the previous step. Once an input set is created, you can reuse it for multiple acceptance tests.
- The only metric we are comparing is the value of the result. The acceptance
test passes if the
meanof the candidate's result values is less than or equal to themeanof the baseline's result values, with a relative tolerance of 5%.
You can see the results of the acceptance test in the Console, under the
Acceptance section of your Nextmv application.
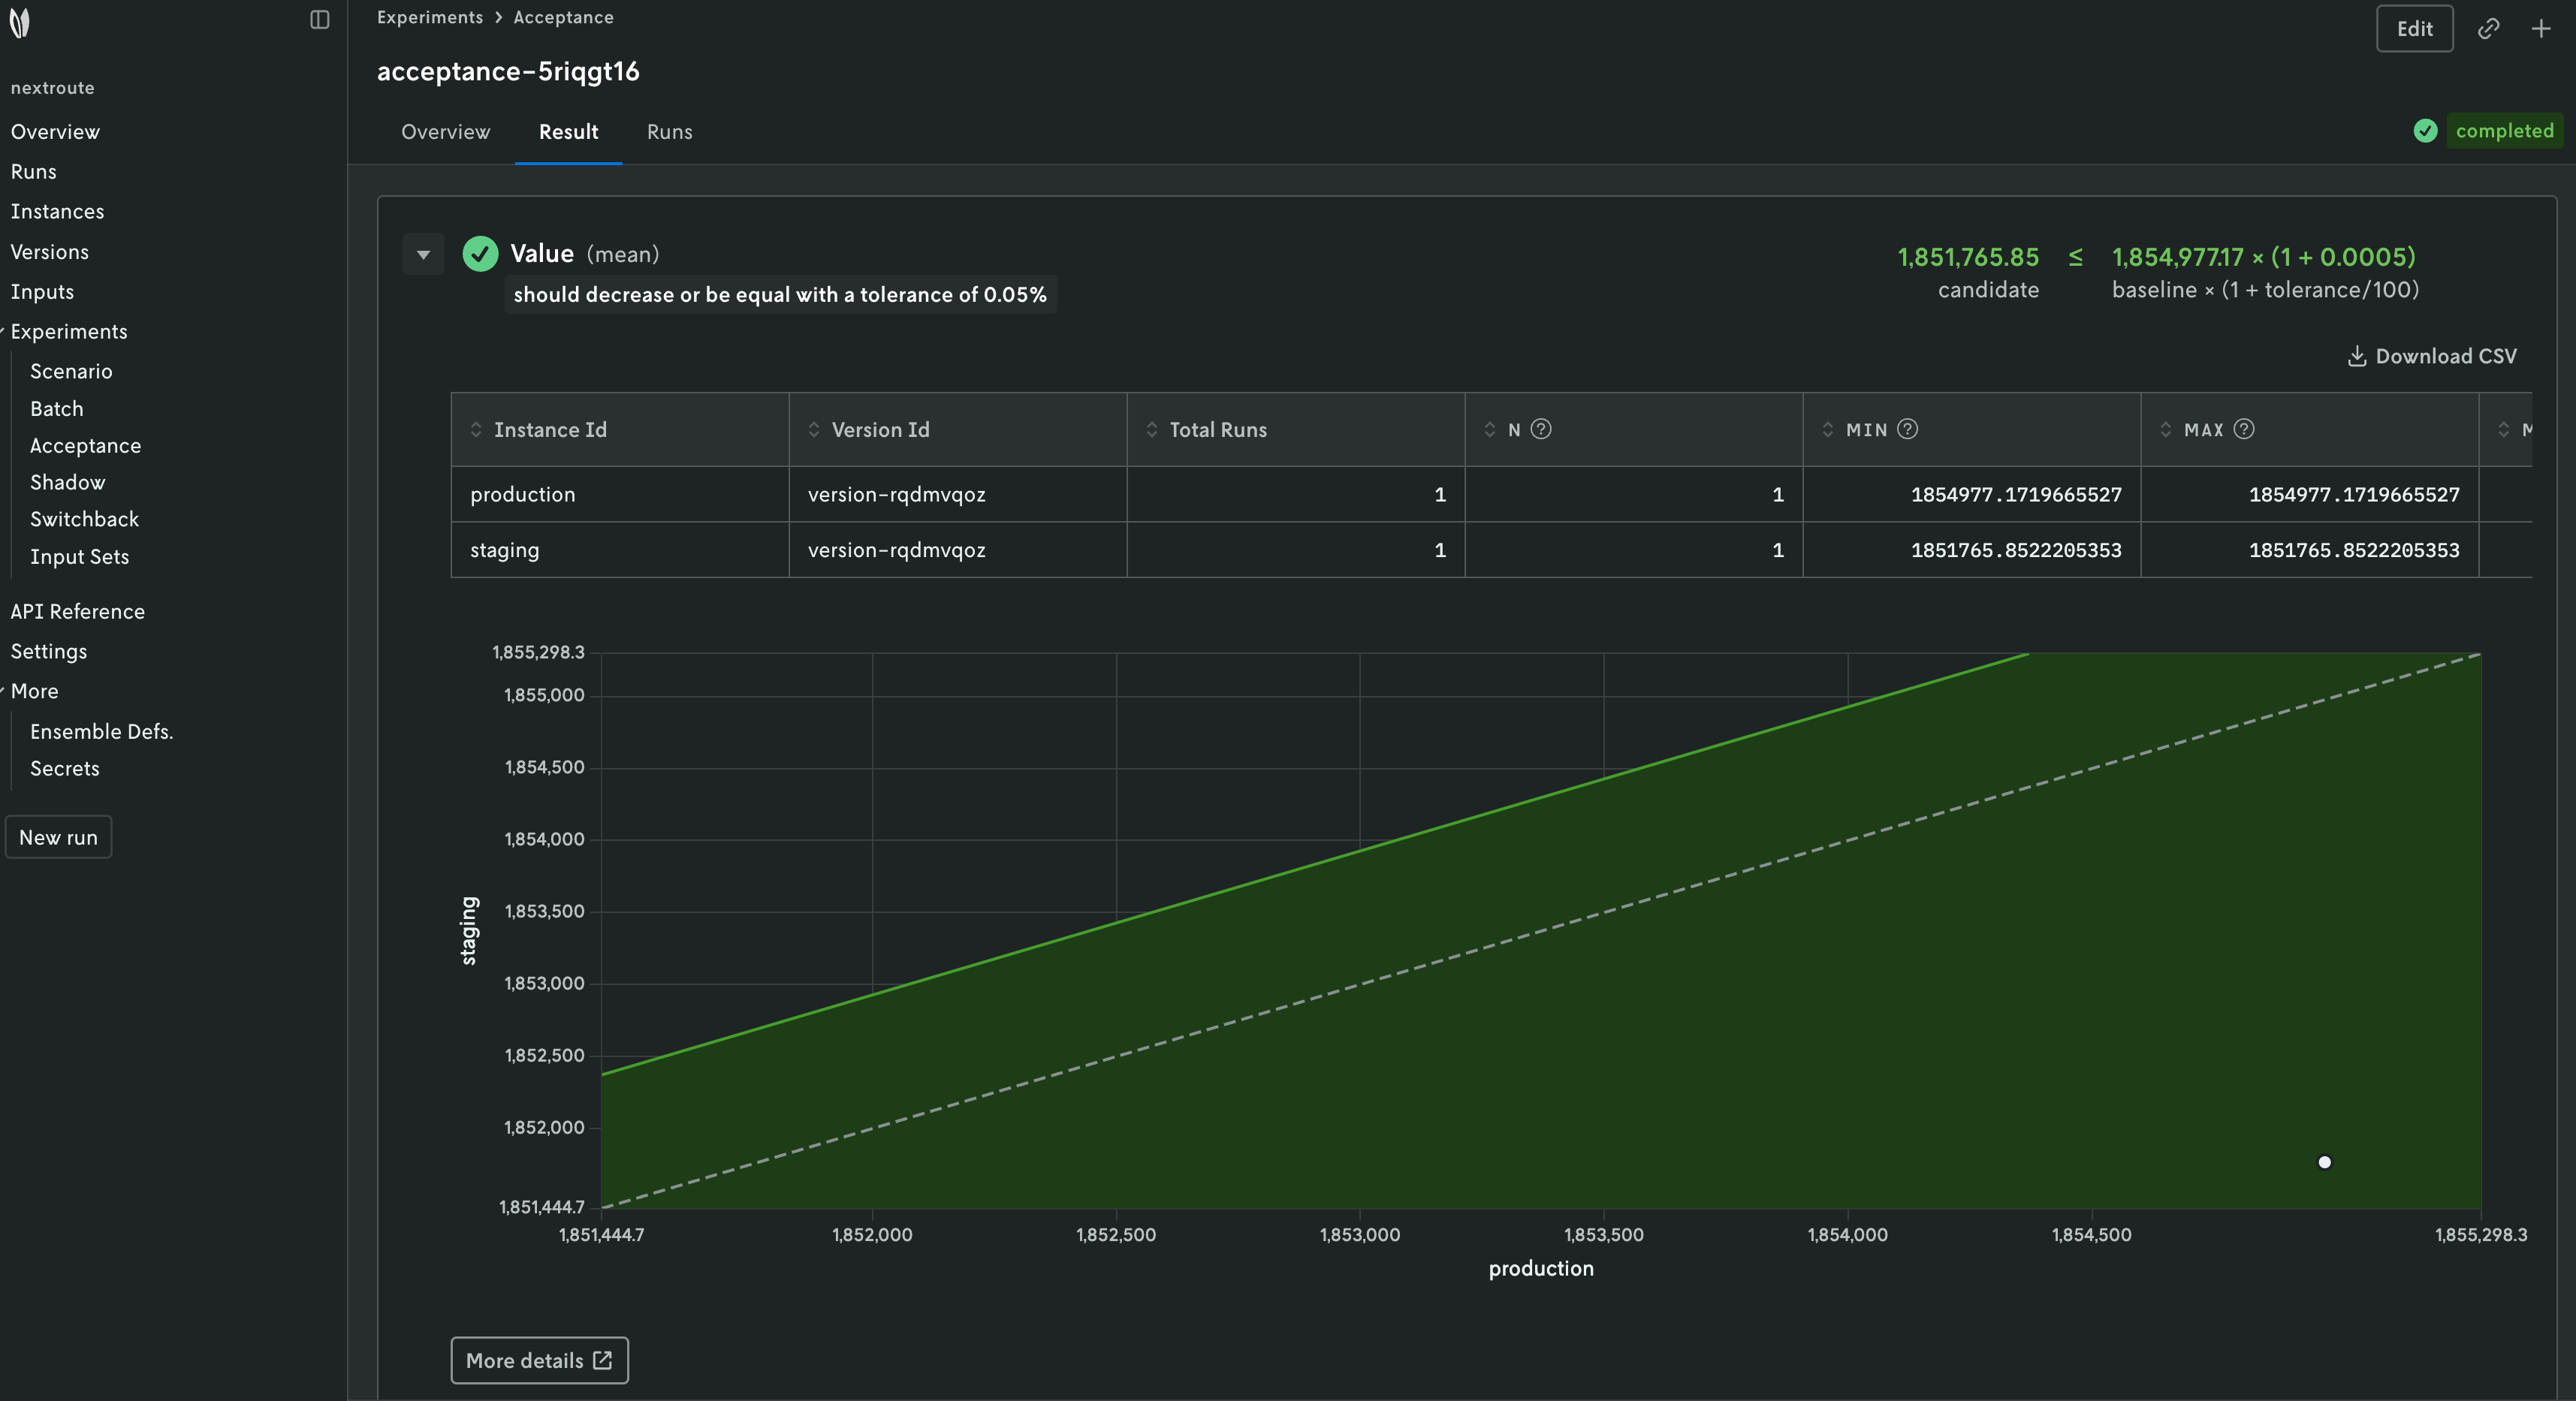
The conclusion for this very simple test is that the staging instance is
performing better than the production instance because the metric did indeed
decrease.
9. Set up a CI/CD decision workflow in GitHub Actions
Instead of running acceptance tests manually, it is a better idea to automate this and other experiments and tests using a CI/CD workflow. This way, you can ensure that every time you push new code, the necessary tests and experiments are run automatically.
In your GitHub repository, create a new workflow file:
.github/workflows/nextmv.yml. Add the following content to that file:
# Create a name for the workflow.
name: CI/CD decision workflow - acceptance testing

# Define the events that trigger the workflow. In this case, we simply run it
# when there is a commit to the main `develop` branch.
on:
  push:
    branches:
      - develop

jobs:
  acceptance-test:
    runs-on: ubuntu-latest
    steps:
      # Check out the current code of the repository.
      - name: Checkout code
        uses: actions/checkout@v6

      # Use the Nextmv GitHub Action to set up the Nextmv CLI.
      - name: Install Nextmv CLI
        uses: nextmv-io/setup-nextmv@v1
        with:
          api-key: ${{ secrets.NEXTMV_API_KEY }}

      # Deploy the code, create a new version, and update the `staging` instance to use the new version.
      - name: Push new version of nextroute and update staging instance
        run: nextmv cloud app push --app-id nextroute --version-yes --update-instance-id staging
        working-directory: ./ci-cd-github-actions/python-nextroute # Location of the app to push

      # Create a new acceptance test comparing `staging` to `production`.
      - name: Create a new acceptance test
        run: |
          # Define metrics in-line or load them from a `.json` file.
          METRIC='{
              "field": "result.value",
              "metric_type": "direct-comparison",
              "params": {
                  "operator": "le",
                  "tolerance": {"type": "relative", "value": 0.05}
              },
              "statistic": "mean"
          }'

          # Create an acceptance test comparing `staging` to `production`.
          nextmv cloud acceptance create --app-id nextroute \
              --candidate-instance-id staging \
              --baseline-instance-id production \
              --metrics "$METRIC" \
              --input-set-id input-set-1
This file is saved as .github/workflows/nextmv.yml in the full tutorial
code.
In this workflow we are doing the following:
- Whenever there is a push to the
develop(main) branch, we run this workflow. - We check out the code of the repository.
- We use the Nextmv GitHub Action to set up the Nextmv CLI. Note that
you must set up a secret in your GitHub repository with your Nextmv API
key. In the workflow, we are referencing that secret as
${{ secrets.NEXTMV_API_KEY }}. - We push the code of the
python-nextrouteapp to Nextmv Cloud, create a new version, and update thestaginginstance to use that new version. Remember how this was all done manually before? - The
working-directoryshould point to the location of theapp.yamlmanifest. In this case, as this workflow is hosted in the tutorials repository, the path points to thepython-nextroutedirectory inside theci-cd-github-actionsdirectory. - We create a new acceptance test comparing the
staginginstance to theproductioninstance, using the same metric and input set as before.
Your GitHub Actions workflow should be similar to this one,
and it should trigger every time you push to the develop branch, like when
merging a pull request, for example.
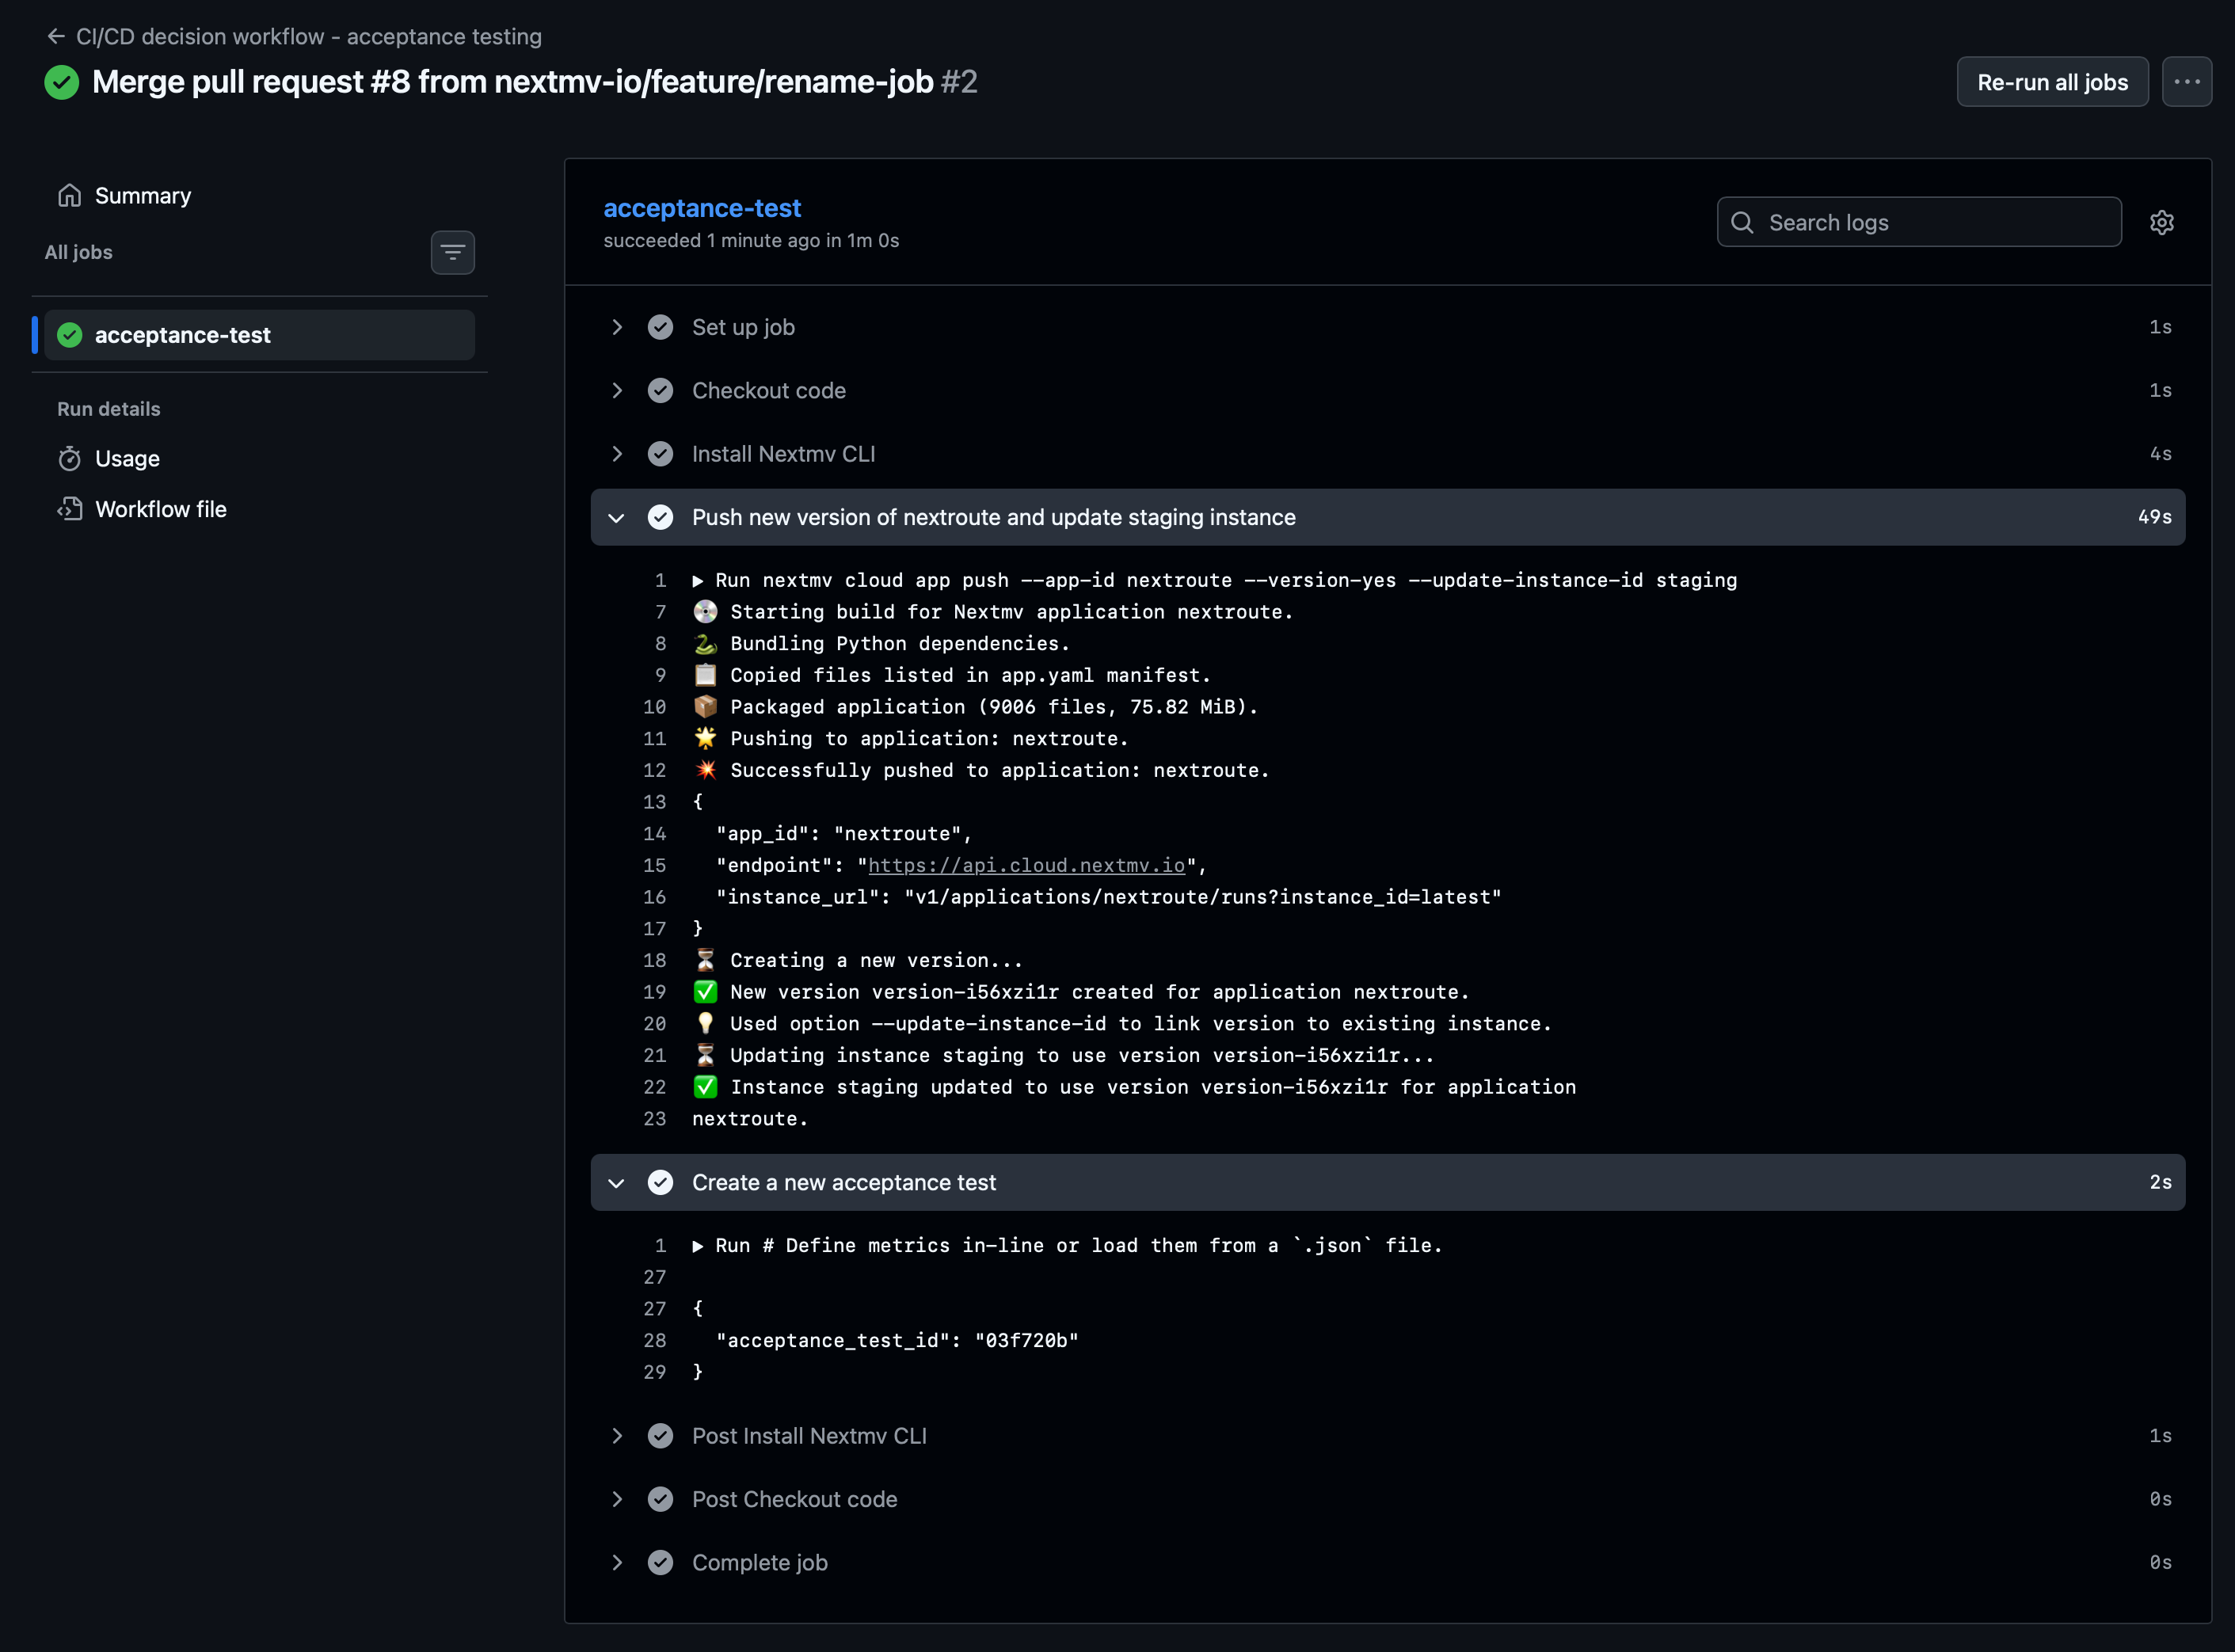
If you refresh the list of acceptance tests in the Nextmv Console, you should see the new acceptance test that was just created by the workflow.
🎉🎉🎉 Congratulations, you have finished this tutorial!
Full tutorial code
You can find the consolidated code examples used in this tutorial in the
tutorials GitHub repository. The
ci-cd-github-actions dir contains all the
code that was shown in this tutorial.
Go into the directory for instructions about running the decision model.