Set up webhooks in the Nextmv Platform
⌛️ Approximate time to complete: 10 min.
In this tutorial you will learn how to set up webhooks using the Nextmv Cloud API and Nextmv CLI. Webhooks are a mechanism for the Nextmv platform to send real-time notifications to your application when certain events occur. Complete this tutorial if you:
- Want to learn how webhooks work in the Nextmv Platform.
- Are fluent using Python 🐍.
- Are familiar using
uvfor managing Python.
To complete this tutorial we will use ngrok to route traffic from the public internet to your local machine. If you already have a server that can receive webhooks, you can use it instead of ngrok.
At a high level, this tutorial will go through the following steps:
- Set up ngrok.
- Create and set up a webhook in the Nextmv Platform.
- Set up a local server to receive webhooks.
- Test the webhook by triggering an event in the Nextmv Platform.
You may follow along with the full tutorial code. Let’s dive right in 🤿.
1. Set up ngrok
Head to ngrok and sign up for a free account. Once you have signed up,
you will be prompted to download and install ngrok. After you are done, go
ahead and get a public URL for your app. Ngrok will give you a command that you
can run to get a public URL. Please note that this command is customized to use
port 8000. For example:
ngrok

Request early access to new features: https://dashboard.ngrok.com/early-access

Session Status                online
Account                       Your name (Plan: Free)
Version                       3.39.9
Region                        United States (California) (us-cal-1)
Web Interface                 http://127.0.0.1:4040
Forwarding                    https://<YOUR-NGROK-DOMAIN> -> http://localhost:8000

Connections                   ttl     opn     rt1     rt5     p50     p90
                              0       0       0.00    0.00    0.00    0.00
Ngrok prints the public URL it assigned you in the Forwarding line.
Throughout this tutorial we write it as https://<YOUR-NGROK-DOMAIN>. Replace
<YOUR-NGROK-DOMAIN> with your own domain wherever it appears. It redirects
traffic to your local machine on port 8000.
Tip
Don't close this terminal window, keep it running so that the tunnel remains active.
2. Create an account
The full suite of benefits starts with a Nextmv Cloud account.
- Visit the Nextmv Console to sign up for an account at https://cloud.nextmv.io.
- Fill out the form. A member of the Nextmv team will reach out to you to complete the sign-up process.
- Log in to your account. The Nextmv Console is ready to use!
Once you have logged in to your account, you need to fetch your API key. You can do so from your settings.
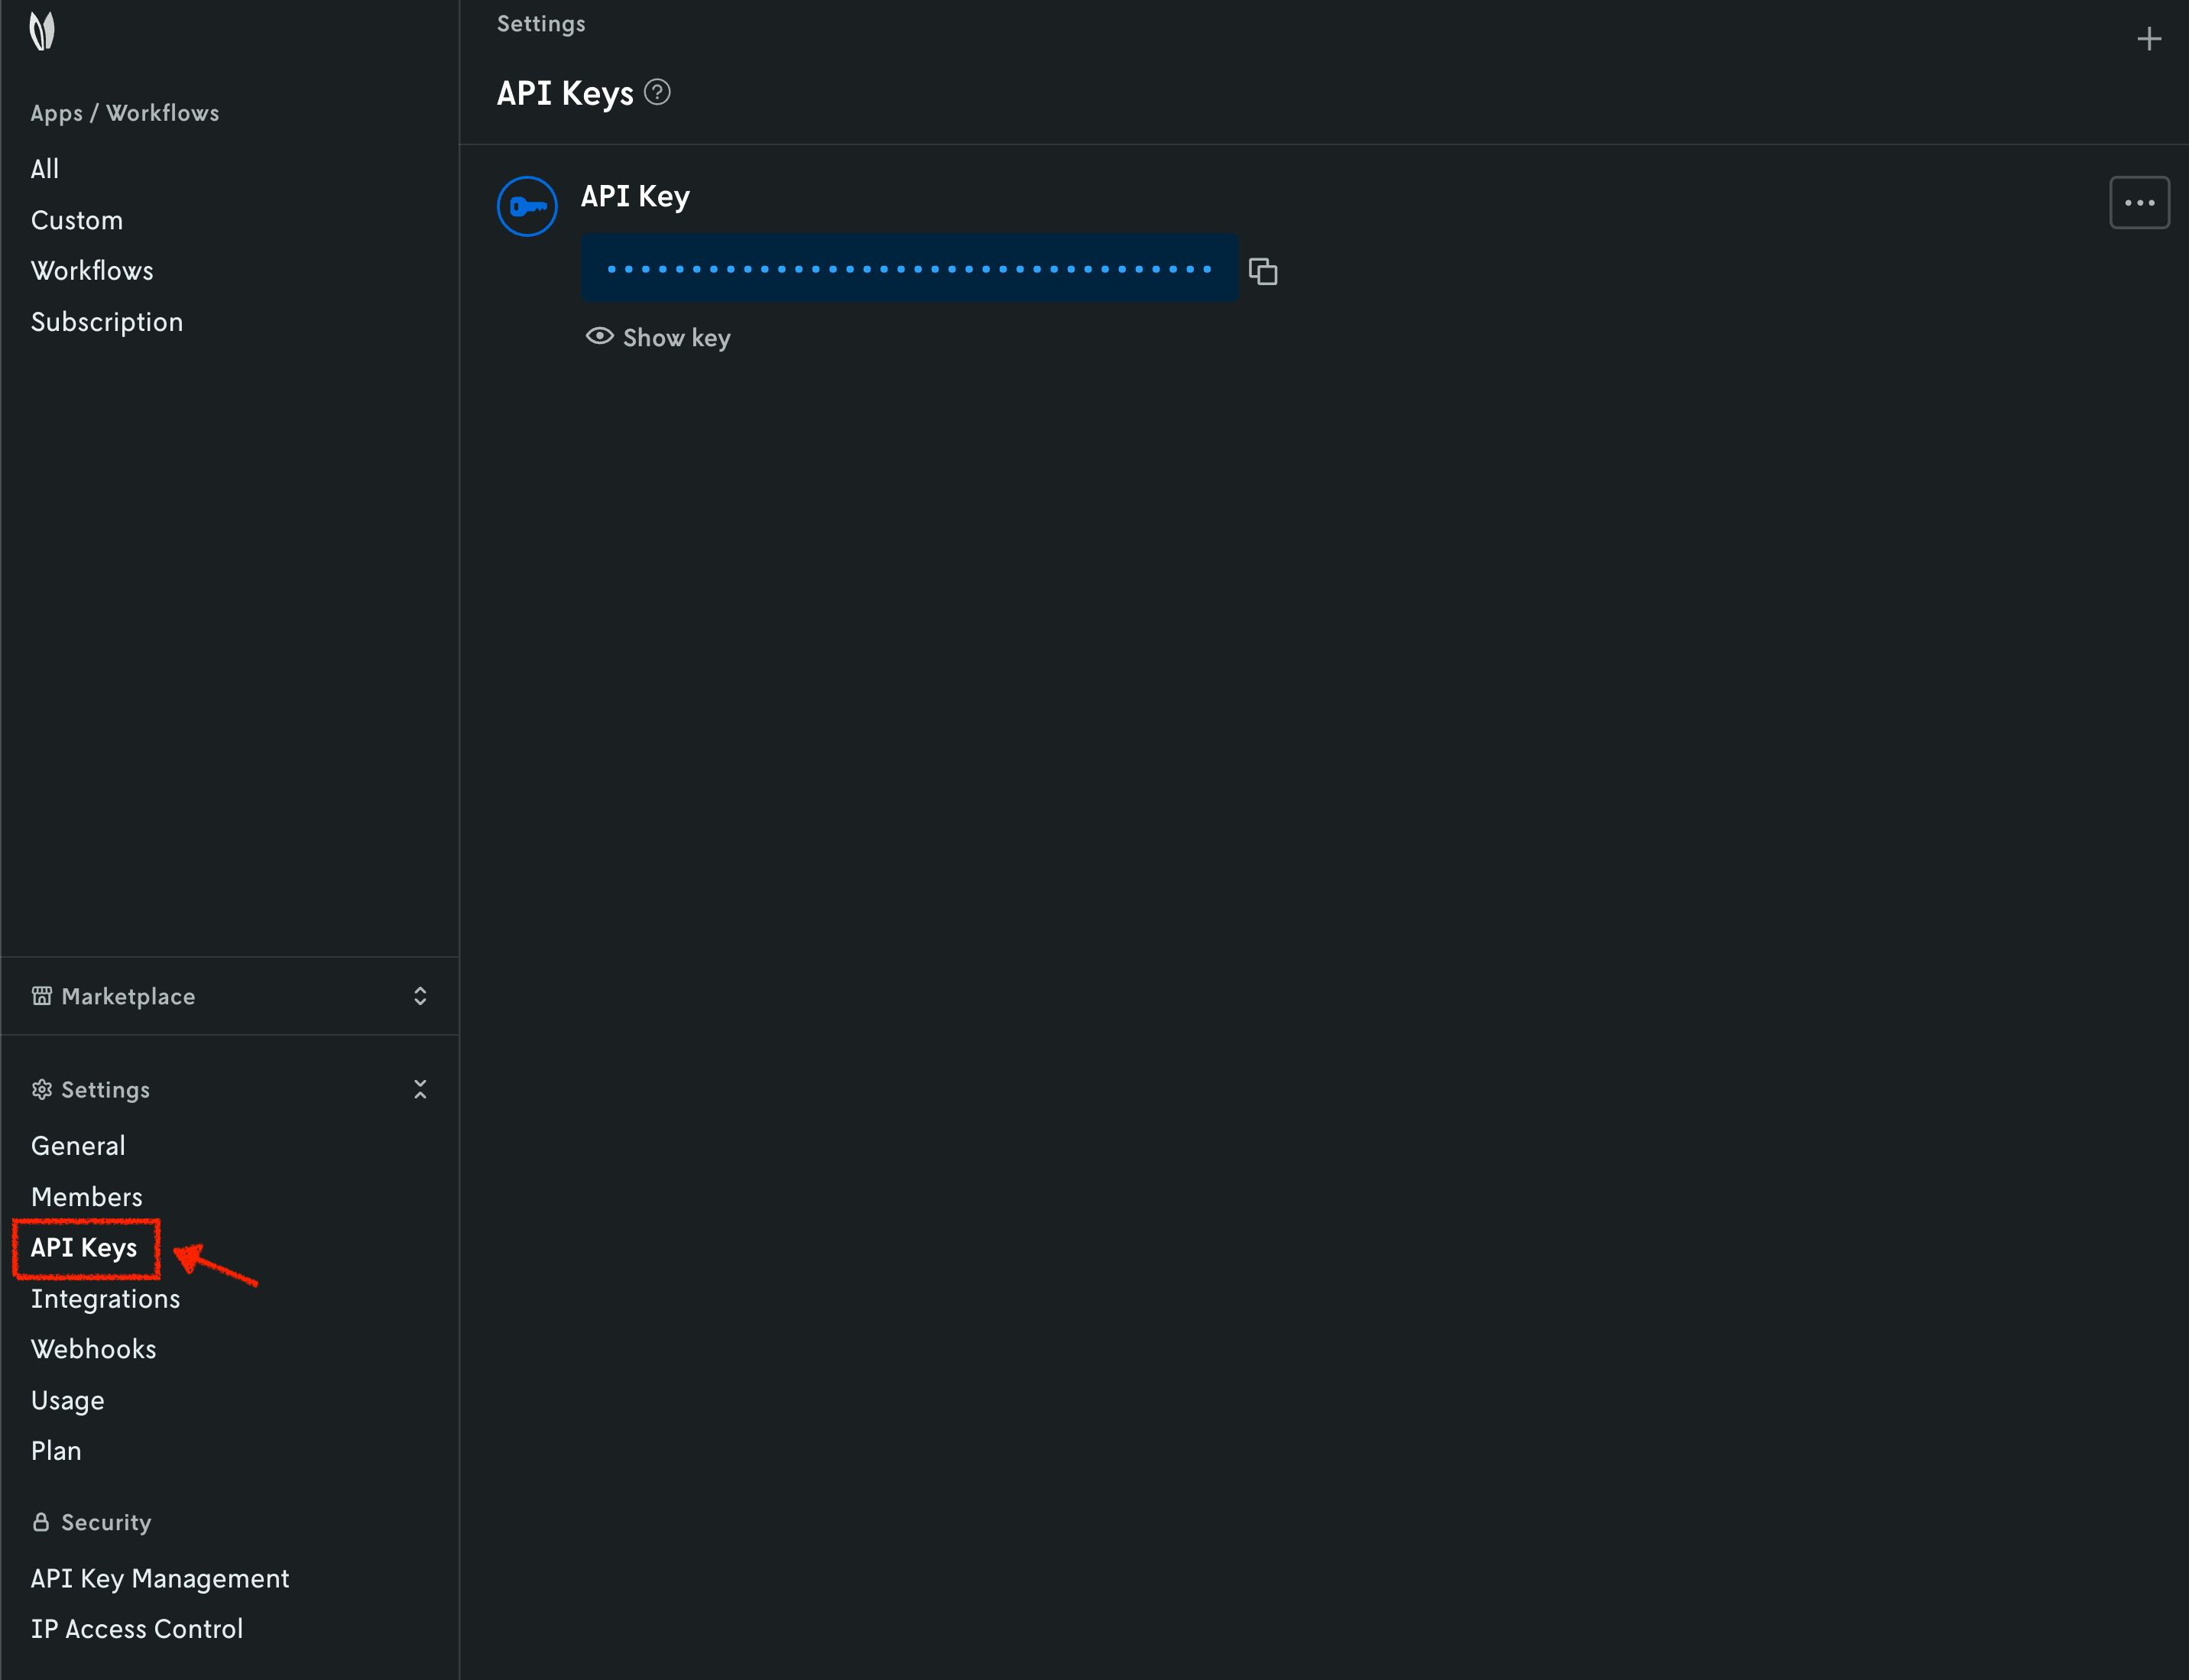
When you have your API key, it is convenient to save it as an environment variable so that you can use it for the rest of this tutorial.
3. Create a webhook
We are going to create a webhook that subscribes to events of type
run.status. This event is triggered when the status of a run changes. For
example, from running to succeeded.
Use curl to create a webhook. Please note that we are using the following
endpoint URL for the endpoint_url property:
https://<YOUR-NGROK-DOMAIN>/webhookhandler. This path
corresponds to:
- The public URL that ngrok has given you.
- The
/webhookhandlerpath that we will set up in the next steps to handle incoming webhook requests.
Warning
Replace <YOUR-NGROK-DOMAIN> with the domain ngrok assigned you before
running this command. Registering a webhook against a domain you do not
control sends your run metadata to a third party.
curl -X 'POST' \
  'https://api.cloud.nextmv.io/v1/webhooks' \
  -H 'accept: */*' \
  -H "Authorization: Bearer $NEXTMV_API_KEY" \
  -H 'Content-Type: application/json' \
  -d '{
  "id": "test_webhook_handler",
  "event_types": [
    "run.status"
  ],
  "endpoint_url": "https://<YOUR-NGROK-DOMAIN>/webhookhandler",
  "description": "Test webhook"
}'
You may use any id you want for the webhook.
4. Retrieve the secret for the webhook
Retrieve the secret for the webhook. The secret is used to recompute the HMAC signature of the request to verify its authenticity.
We are going to use the value of the secret property in the next steps to
verify the authenticity of the webhook requests.
5. Create a local server to receive webhooks
Info
If you already have a server that can receive webhooks, you can use it instead of following this step.
If you are following along with the full tutorial code, run the following command in the root of your project.
On the other hand, if you are completing this tutorial from scratch, run the following command in the root of your project.
uv init --bare # Execute if you don't have a pyproject.toml file in your project.
uv add 'fastapi[standard]'
This example will use FastAPI to create a simple server that will handle incoming webhook requests.
Create a file named main.py (if it does not exist) and add the following code to it:
import hashlib
import hmac
import time

from fastapi import FastAPI, Request, Response
from fastapi.responses import JSONResponse

SECRET = "YOUR_WEBHOOK_SECRET"  # Replace with your actual webhook secret

app = FastAPI()


def check_signature(
    payload: bytes,
    t: int,
    signature: str,
    secret: bytes,
    max_age_seconds: int = 300,
    max_skew_seconds: int = 60,
) -> bool:
    """
    Recompute the signature of the payload using the secret and the timestamp, and compare it
    with the signature provided in the header. Returns False if the timestamp falls outside the
    accepted window, so that a captured request cannot be replayed indefinitely.
    """

    # The signature stays valid for as long as the payload does, so the
    # timestamp is what bounds replay. Check it before anything else.
    now = time.time()
    if not (now - max_age_seconds < t < now + max_skew_seconds):
        return False

    mac = hmac.new(secret, digestmod=hashlib.sha256)
    mac.update(str(t).encode())
    mac.update(b".")
    mac.update(payload)
    recomputed_signature = mac.hexdigest()

    # Constant-time comparison. A plain `==` short-circuits on the first
    # differing character and leaks how many leading characters matched.
    return hmac.compare_digest(recomputed_signature, signature)


@app.post("/webhookhandler")
async def webhook_handler(request: Request):
    """
    Handle incoming webhook requests.
    """

    # Gets the signature from the request header.
    signature = request.headers.get("nextmv-signature")
    if not signature:
        return Response(
            status_code=401,
            headers={"content-type": "text/plain"},
            content=bytes("Unauthorized: Missing Signature", "utf-8"),
        )

    # Extract the timestamp and the signature string from the header. The
    # timestamp itself is validated inside `check_signature`. Only the errors a
    # malformed header can actually cause are caught here: ValueError from the
    # two-part unpacking and from `int`, IndexError from a missing "=".
    try:
        t, sig = signature.split(",")
        signature_time = int(t.split("=")[1])
        signature_string = sig.split("=")[1]
    except (ValueError, IndexError):
        return Response(
            status_code=401,
            headers={"content-type": "text/plain"},
            content=bytes("Unauthorized: Invalid Signature Format", "utf-8"),
        )

    # Make sure secret is set.
    if not SECRET:
        return Response(
            status_code=500,
            headers={"content-type": "text/plain"},
            content=bytes("Internal Server Error", "utf-8"),
        )

    # Check signature.
    body = await request.body()
    if not check_signature(body, signature_time, signature_string, SECRET.encode()):
        return Response(
            status_code=401,
            headers={"content-type": "text/plain"},
            content=bytes("Unauthorized: Invalid signature", "utf-8"),
        )

    # Do something useful with the webhook payload here. For example, you can
    # parse the JSON payload and take action based on its contents.
    body_json = body.decode("utf-8")
    print(body_json)

    # Optionally give a response to the webhook sender, which is the Nextmv
    # Cloud API.
    return JSONResponse(
        status_code=200,
        content={
            "message": "Webhook received!",
            "body": body_json,
        },
    )
Note that the value of the SECRET constant should be the secret value that
you retrieved in the previous step.
This script:
- Creates a FastAPI server that listens for incoming
POSTrequests at the/webhookhandlerendpoint. - Extracts the
Nextmv-Signatureheader from the request. - Validates the timestamp and signature to ensure the request is authentic.
- Processes the webhook request and returns a JSON response.
Now, run the server with the following command, noting that we are using port
8000 to match the ngrok setup:
⚡️ Starting FastAPI in development mode

🐍 Using import string: main:app (auto-discovered, use --verbose to learn more)

💡 You can configure an entrypoint in pyproject.toml for this app with:

    [tool.fastapi]
    entrypoint = "main:app"

🌐 Server started at http://127.0.0.1:8000
    Documentation at http://127.0.0.1:8000/docs

  Logs:

▕  Will watch for changes in these directories: ['/your/project/directory']
▕  Uvicorn running on http://127.0.0.1:8000 (Press CTRL+C to quit)
▕  Started reloader process [62721] using WatchFiles
▕  Started server process [62749]
▕  Waiting for application startup.
▕  Application startup complete.
Tip
Do not close this terminal window, keep it running so that the server remains active. At this point, you should have 2 terminal windows open:
- The first one running ngrok.
- The second one running the FastAPI server.
We have everything set up to start testing the webhook. In the next step, we will trigger an event in the Nextmv Platform to test the webhook.
6. Install the Nextmv CLI
Please see the Nextmv CLI installation guide.
7. Clone a community app
To work with community apps you have two options:
- Clone the GitHub repository locally.
- Use the Nextmv CLI to clone a specific community app.
This tutorial will use the second option.
For this tutorial, we will be using the python-hello-world community app,
which is a "hello world" style application in Python. To clone this community
app, run the following command in a new terminal (keeping the terminals for
ngrok and FastAPI open):
This command is saved as app1.sh in the full tutorial
code.
Once the app has been cloned, you should see a structure similar to the following:
.
├── main.py
├── pyproject.toml
├── python-hello-world
│   ├── app.yaml
│   ├── input.json
│   ├── LICENSE
│   ├── main.py
│   ├── pyproject.toml
│   ├── README.md
│   ├── requirements.txt
│   └── uv.lock
├── README.md
└── uv.lock
8. Create your Nextmv Cloud application
Tip
Go to the Applications section to learn more about Nextmv applications.
Run the following command:
⏳ Creating or getting application...
{
  "id": "test-webhooks",
  "name": "test-webhooks",
  "description": "",
  "type": "custom",
  "default_instance": "latest",
  "default_experiment_instance": "",
  "subscription_id": "",
  "locked": false,
  "created_at": "2026-07-09T18:40:36.158310Z",
  "updated_at": "2026-07-09T18:42:58.375241Z"
}
This will create a new application in Nextmv Cloud. Note that the name and app
ID can be different, but for simplicity this tutorial uses the same name and
app ID. This command is saved as app2.sh in the full tutorial
code. You can also create applications directly from
Nextmv Console.
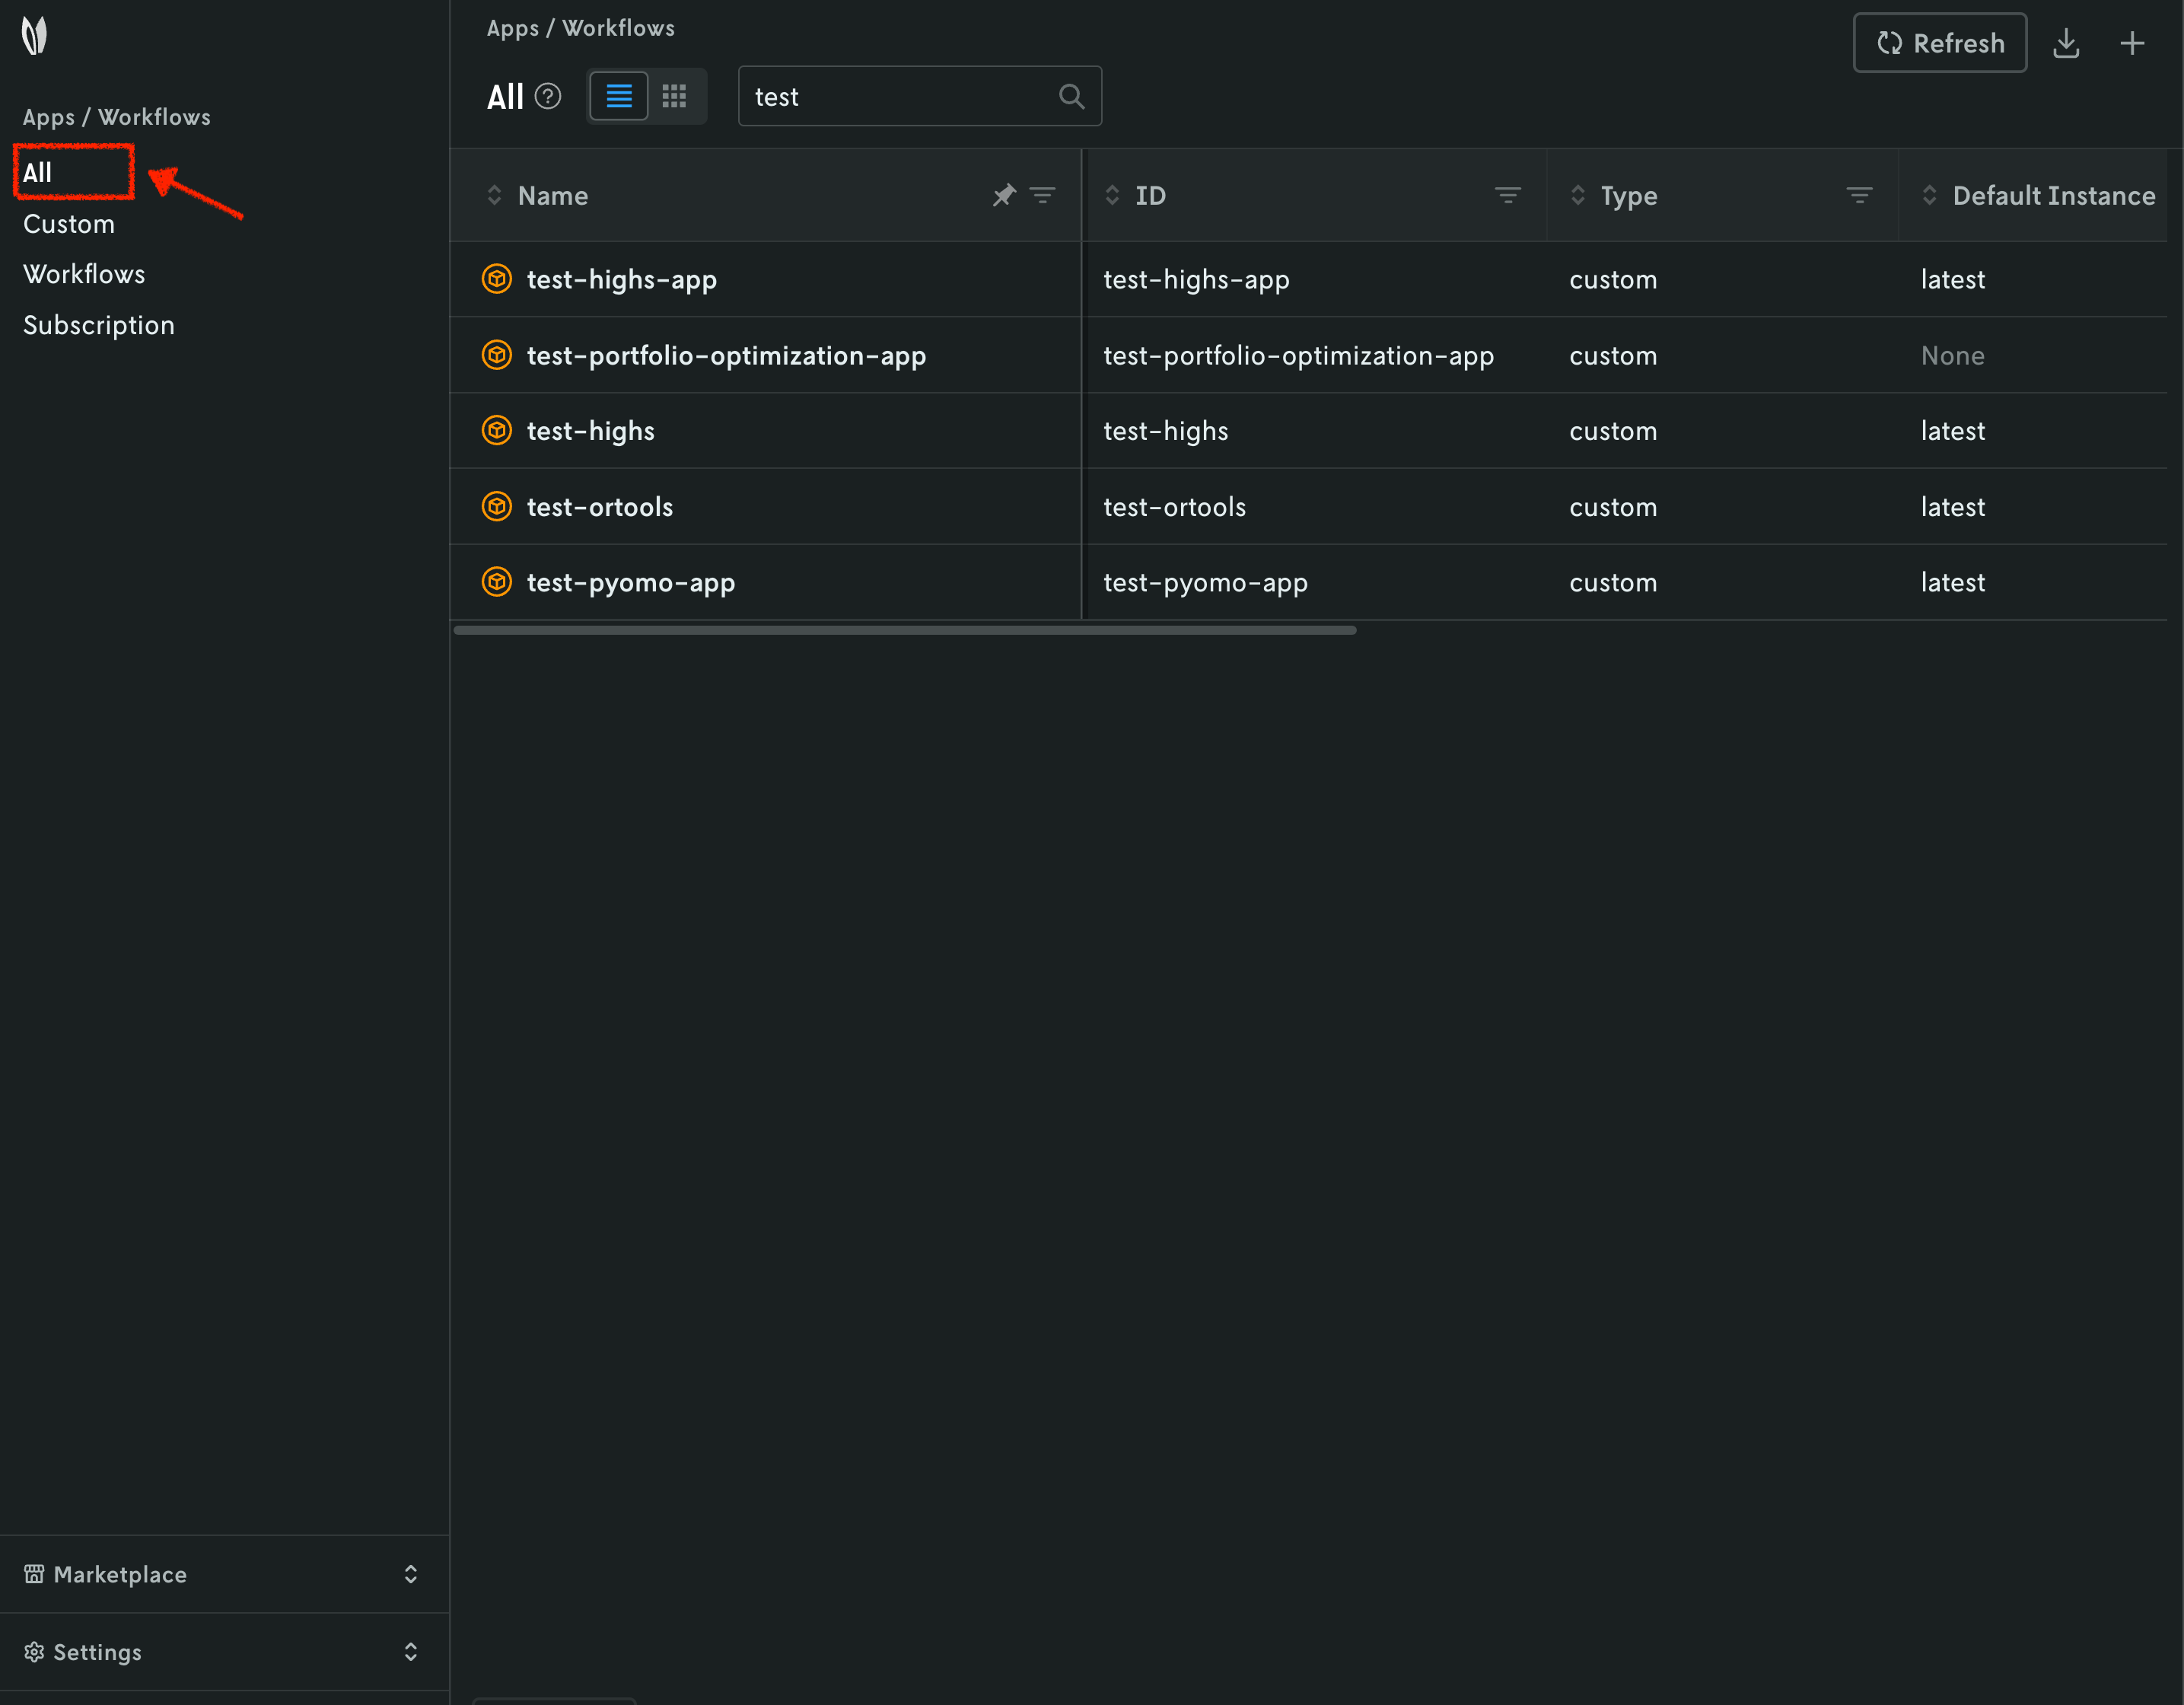
You can go to the Apps section in the Nextmv Console where you will see your applications.
9. Push your Nextmv application
You are going to push your app to Nextmv Cloud. Once an application has been pushed, you can run it remotely, perform testing, experimentation, and much more. Pushing is the equivalent of deploying an application, this is, taking the executable code and sending it to Nextmv Cloud.
Deploy your app (push it) to Nextmv Cloud. Note that this command is being
executed outside (one directory above) of the python-hello-world directory.
💽 Starting build for Nextmv application.
🐍 Bundling Python dependencies.
📋 Copied files listed in "app.yaml" manifest.
📦 Packaged application (25.49 MiB, 2120 files).
🌟 Pushing to application: "test-webhooks".
💥️ Successfully pushed to application: "test-webhooks".
{
  "app_id": "test-webhooks",
  "endpoint": "api.cloud.nextmv.io",
  "instance_url": "https://api.cloud.nextmv.io/v1/applications/test-webhooks/runs?instance_id=latest"
}
This command is saved as app3.sh in the full tutorial
code.
You can go to the Apps section in the Nextmv Console where you will see your application. You can click on it to see more details. Once you are in the overview of the application in the Nextmv Console, it should show the following:
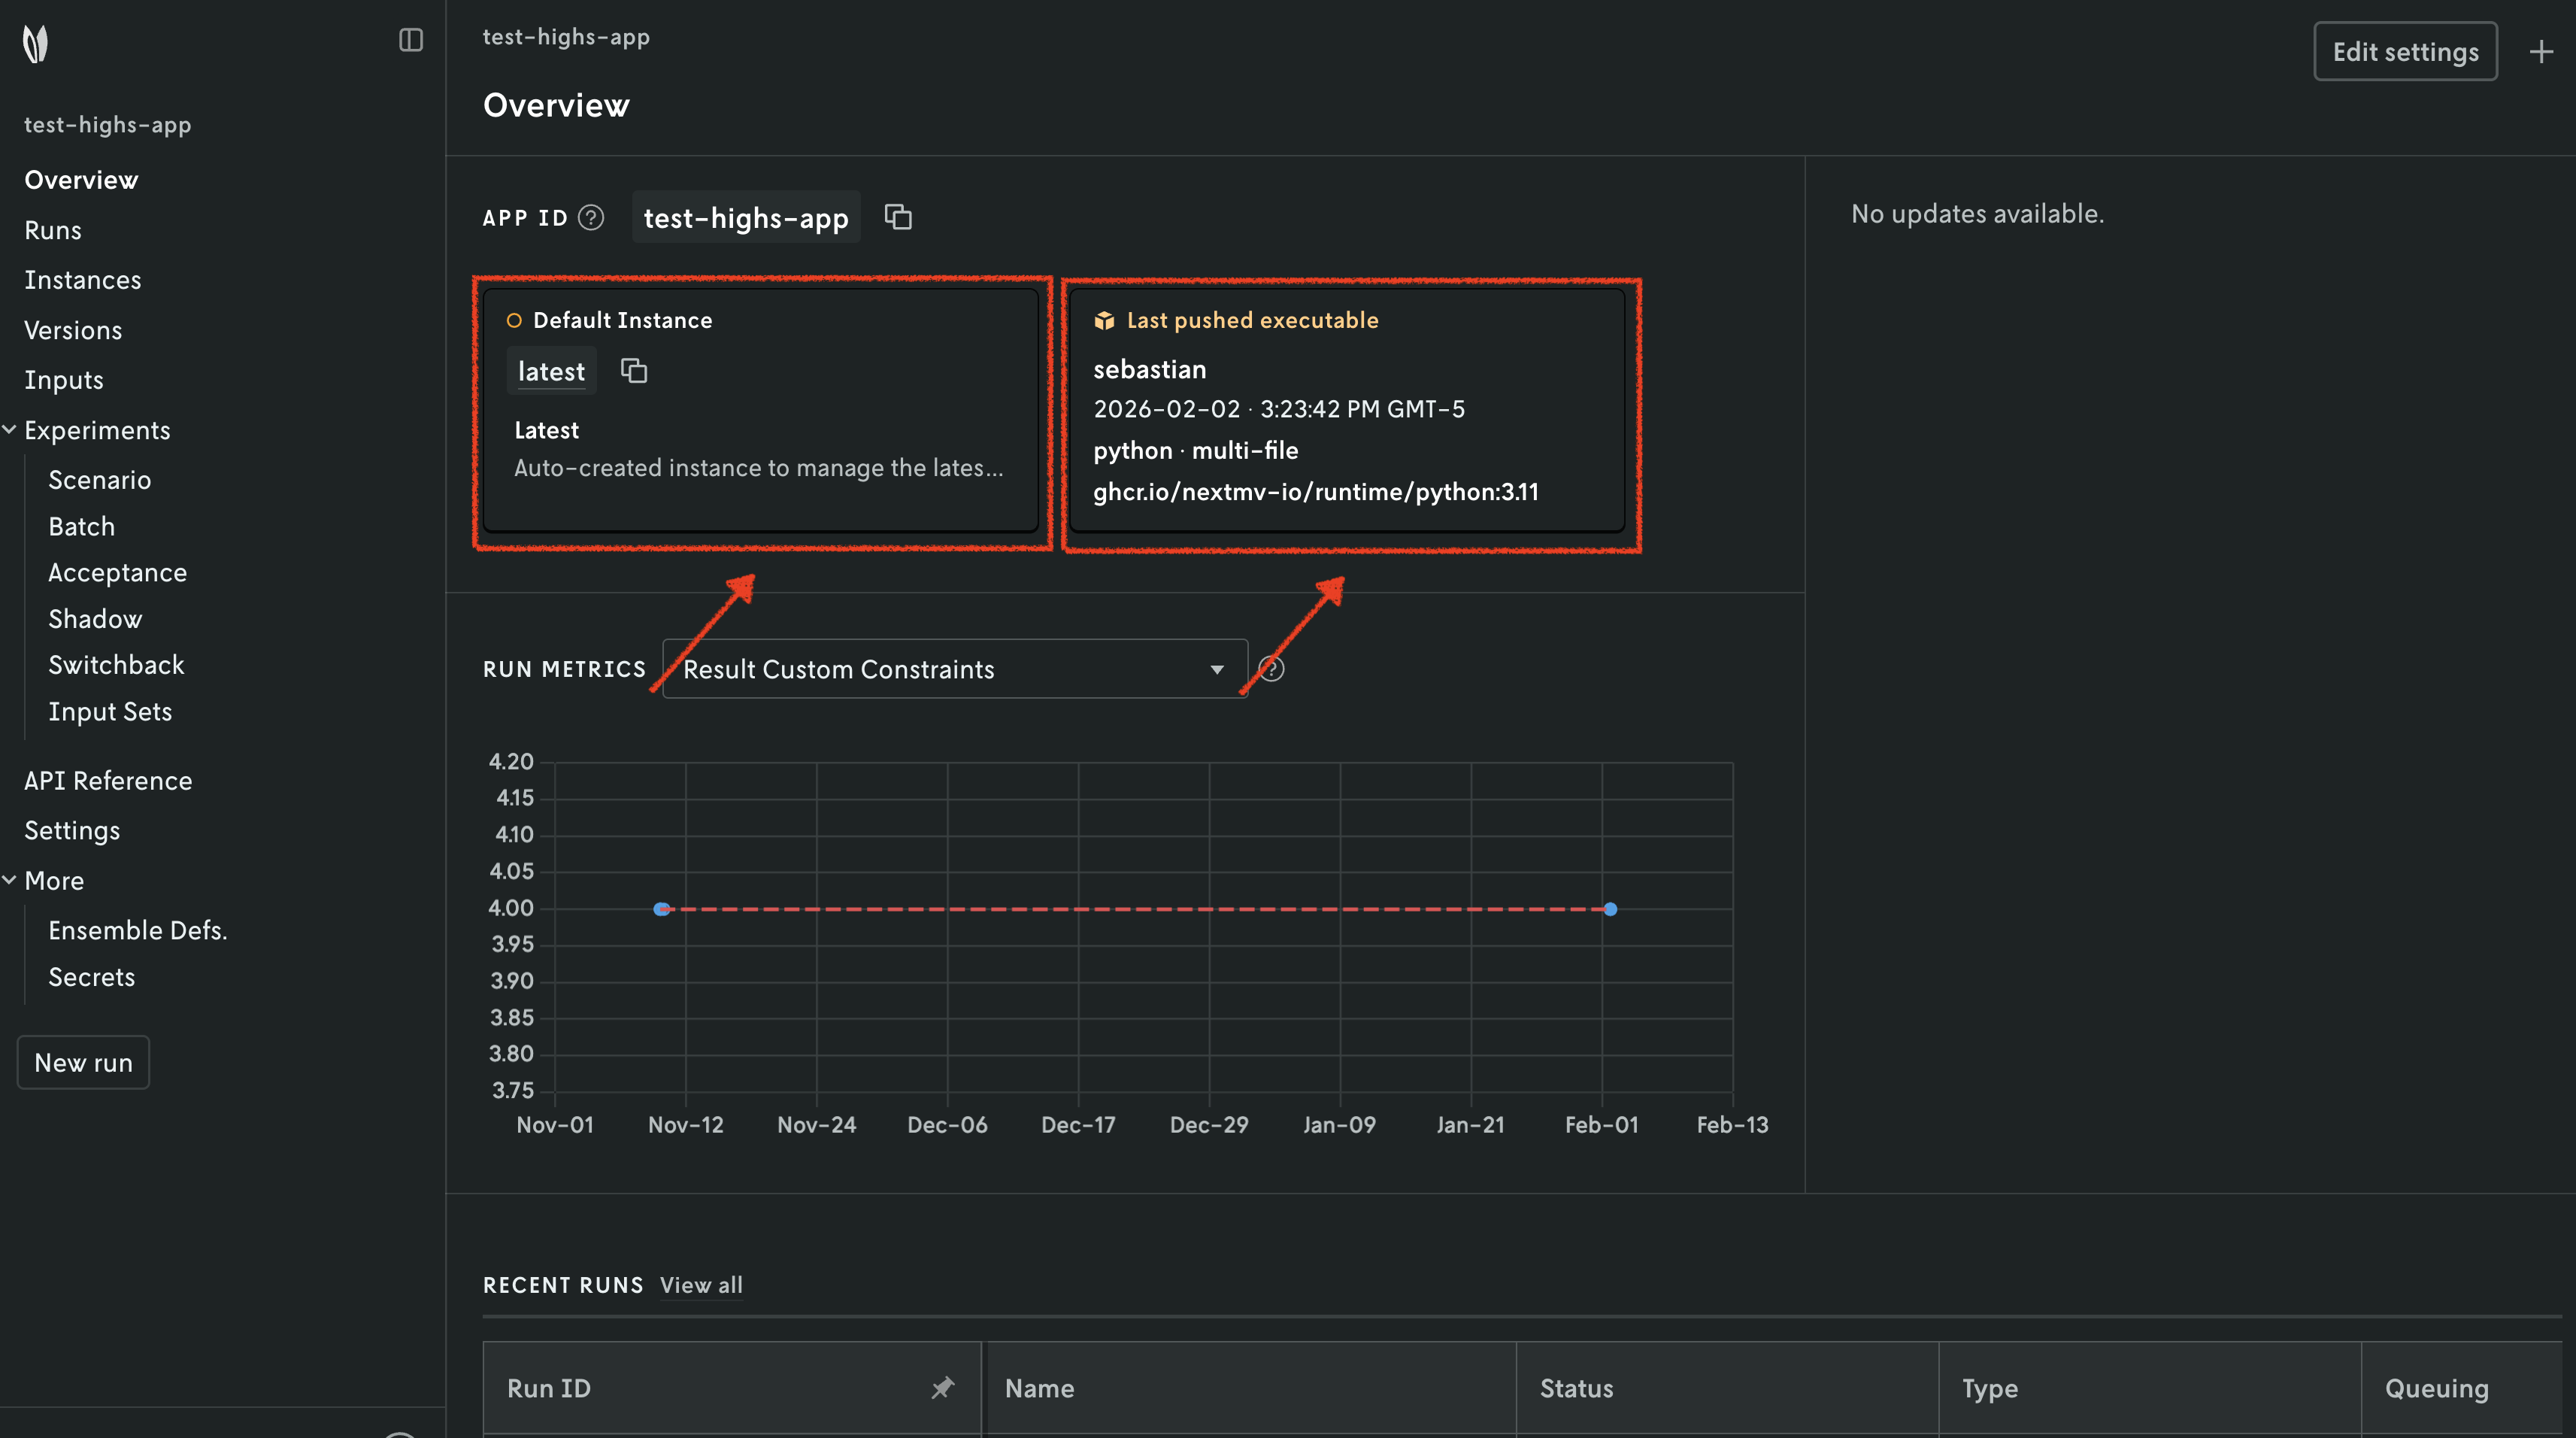
- There is now a pushed executable.
- There is an auto-created
latestinstance, assigned to the executable.
An instance is like the endpoint of the application.
10. Test the webhook
We are going to test the webhook by running the Nextmv application remotely. Here is the order of operations that will happen:
- We start a remote run of the Nextmv application.
- A webhook request is sent to the ngrok public URL. The
run.statusevent is triggered with the run status beingqueued. - The ngrok public URL redirects the request to the local server.
- Our local server receives and processes the webhook request.
- When the run status changes to
running, another webhook request is sent, repeating steps 3 and 4. - When the run status changes to
succeeded, another webhook request is sent, repeating steps 3 and 4.
In total, we will receive 3 webhook requests, one for each run status change.
You can run your Nextmv application using the Nextmv CLI. Here is an example command you can run from the root of the app.
✅ Run latest-GztfcZEDR created.
⏳ Getting run results...
💡 Removed assets from output for cleaner display, use --output to save the full output.
{
  "description": "",
  "id": "latest-GztfcZEDR",
  "metadata": {
    "application_id": "test-webhooks",
    "application_instance_id": "latest",
    "application_version_id": "",
    "created_at": "2026-07-20T20:44:40Z",
    "duration": 4566.0,
    "error": "",
    "execution_class": "6c9500mb870s",
    "execution_duration": 4130.0,
    "format": {
      "input": {
        "type": "json"
      },
      "output": {
        "type": "json"
      }
    },
    "initiated_at": "2026-07-20T20:44:40.778332Z",
    "input_size": 61.0,
    "metrics": {
      "message": "Hello, world",
      "value": 1.23
    },
    "options": {
      "active_options": {
        "details": "true"
      },
      "options_summary": [
        {
          "name": "details",
          "source": "version",
          "value": "true"
        }
      ]
    },
    "output_size": 25099.0,
    "queuing_disabled": false,
    "queuing_priority": 6,
    "run_type": {
      "type": "standard",
      "definition_id": "",
      "reference_id": ""
    },
    "runtime": "python-3_11",
    "status_v2": "succeeded"
  },
  "name": "",
  "user_email": "sebastian@nextmv.io",
  "console_url": "https://cloud.nextmv.io/app/test-webhooks/run/latest-GztfcZEDR?view=details",
  "output": {
    "options": {
      "details": true
    },
    "solution": {
      "message": "Hello, world"
    },
    "metrics": {
      "value": 1.23,
      "message": "Hello, world"
    }
  }
}
This command is saved as app4.sh in the full tutorial
code.
As soon as you run the command, you should see the two other terminal windows (ngrok and FastAPI server) receiving and processing the webhook requests. You should see output similar to the following:
{"event_type":"run.status","api_version":"2024-03-04","data":{"run_id":"latest-AZSEtZEDg","status":"running","status_v2":"queued","created_at":"2026-07-20T21:03:08Z","duration":0,"input_size":61,"output_size":0,"error":null,"application_id":"test-webhooks","application_instance_id":"latest","application_version_id":""}}
▕  18.189.36.125:0 - "POST /webhookhandler HTTP/1.1" 200
{"event_type":"run.status","api_version":"2024-03-04","data":{"run_id":"latest-AZSEtZEDg","status":"running","status_v2":"running","created_at":"2026-07-20T21:03:08Z","duration":0,"input_size":61,"output_size":0,"error":null,"application_id":"test-webhooks","application_instance_id":"latest","application_version_id":""}}
▕  18.189.36.125:0 - "POST /webhookhandler HTTP/1.1" 200
{"event_type":"run.status","api_version":"2024-03-04","data":{"run_id":"latest-AZSEtZEDg","status":"succeeded","status_v2":"succeeded","created_at":"2026-07-20T21:03:08Z","duration":4091,"input_size":61,"output_size":25099,"error":null,"application_id":"test-webhooks","application_instance_id":"latest","application_version_id":""}}
▕  18.189.36.125:0 - "POST /webhookhandler HTTP/1.1" 200
You can inspect the conversations of the webhook. A conversation is the request to and the response from the registered endpoint.
{
  "items": [
    {
      "id": "conv-1",
      "webhook_id": "test_webhook_handler",
      "created_at": "2026-07-20T21:03:13Z",
      "http_status": 200,
      "response_duration": null,
      "error": null,
      "status": "succeeded"
    },
    {
      "id": "conv-2",
      "webhook_id": "test_webhook_handler",
      "created_at": "2026-07-20T21:03:10Z",
      "http_status": 200,
      "response_duration": null,
      "error": null,
      "status": "succeeded"
    },
    {
      "id": "conv-3",
      "webhook_id": "test_webhook_handler",
      "created_at": "2026-07-20T21:03:09Z",
      "http_status": 200,
      "response_duration": null,
      "error": null,
      "status": "succeeded"
    }
  ]
}
If we inspect the most recent conversation, we can see the request and response that was processed by the webhook.
{
  "id": "conv-1",
  "webhook_id": "test_webhook_handler",
  "created_at": "2026-07-20T21:03:13Z",
  "http_status": 200,
  "response_duration": 175,
  "endpoint_url": "https://<YOUR-NGROK-DOMAIN>/webhookhandler",
  "request_body": {
    "event_type": "run.status",
    "api_version": "2024-03-04",
    "data": {
      "run_id": "latest-AZSEtZEDg",
      "status": "succeeded",
      "status_v2": "succeeded",
      "created_at": "2026-07-20T21:03:08Z",
      "duration": 4091,
      "input_size": 61,
      "output_size": 25099,
      "error": null,
      "application_id": "test-webhooks",
      "application_instance_id": "latest",
      "application_version_id": ""
    }
  },
  "response_body": "{\"message\":\"Webhook received!\",\"body\":\"{\\\"event_type\\\":\\\"run.status\\\",\\\"api_version\\\":\\\"2024-03-04\\\",\\\"data\\\":{\\\"run_id\\\":\\\"latest-AZSEtZEDg\\\",\\\"status\\\":\\\"succeeded\\\",\\\"status_v2\\\":\\\"succeeded\\\",\\\"created_at\\\":\\\"2026-07-20T21:03:08Z\\\",\\\"duration\\\":4091,\\\"input_size\\\":61,\\\"output_size\\\":25099,\\\"error\\\":null,\\\"application_id\\\":\\\"test-webhooks\\\",\\\"application_instance_id\\\":\\\"latest\\\",\\\"application_version_id\\\":\\\"\\\"}}\"}",
  "error": null,
  "status": "succeeded"
}
🎉🎉🎉 Congratulations, you have finished this tutorial!
Full tutorial code
You can find the consolidated code examples used in this tutorial in the
tutorials GitHub repository. The webhooks
dir contains all the code that was shown in this tutorial.
Go into the directory for instructions about running the decision model.