Explore Nextmv with a new model and the CLI
⌛️ Approximate time to complete: 15 min.
In this tutorial you will learn how to use the Nextmv CLI and community apps to explore new decision models and the Nextmv Platform, from scratch. Complete this tutorial if you:
- Don’t have a pre-existing decision model and you want to explore the Nextmv Platform.
- Are fluent using a language of your preference, such as Python, Java, Go, etc.
Community apps are Nextmv applications that showcase how to solve different decision problems with various languages and solvers. They are a great way to explore new decision models and the Nextmv Platform. You can think of community apps as examples that serve as strong references when building and customizing your own decision models.
At a high level, this tutorial will go through the following steps:
- Clone a community app locally.
- Push the model to Nextmv Cloud.
- Run the model remotely.
- Perform scenario testing.
You may follow along with the full tutorial code. Let’s dive right in 🤿.
1. Create an account
The full suite of benefits starts with a Nextmv Cloud account.
- Visit the Nextmv Console to sign up for an account at https://cloud.nextmv.io.
- Fill out the form. A member of the Nextmv team will reach out to you to complete the sign-up process.
- Log in to your account. The Nextmv Console is ready to use!
Once you have logged in to your account, you need to fetch your API key. You can do so from your settings.
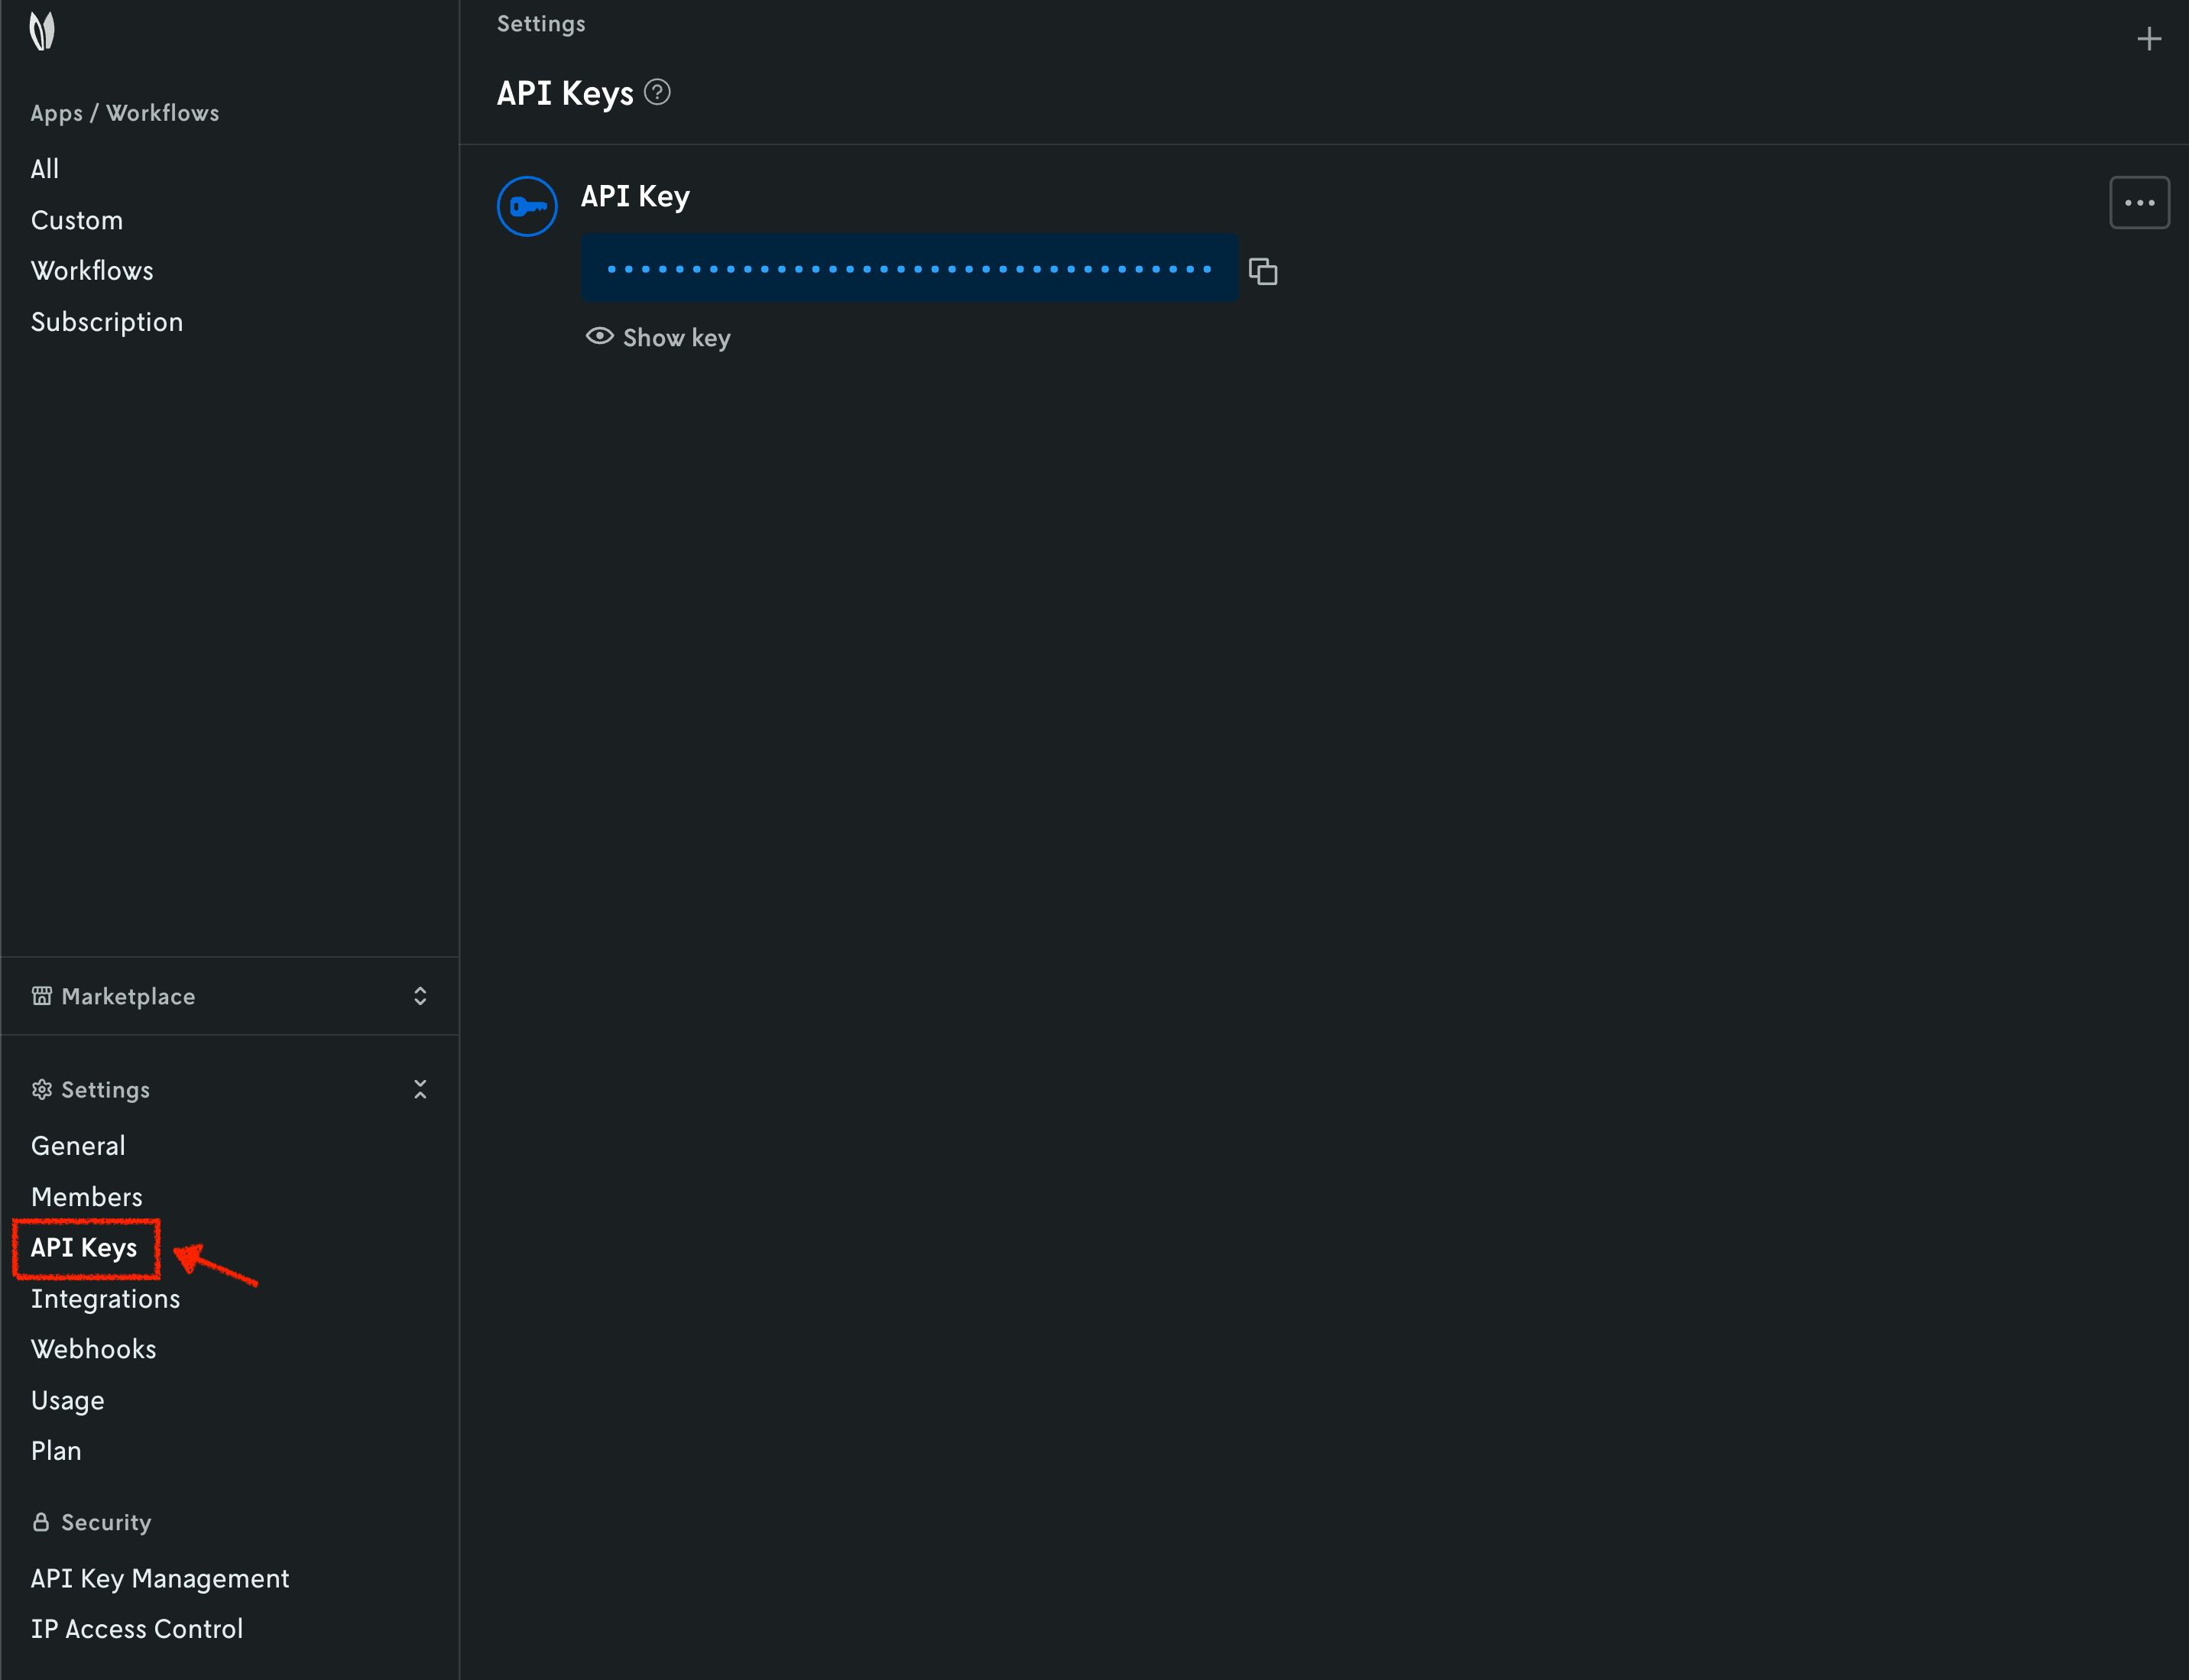
When you have your API key, it is convenient to save it as an environment variable so that you can use it for the rest of this tutorial.
2. Install the Nextmv CLI
Please see the Nextmv CLI installation guide.
3. Clone a community app
To work with community apps you have two options:
- Clone the GitHub repository locally.
- Use the Nextmv CLI to clone a specific community app.
This tutorial will use the second option.
You can list the available community apps with the following command:
┏━━━━━━━━━━━━━━━━━━━━━━━━━━━┳━━━━━━━━┳━━━━━━━━━━━━━┳━━━━━━━━━━━━━━━━━━━━━━━━━━━┓
┃ Name                      ┃ Type   ┃ Latest      ┃ Description               ┃
┡━━━━━━━━━━━━━━━━━━━━━━━━━━━╇━━━━━━━━╇━━━━━━━━━━━━━╇━━━━━━━━━━━━━━━━━━━━━━━━━━━┩
│ go-hello-world            │ go     │ v20251006.0 │ Get started with Go and   │
│                           │        │             │ Nextmv.                   │
│ go-highs-knapsack         │ go     │ v20251006.0 │ Use Go and HiGHS -        │
│                           │        │             │ knapsack.                 │
│ ...                       │ ...    │ ...         │ ...                       │
│ python-highs-knapsack     │ python │ ...         │ Use Python and HiGHS -    │
│                           │        │             │ knapsack.                 │
│ ...                       │ ...    │ ...         │ ...                       │
└───────────────────────────┴────────┴─────────────┴───────────────────────────┘
Info
The exact list of community apps, their versions, and the table formatting may vary depending on the version of the CLI and the available community apps at the time.
This command is saved as app1.sh in the full tutorial
code.
For this tutorial, we will be using the python-highs-knapsack community app,
which solves a knapsack problem using the HiGHS solver and Python. To clone
this community app, run the following command:
This command is saved as app2.sh in the full tutorial
code.
Once the app has been cloned, you should see a structure similar to the following:
python-highs-knapsack
├── app.yaml
├── input.json
├── LICENSE
├── main.ipynb
├── main.py
├── pyproject.toml
├── README.md
├── requirements.txt
└── uv.lock
4. Run the community app locally
You can run the executable code locally to verify that everything is working as
expected. Each community app comes with a README.md file that contains
detailed instructions on how to run the app locally. Let’s follow those steps to
run the app.
-
Make sure you are standing at the root of the cloned community app, where the
app.yamlmanifest is located. You may have tocdinto thepython-highs-knapsackdirectory if you haven't already. -
Sync the project.
-
Run the app:
Solving knapsack problem:
  - items: 11
  - capacity: 50
{
  "options": {
    "duration": 30
  },
  "solution": {
    "items": [
      {
        "id": "cat",
        "value": 100,
        "weight": 20
      },
      {
        "id": "water",
        "value": 40,
        "weight": 2
      },
      {
        "id": "phone",
        "value": 6,
        "weight": 1
      },
      {
        "id": "book",
        "value": 63,
        "weight": 10
      },
      {
        "id": "rx",
        "value": 81,
        "weight": 1
      },
      {
        "id": "coat",
        "value": 44,
        "weight": 9
      },
      {
        "id": "keys",
        "value": 92,
        "weight": 1
      },
      {
        "id": "nuts",
        "value": 18,
        "weight": 4
      }
    ]
  },
  "assets": [],
  "metrics": {
    "duration": 0.0006861686706542969,
    "value": 444,
    "status": "HighsStatus.kOk",
    "variables": 11,
    "constraints": 1,
    "solver_version": "1.9.0"
  }
}
5. Create your Nextmv Cloud application
Tip
Go to the Applications section to learn more about Nextmv applications.
Run the following command:
⏳ Creating or getting application...
{
  "id": "test-community-app",
  "name": "test-community-app",
  "description": "",
  "type": "custom",
  "default_instance": "latest",
  "default_experiment_instance": "",
  "subscription_id": "",
  "locked": false,
  "created_at": "2026-07-09T18:40:36.158310Z",
  "updated_at": "2026-07-09T18:42:58.375241Z"
}
This will create a new application in Nextmv Cloud. Note that the name and app
ID can be different, but for simplicity this tutorial uses the same name and
app ID. This command is saved as app3.sh in the full tutorial
code. You can also create applications directly from
Nextmv Console.
You can go to the Apps section in the Nextmv Console where you will see your applications.
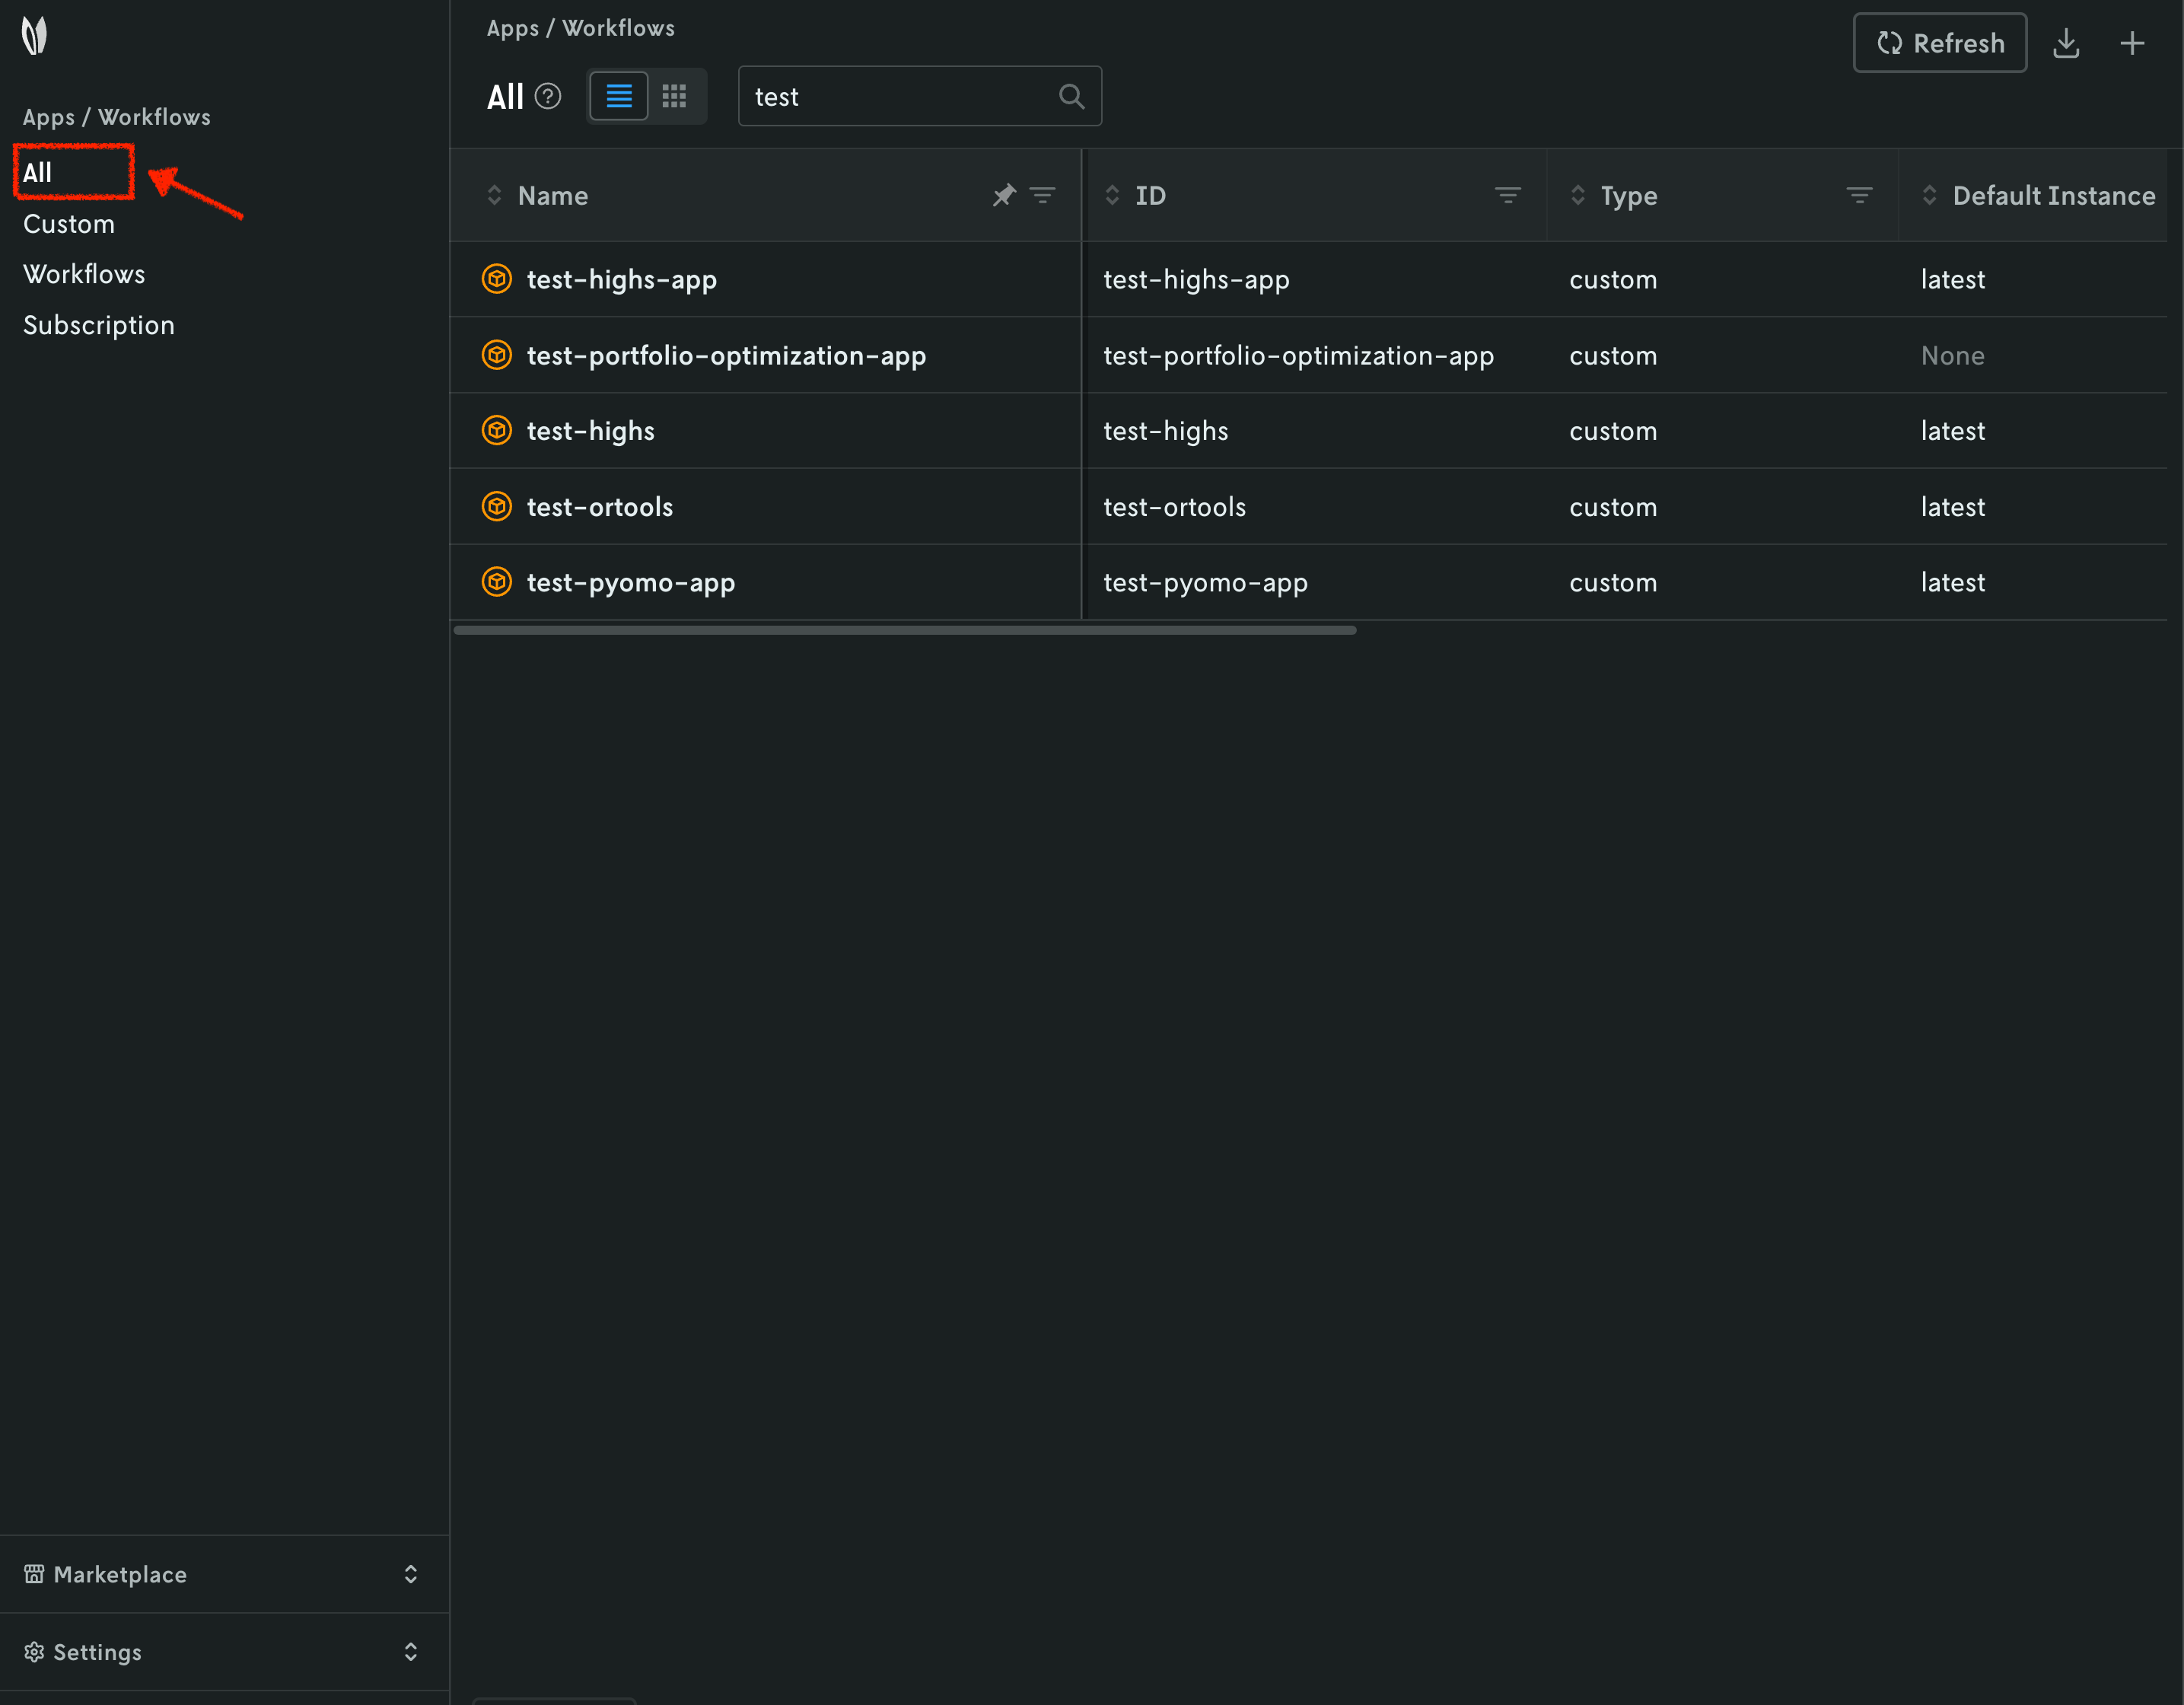
6. Push your Nextmv application
So far, your application has run locally. You are going to push your app to Nextmv Cloud. Once an application has been pushed, you can run it remotely, perform testing, experimentation, and much more. Pushing is the equivalent of deploying an application, this is, taking the executable code and sending it to Nextmv Cloud.
At the root of your local project (where the app.yaml manifest is located),
deploy your app (push it) to Nextmv Cloud:
💽 Starting build for Nextmv application.
🐍 Bundling Python dependencies.
📋 Copied files listed in "app.yaml" manifest.
📦 Packaged application (25.49 MiB, 2120 files).
🌟 Pushing to application: "test-community-app".
💥️ Successfully pushed to application: "test-community-app".
{
  "app_id": "test-community-app",
  "endpoint": "api.cloud.nextmv.io",
  "instance_url": "https://api.cloud.nextmv.io/v1/applications/test-community-app/runs?instance_id=latest"
}
This command is saved as app4.sh in the full tutorial
code.
You can go to the Apps section in the Nextmv Console where you will see your application. You can click on it to see more details. Once you are in the overview of the application in the Nextmv Console, it should show the following:
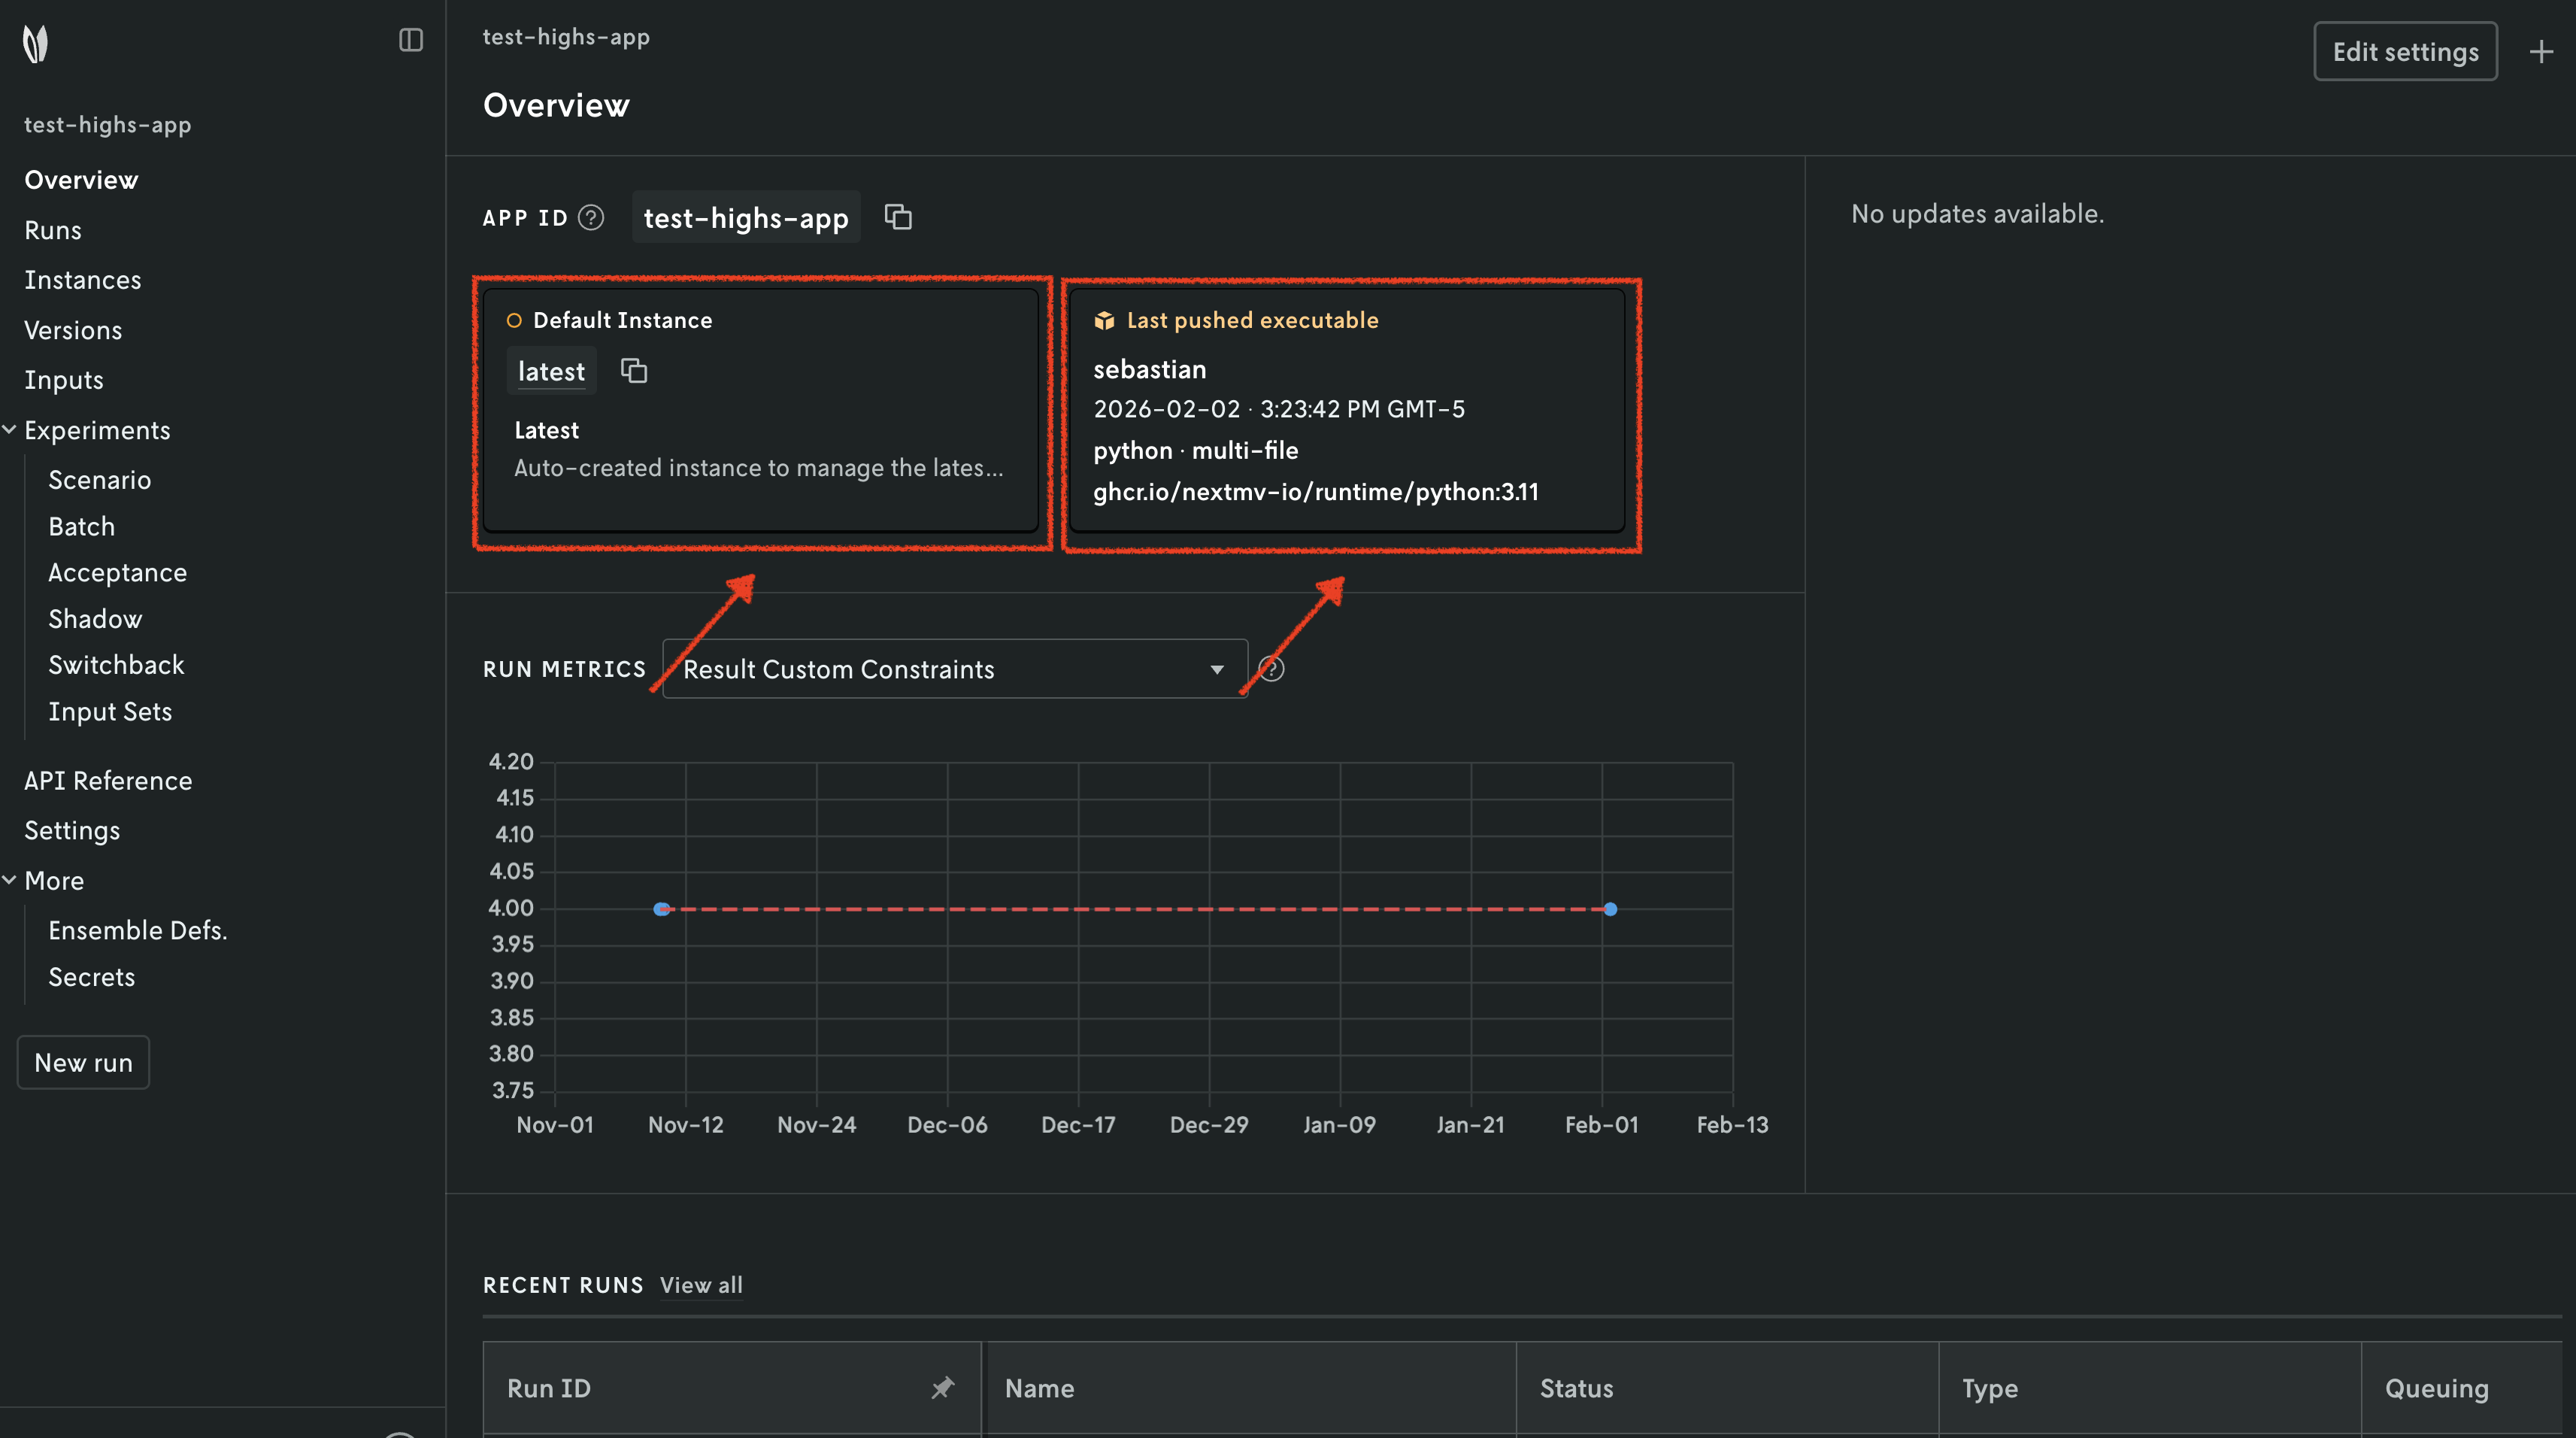
- There is now a pushed executable.
- There is an auto-created
latestinstance, assigned to the executable.
An instance is like the endpoint of the application.
7. Run the Nextmv application remotely
To run the Nextmv application remotely, you have several options. For this tutorial, we will be using the Nextmv Console and CLI.
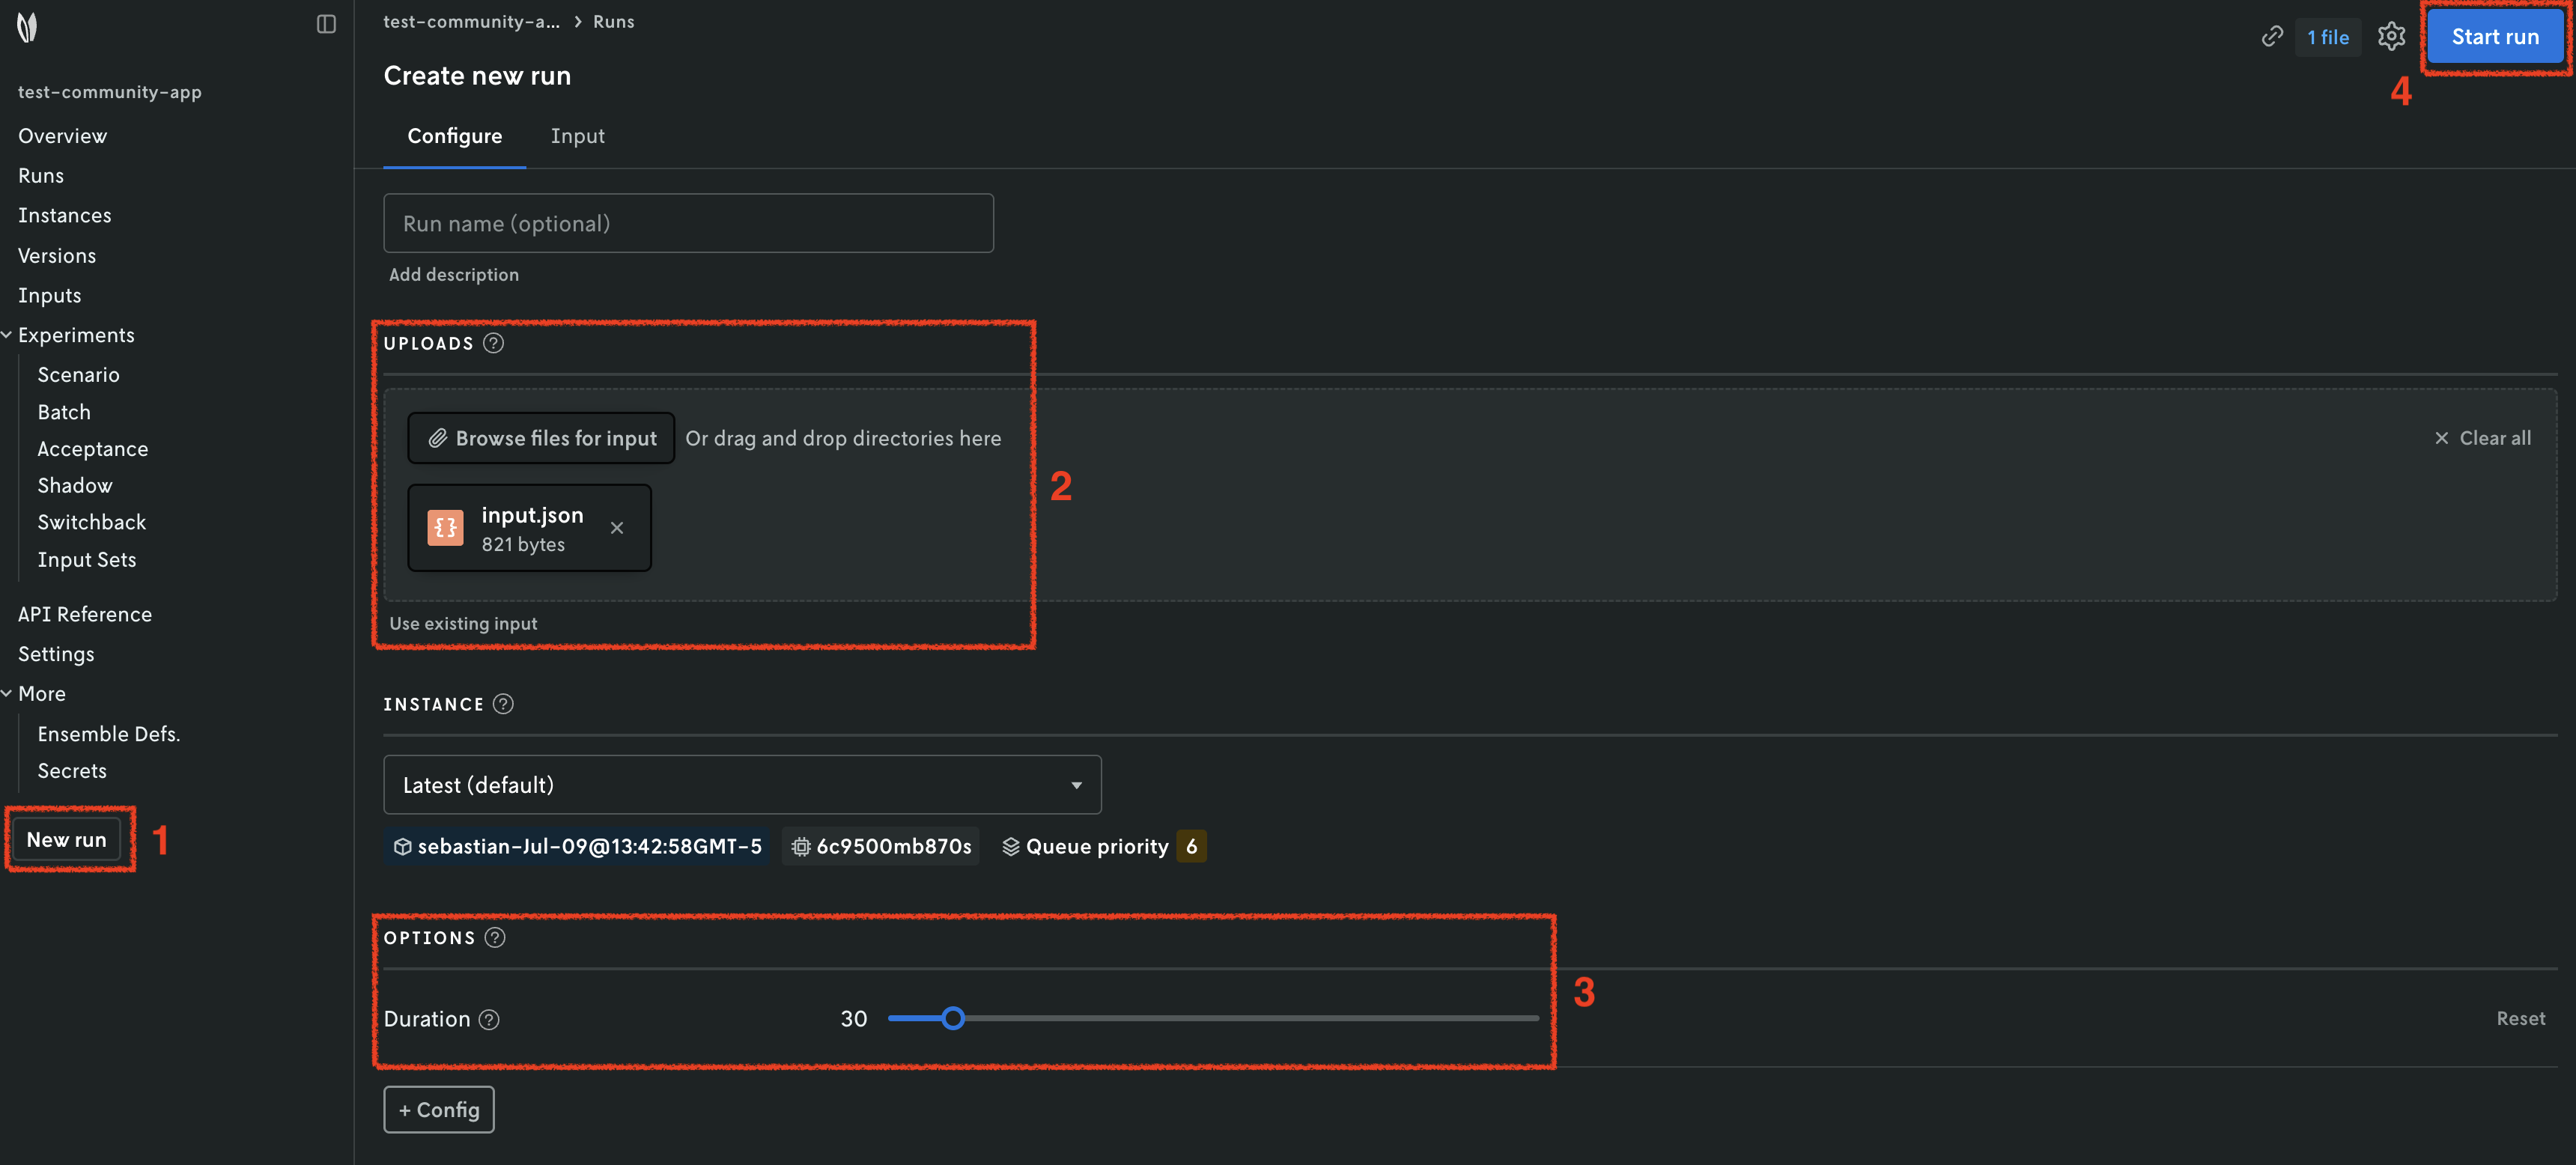
In the Nextmv Console, in the app overview page:
- Press the
New runbutton. - Drop the data files that you want to use. You will get a preview of the
data. You can drop the
input.jsonfile that comes with the community app. - Optionally, configure your run according to the options that can be passed.
In this case, you can configure the
duration. - Start the run.
You can use the Nextmv Console to browse the information of the run:
- Summary
- Output
- Input
- Metadata
- Logs
Nextmv is built for collaboration, so you can invite team members to your account and share run URLs.
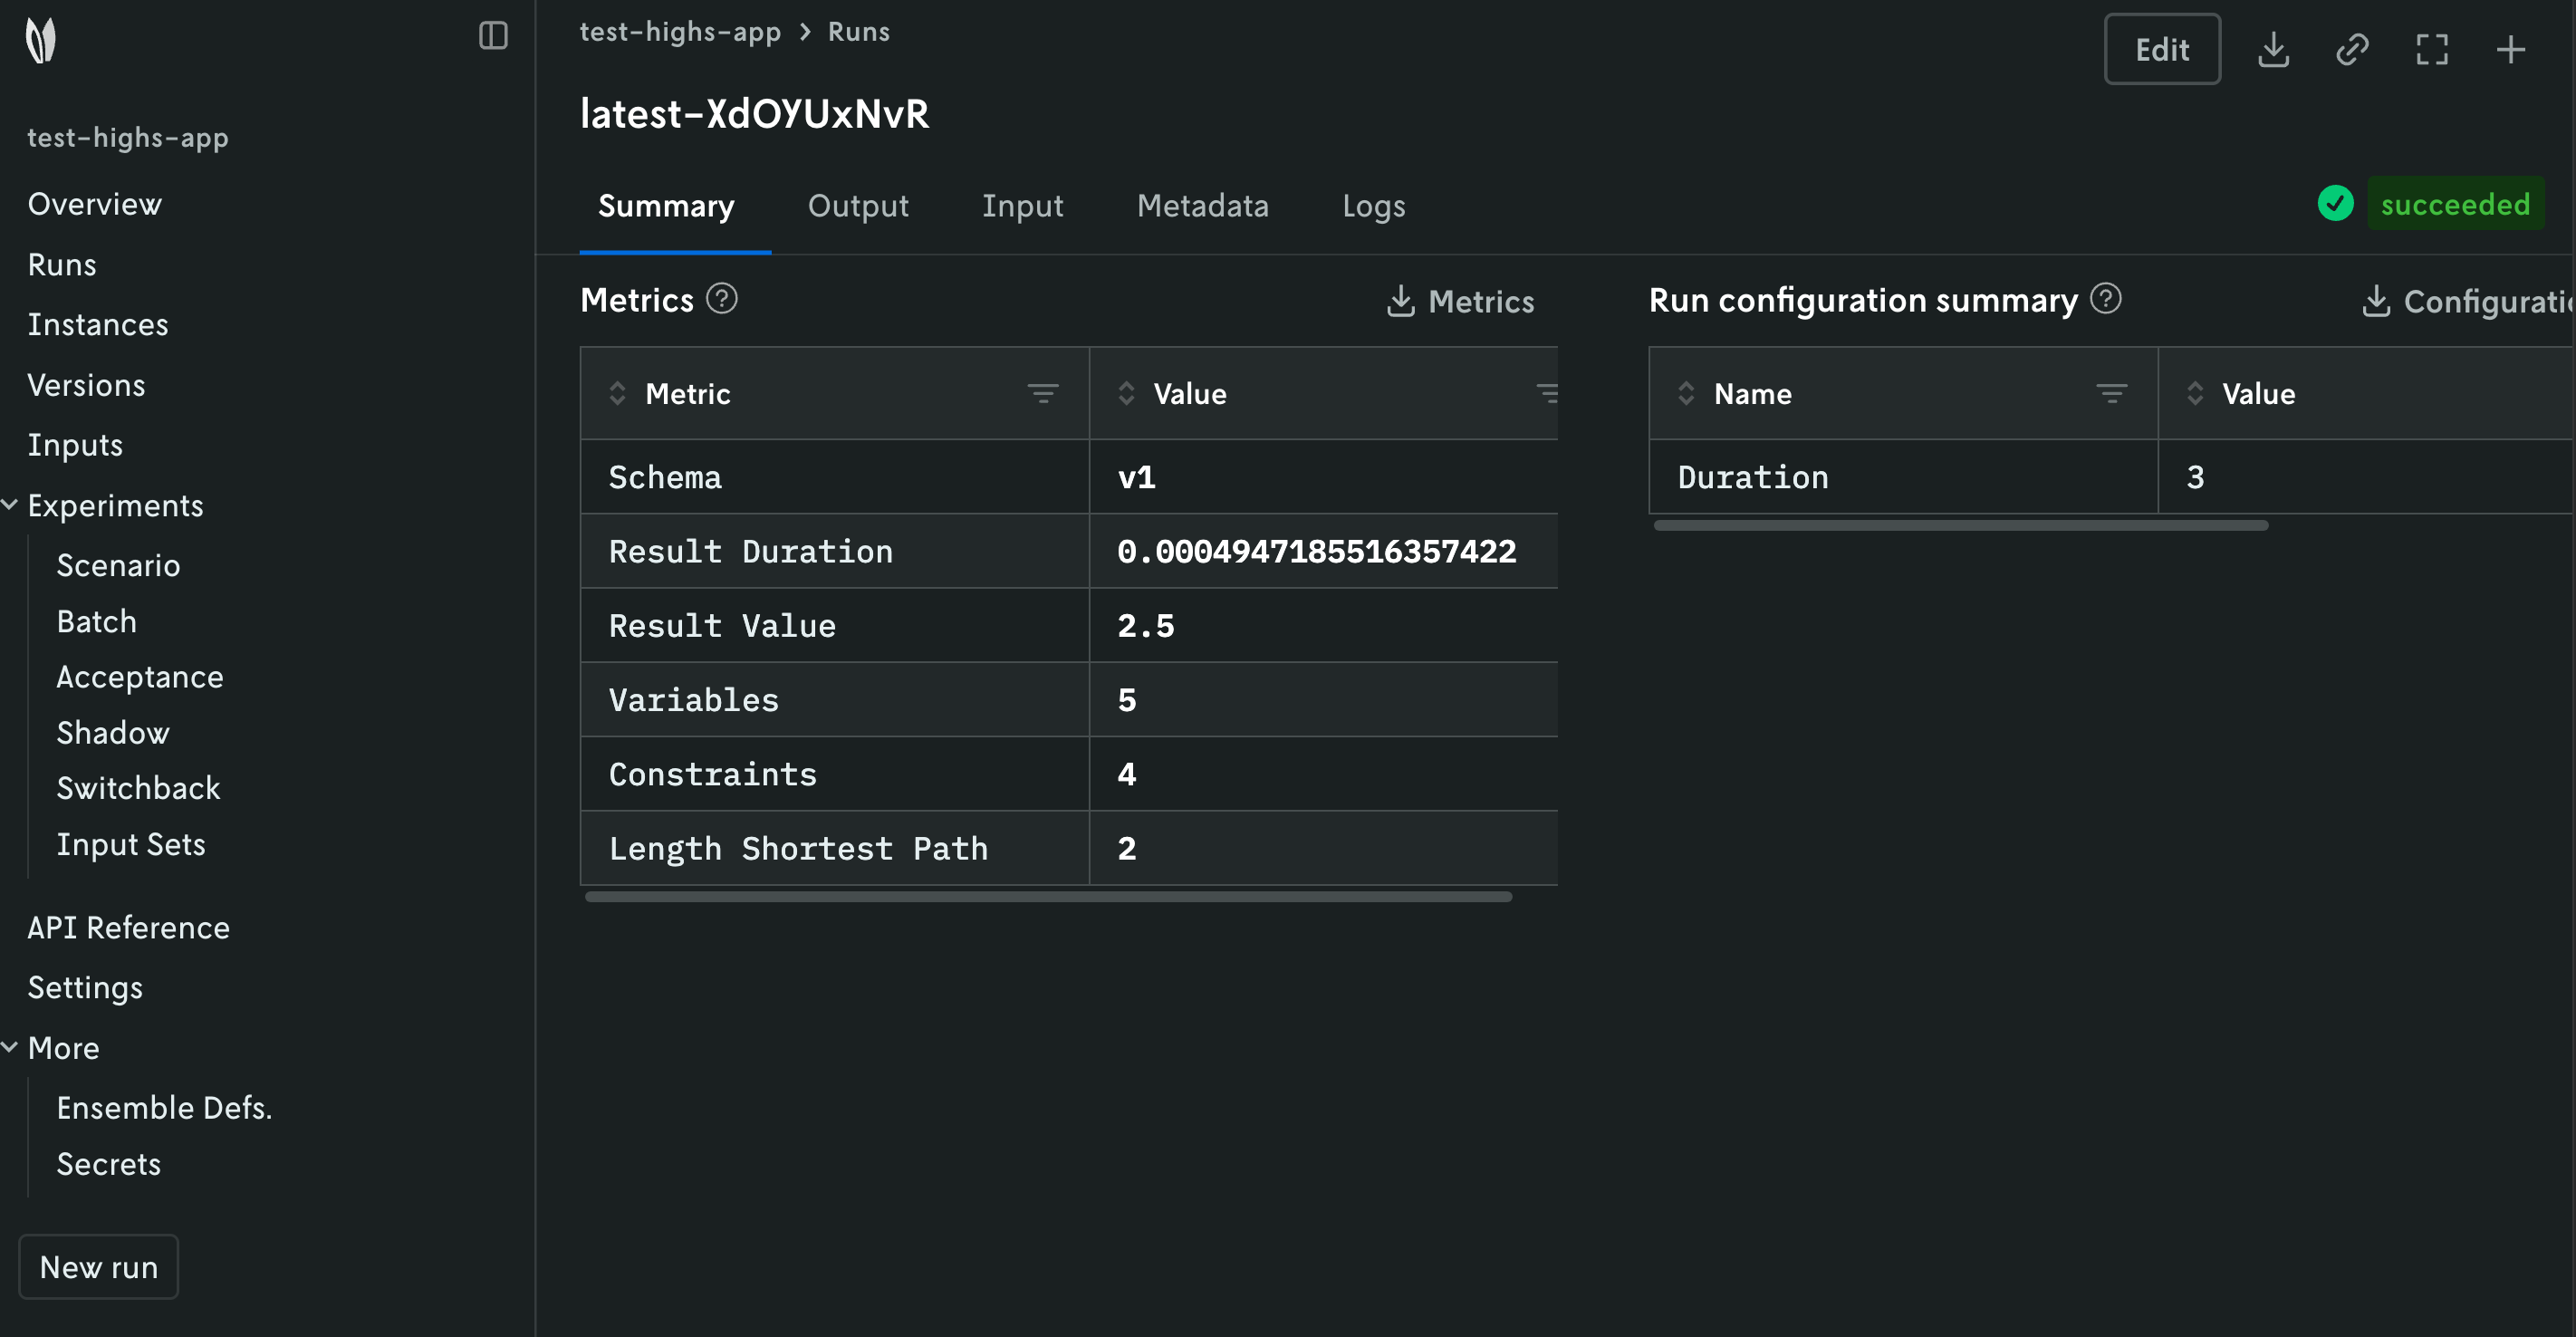
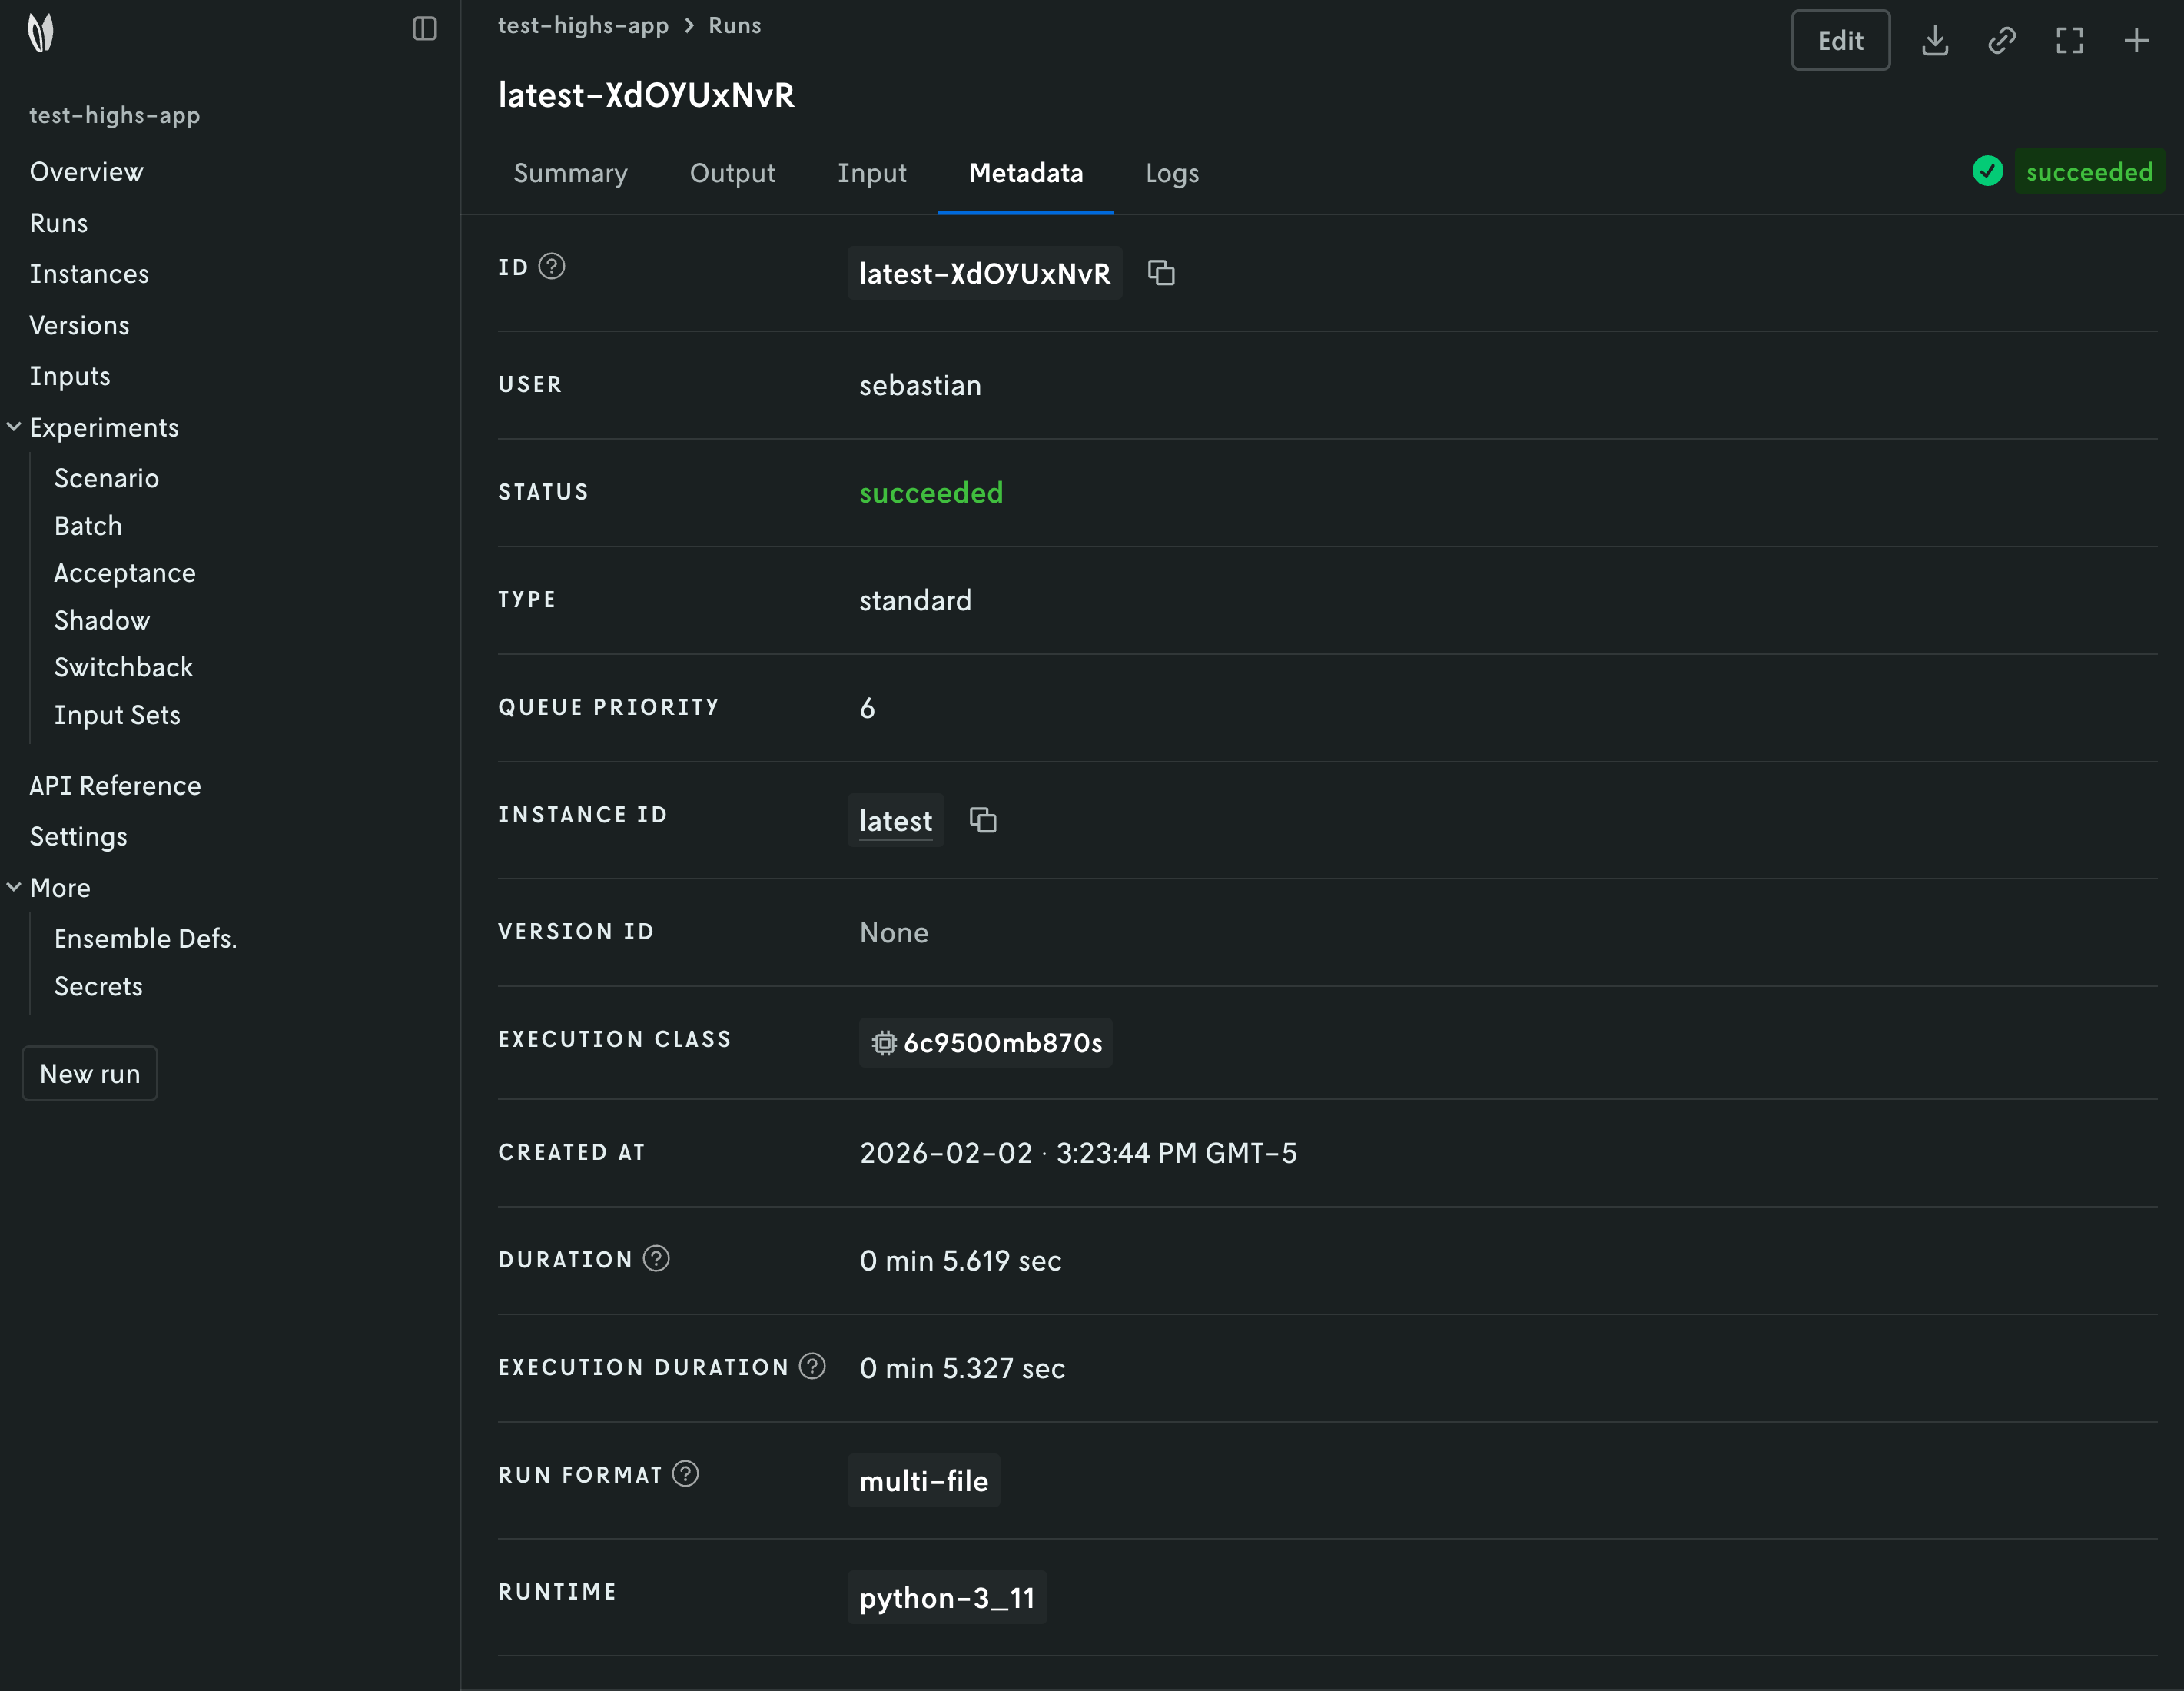
Alternatively, you can run your Nextmv application using the Nextmv CLI. Here is an example command you can run from the root of the app.
This command is saved as app5.sh in the full tutorial
code.
8. Perform a scenario test
We are going to take full advantage of the Nextmv Platform by creating a scenario test. Scenario tests are generally used as an exploratory test to understand the impacts to business metrics (or KPIs) on situations such as:
- Updating a model with a new feature, such as an additional constraint.
- Comparing how the same model performs in different conditions, such as low demand vs. high demand.
- Doing a sensitivity analysis to understand how the model behaves when changing a parameter.
Start by creating an input set. As the name suggests, it is a set of inputs, and it serves as a base so that we can perform runs varying one or more configurations (options). To create an input set, you have several options. For this tutorial, we will be using the Nextmv Console and CLI.
- Navigate to the
Input setssection. - Set a name for your input set.
- Use the
Instance + date rangecreation type given that we already have a few runs on thelatestinstance. - Create the input set.
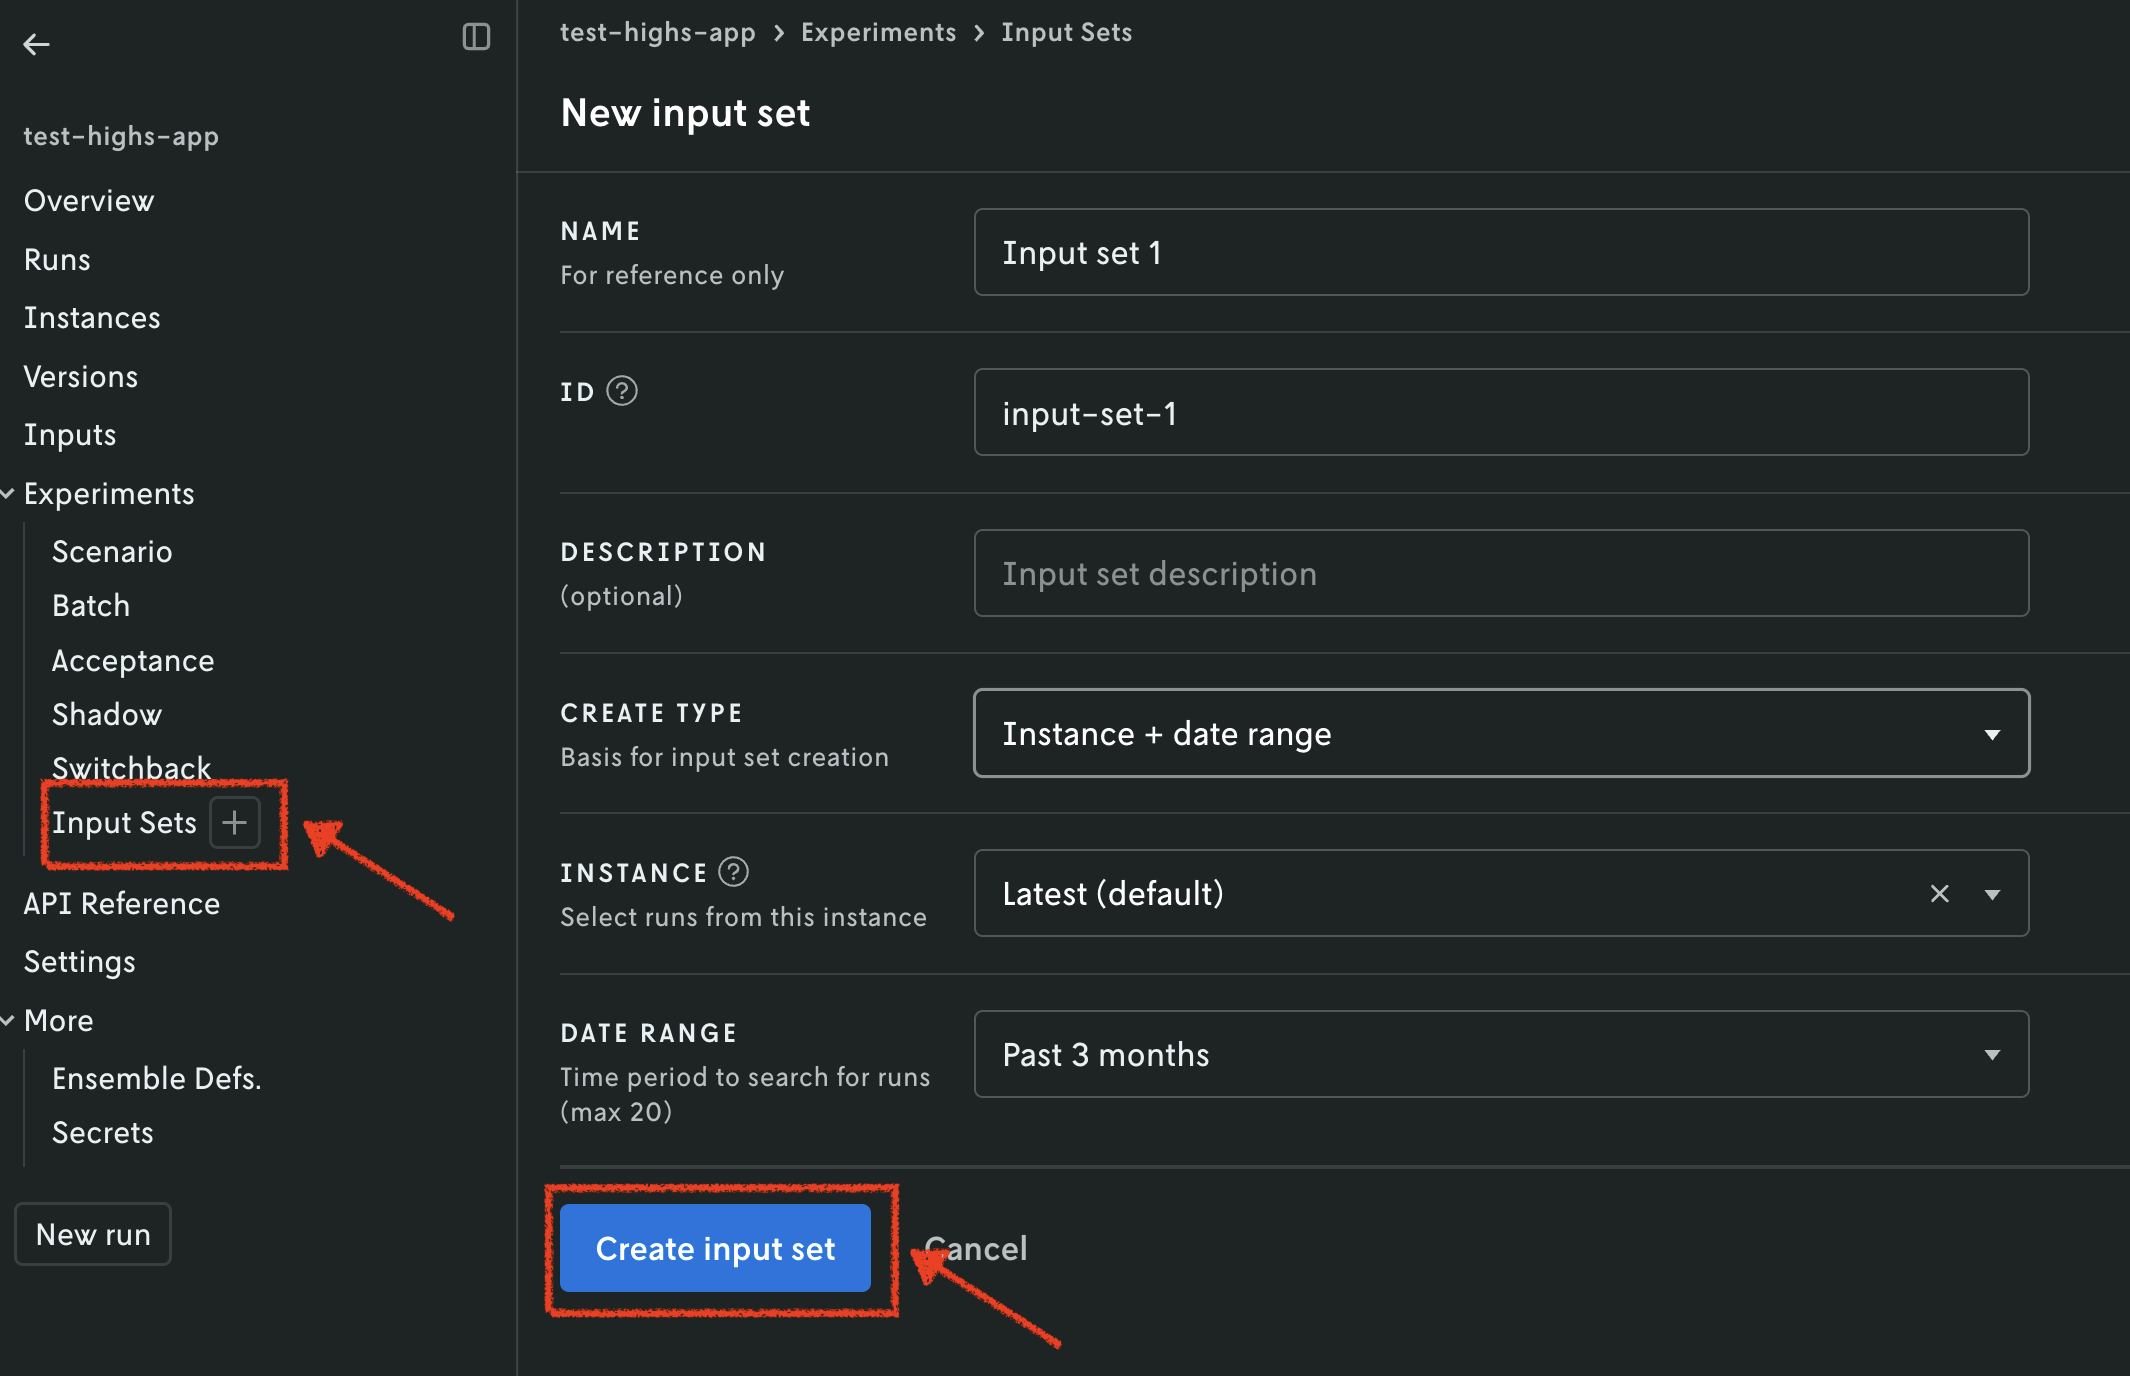
Another option for creating the input set is using the Nextmv CLI. Here is an example command.
This command is saved as app6.sh in the full tutorial
code.
Once your input set has been created, we are going to create a scenario test. Similarly to runs and input sets, you may use the Console or CLI, amongst other options. We will continue to use both in this tutorial.
- Navigate to the
Scenariosection. - Set a name for your scenario test.
- Select the input set you just created in the previous step.
- Select the
latestinstance. - Create configuration combinations, which will be factored in to create the
scenarios. We are setting
durationto be 5, 10, 20 and 30 seconds. - Optionally, you may configure repetitions. These are useful when the results are not deterministic.
- Create the scenario test. Review and confirm the number of scenarios that will be created.
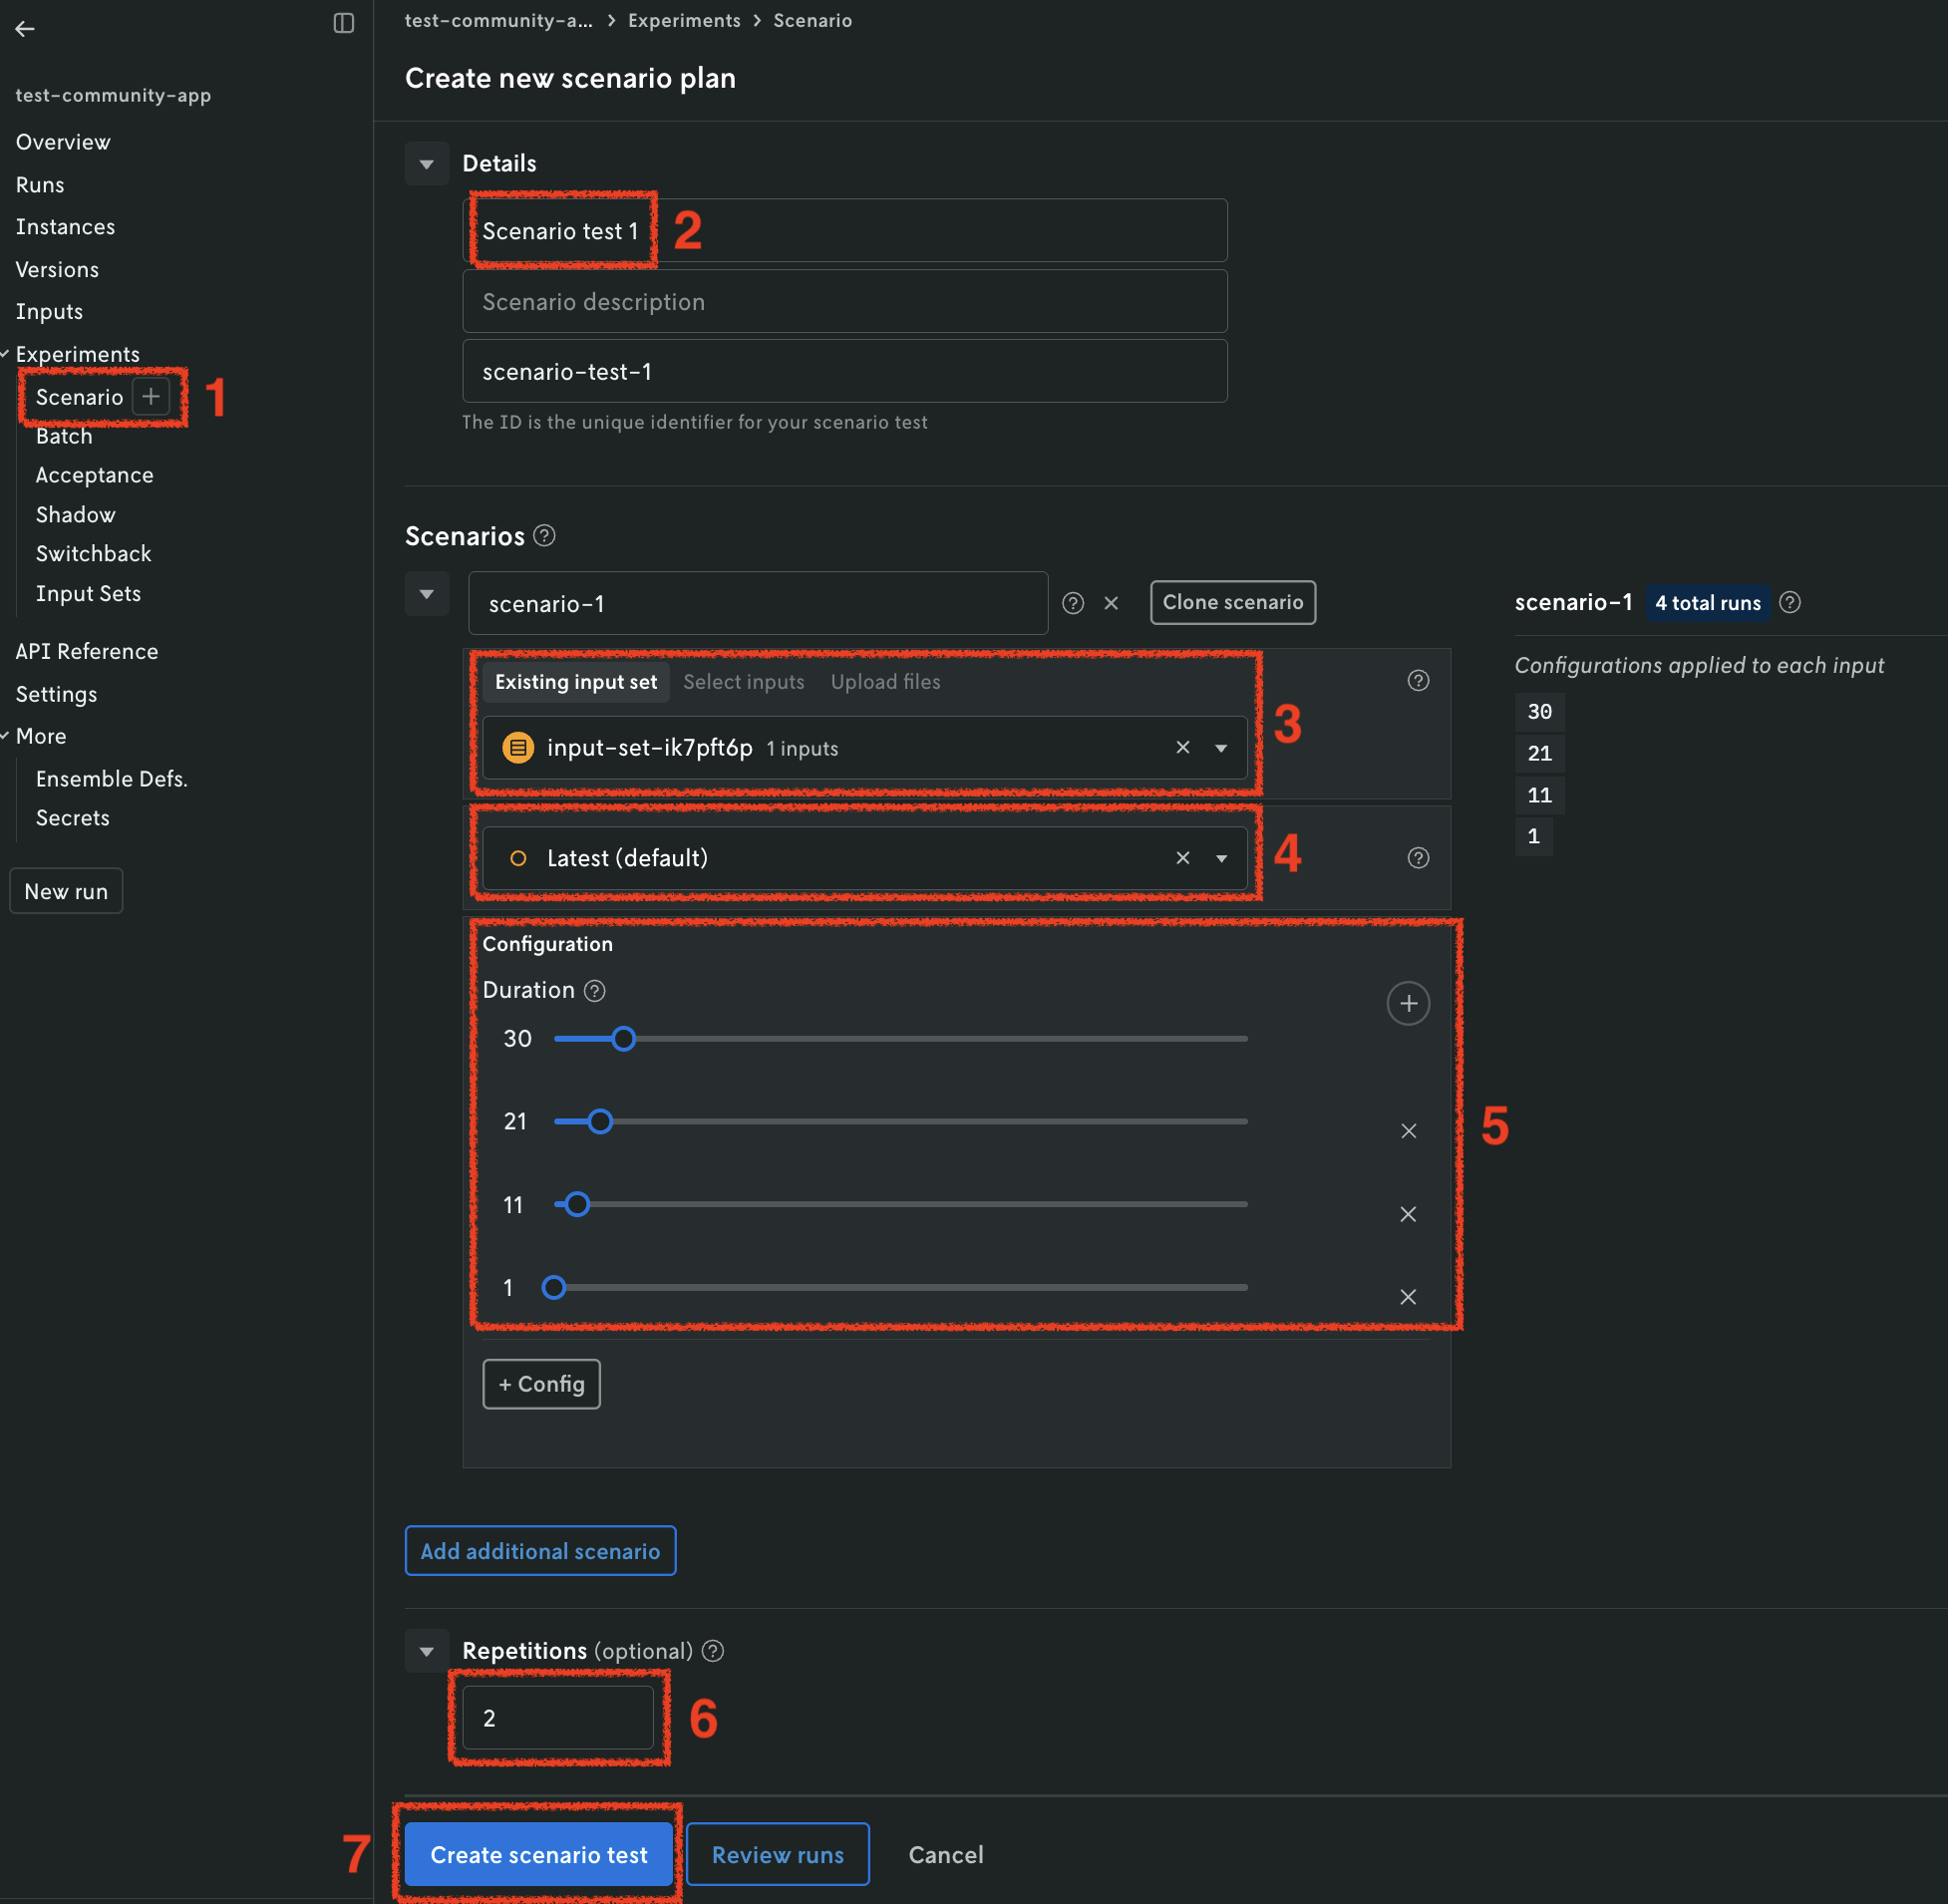
Once all the runs in the scenario test are completed, you can visualize the result of the test. A pivot table is provided to create useful comparisons of your metrics across the scenario test runs.
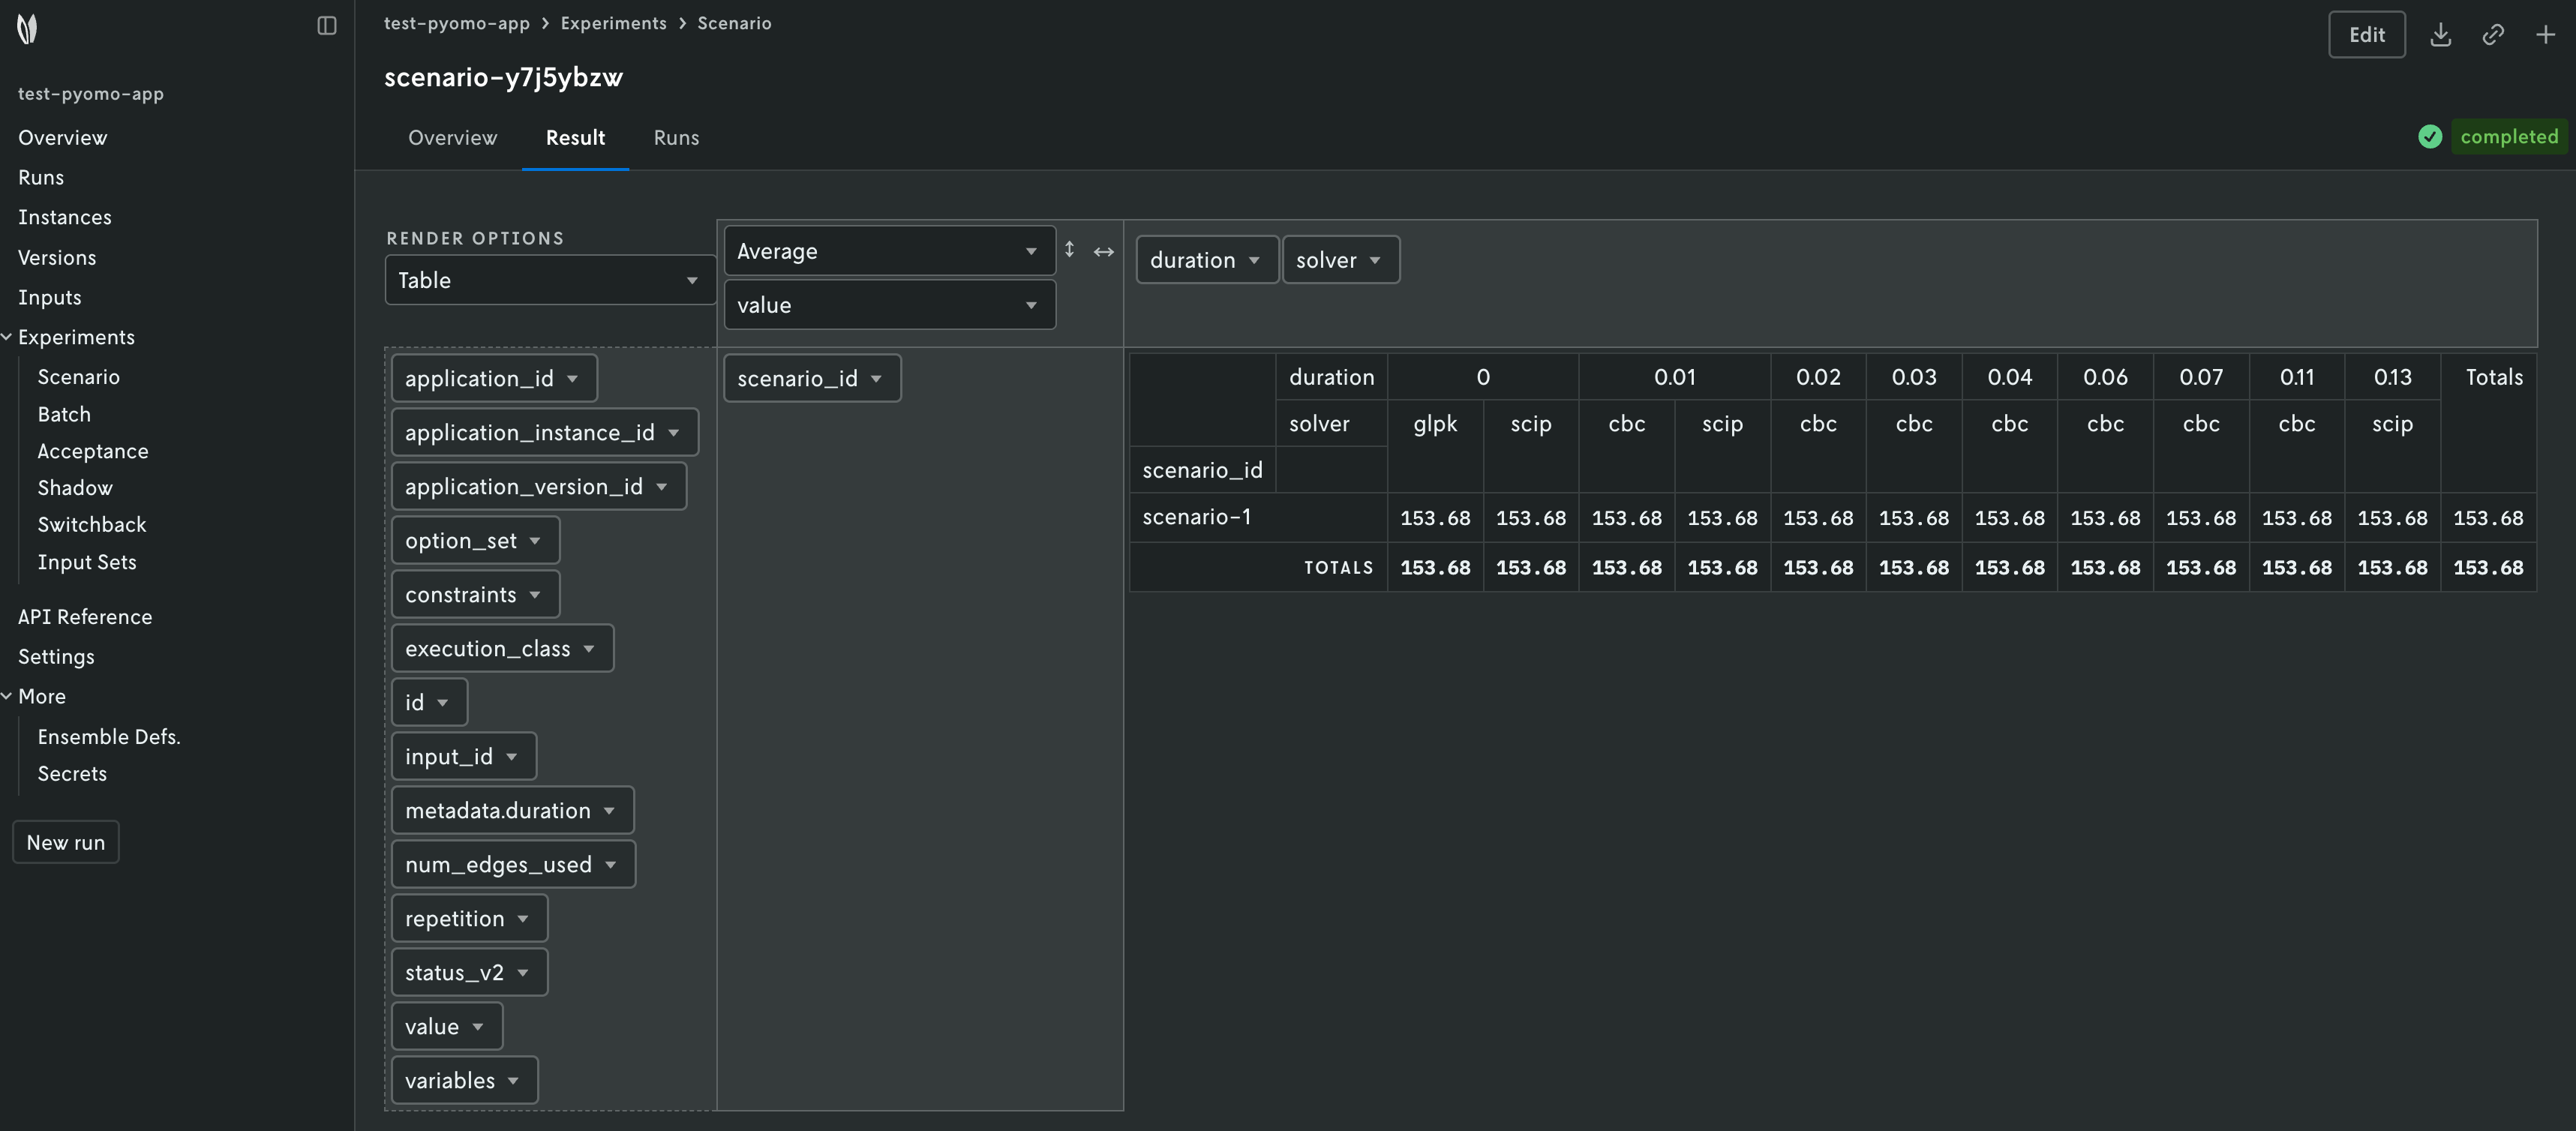
Alternatively, you may create a scenario test using the CLI. Run the following command:
SCENARIO='{
    "instance_id": "latest",
    "scenario_input": {
        "scenario_input_type": "input_set",
        "scenario_input_data": "<INPUT_SET_ID_CREATED_PREVIOUSLY>"
    },
    "configuration": [
        {
            "name": "duration",
            "values": ["5", "10", "20", "30"]
        }
    ]
}'
nextmv cloud scenario create -a test-community-app -r 2 --scenarios "$SCENARIO"
This command is saved as app7.sh in the full tutorial
code.
🎉🎉🎉 Congratulations, you have finished this tutorial!
Full tutorial code
You can find the consolidated code examples used in this tutorial in the
tutorials GitHub repository. The
explore-new-model-cli dir contains all the
code that was shown in this tutorial.
Go into the directory for instructions about running the decision model.